
Where Is the WordPress Media Folder? Uploads Location Guide 2026
Introduction
Every photo, PDF, and video you add to WordPress has to live somewhere. Many site owners look for a folder called “media” and cannot find one. That is because WordPress does not use that name. Your files sit in a folder called uploads, and it is easy to find once you know where to look.
This guide shows you exactly where the folder is, how WordPress sorts the files inside it, and how to open it safely. You will also learn why the Media Library and the folder can show different things, and how to fix the most common problems. Each step uses the current WordPress admin screens.
What the WordPress Media Folder Really Is
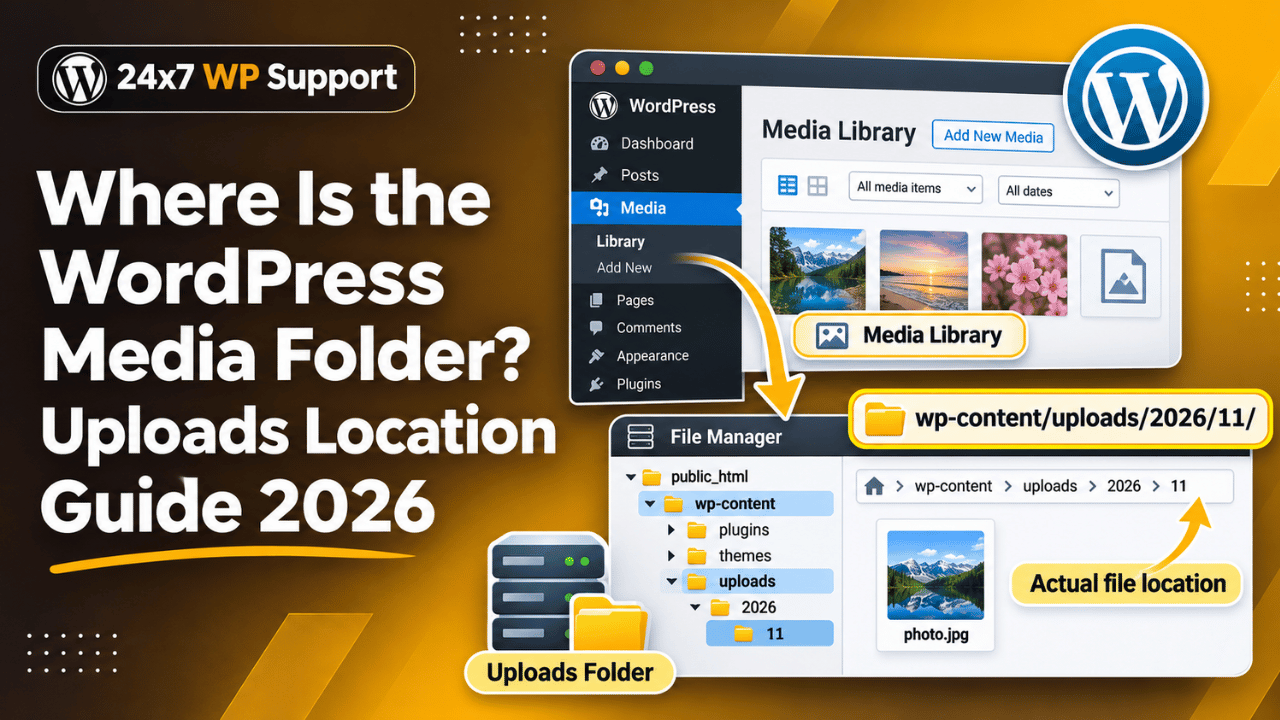
WordPress has two things that people call “media”. The first is the Media Library. This is the screen you open from the dashboard at Media → Library. It is a database view. It lists each file along with its title, caption, alt text, and upload date.
The second is the uploads folder. This is a real folder on your web server. It holds the actual image, audio, video, and document files. When you upload a file, WordPress saves it into this folder. It then adds a record to the database so the Media Library can show it.
So the answer to “where is the media folder” has two parts. Inside the dashboard, it is the Media Library. On the server, it is the uploads folder. The Library is the catalogue. The folder is the shelf where the files sit. If you want to move, back up, or clean up files in bulk, you will work with the folder. If you want to edit a title or alt text, you will use the Library.
Knowing this split saves a lot of confusion. Most “missing media” worries come from the two getting out of step with each other. We cover that in a later section.
Where the Uploads Folder Lives on Your Server
On a standard WordPress install, the path is wp-content/uploads. It sits inside your main WordPress folder, next to your themes and plugins folders. The full path on the server often looks like public_html/wp-content/uploads. Your host may use a different name for the top folder, such as www or htdocs.
The public web address follows the same pattern. A file you upload in November 2026 might load from yourdomain.com/wp-content/uploads/2026/11/photo.jpg. If you can load that kind of address in a browser, the file is stored in the folder.
You can also ask WordPress for the exact path. Go to Tools → Site Health → Info and open the section called Directories and Sizes. It lists the uploads directory path and its total size. This is the quickest way to confirm the real location, especially on a site that someone else built.
On a multisite network, the layout changes slightly. The main site still uses wp-content/uploads. Each extra site gets its own folder inside it, such as wp-content/uploads/sites/2/. This keeps each site’s files apart.
A few sites use a custom location, set by a developer in code or by the host. If the default folder looks empty but the Library shows images, check the Site Health path before you assume anything is lost.
How WordPress Organizes Files Inside the Uploads Folder
By default, WordPress sorts uploads into year and month folders. A photo added in November 2026 goes into uploads/2026/11/. This keeps any single folder from growing too large. It also makes old files easy to find by date.
Each image becomes several files. WordPress makes smaller copies, called sizes, so that themes can load a small file where a small image is needed. A single upload named photo.jpg may produce photo-150×150.jpg, photo-300×200.jpg, photo-768×512.jpg, and photo-1024×683.jpg. Newer versions also make larger sizes such as 1536 and 2048 pixels wide.
WordPress also shrinks very large images. If you upload a photo wider than 2560 pixels, it creates a scaled copy named photo-scaled.jpg. It keeps your original file next to it. The scaled copy is the one most pages use. You can read more about size settings in our guide to custom image thumbnail sizes.
Non-image files such as PDFs, audio, and video go into the same date folders. WordPress allows many file types by default. You can see the full list in our overview of supported file types in the Media Library. Modern WordPress also accepts WebP and AVIF images, which helps when you want smaller files. See how to use WebP images in WordPress for details.
How to Open the Uploads Folder Step by Step
You cannot browse the uploads folder from inside the WordPress dashboard. You need access to your server files. There are three common ways to do this. Pick the one that matches your hosting setup.
Before you change anything, take a full backup. Opening and viewing files is safe. Moving, renaming, or deleting them on a live site is not. Our guide to backing up and restoring a WordPress website walks through it.
Option 1: Your hosting file manager. Log in to your hosting account and look for a tool called File Manager. Open your site’s main folder, then open wp-content, then uploads. You will see the year folders. You can view, download, and upload files here without any extra software.
Option 2: An FTP or SFTP client. FTP is a way to connect to your server from a desktop program. Your host gives you a username, password, and server address. Connect, then go to wp-content/uploads. SFTP is the secure version and is the better choice when your host offers it. Our guide to FTP access in WordPress explains the setup.
Option 3: WP-CLI. WP-CLI is a command line tool for WordPress. If your host supports it, run wp eval ‘echo wp_upload_dir()[“basedir”];’ to print the exact folder path. Only use command line tools if you are comfortable with them, and only after a backup.
Why the Media Library and the Folder Can Show Different Files
The Library reads the database. The folder holds the real files. If the two disagree, you will see broken or missing images, or files that take up space but never show in the Library.
Files in the folder but not in the Library. If you upload a file by FTP, WordPress does not know about it. The file exists, but no database record points to it. It will not appear at Media → Library. A WP-CLI import can add it. Otherwise, upload it again through the dashboard.


Entries in the Library but no file. This happens after a site move that copied the database but not the uploads folder. The Library lists images, but each one shows a broken thumbnail. Copy the missing uploads folder from the old site or from a backup to fix this.
Orphaned files. When you delete an image from the Library, WordPress removes the file and its sizes. But files from deleted plugins or old themes can stay behind. They waste disk space. Our guide to cleaning up and managing WordPress media files shows how to find them safely.
When in doubt, compare one broken image. Copy its address from the browser. Check whether that exact path exists in the uploads folder. The result tells you which side of the pair is missing.
How to Change the Month and Year Folder Setting
Some site owners prefer one flat folder instead of date folders. WordPress lets you switch this with a single setting. Go to Settings → Media. Look for the checkbox labelled Organize my uploads into month- and year-based folders. Untick it and click Save Changes.
From that moment, new uploads go straight into wp-content/uploads. Old files stay where they are. WordPress does not move them, so no existing link breaks. This is the safest way to change the structure.
Think before you turn the setting off. A flat folder can grow to many thousands of files. Some servers slow down when a single folder holds that many. Date folders also make manual searching easier. For most sites, the default is the better choice.
You can also adjust the sizes WordPress creates on the same Settings → Media screen. You will see the thumbnail, medium, and large dimensions. Lower values mean smaller files and less disk use. Changing them affects only new uploads. Old images keep their old sizes unless you regenerate them.
How to Move or Change the Uploads Folder Location Safely
Most sites never need to move the uploads folder. A developer might do it to serve images from a separate disk or a content delivery network. If you need this, treat it as a careful job, not a quick fix.
Work on a staging copy first. Our guide to setting up a staging site explains how. Do not test this on your live site. A mistake can make every image on your site vanish until you undo it.
The old way to change the path was a constant in the wp-config.php file. That method is now deprecated. Current practice uses a code filter called upload_dir, added through a small custom plugin. Before you edit any file, read about the wp-config.php file and keep a backup copy of it.
After a move, old images still point to the old address in your database. You must update those addresses with a search and replace tool, such as WP-CLI’s search-replace command. Run it on the staging copy first. Then test your pages, then repeat on the live site only after a fresh backup.
If you only want faster delivery, a simpler option exists. Many sites keep the folder where it is and add a content delivery network in front. That gives most of the speed benefit without moving anything.
Fixing Common Media Folder Problems
Upload fails with “Unable to create directory”. WordPress cannot write to the uploads folder. The usual cause is wrong permissions. Folders should normally be set to 755 and files to 644. Our guide on fixing file and folder permissions in WordPress shows the steps. Also check that your disk is not full.
The file is too large. This error comes from a server limit, not the folder. You can raise it in your host settings. See how to increase the upload size in WordPress.
Images disappeared after a move. The uploads folder was not copied. Restore it from your backup, and then clear any caching plugin.
The folder is huge. Sort the folder by size in your file manager. Look for big videos and the original copies of large photos. Remove what you no longer use only after a backup. Then run a regenerate step if you changed the size settings.
Broken image after renaming a file. If you rename a file in the folder, every page that uses it still points to the old name. Rename it back, or use a search and replace tool to update the links.
Need Help With Your WordPress Media Files?
Most media folder questions come down to one fact. The Library is a view, and wp-content/uploads is the real storage. Once you know that, you can find files, back them up, and fix missing images with confidence. Always take a backup before you move or delete anything on a live site.
A short checklist helps here. Confirm the folder path in Site Health. Check that your latest backup includes wp-content/uploads. Make sure the folder permissions are correct. Review your size settings so you do not store image sizes that no page uses. These four checks take about ten minutes. They prevent most media trouble before it starts, and they make any later move or cleanup much safer.
If your uploads fail, images go missing, or you want a safe migration, the team at 24×7 WP Support works on these jobs every day. If you would like someone to take a look, get in touch and describe what you see.
Related posts:
WordPress Plugin Updates Not Showing in 2026: Why the Update Check Fails and How to Fix It

Flodesk WooCommerce integration: Confused how to set up?

Where to Buy Premium WordPress Themes: Best Marketplaces in 2026

Do You Really Need a Security Plugin for WordPress in 2026?
How to Add a Counter in WordPress: A Complete 2026 Guide

Brian is a WordPress support specialist and content contributor at 24×7 WP Support. He writes practical, easy-to-follow guides on WordPress troubleshooting, WooCommerce issues, plugin and theme errors, website security, migrations, performance optimization, and integrations. With a focus on solving real website problems, Brian helps business owners, bloggers, and online store managers keep their WordPress sites running smoothly.