
How to Upgrade your Pinterest Account to WordPress?
Last updated on September 29th, 2021 at 11:15 am
As we know that Pinterest is the most valuable marketing tool. The purpose of creating Pinterest is only for small businesses and creators. They can show their creativity in the form of images. This article has been returned on the basis of a lot of queries home users are coming at the topic, then they are facing a lot of problems for upgrading the Pinterest account to WordPress. Our research team will do research on this topic and presenting the best and the simplest way so that we can remove readers’ problems in the simplest way. So follow all the step which is given below.
What is the reason behind to verify a WordPress website on Pinterest and what are their benefits?
We already know that Pinterest is the most popular social media platform. On this platform, there are a lot of users who show their creative skills in the form of an image. It is most beneficial for bloggers to also know they can collect a lot of website URL links and content in the form of images and pictures with the help of creating a board format. There are a lot of benefits upgrading the interest-bearing account to WordPress Such as
- The user of interest well kept and have to see their analytical performance of their pins
- With the help of this energetic performance, users can also analyze impression engagement saves, and many more things.
- Pinterest also creates pins automatically for a user WordPress website.
Users need to follow all the steps which on given below and help the user to upgrade their Pinterest account to WordPress.
- Users need to open a browser and in the search box using need to type Pinterest.
- Users may click on the direct link on the Pinterest website over here.
- A new screen appears in front of the user. Now the user must click on the three-dot option which is present on the right top corner of the screen.
- After that, the user will see that a context menu appears on the screen. In that context, the menu user needs to click on the Add a free business account now an option as you can see in the image given below.
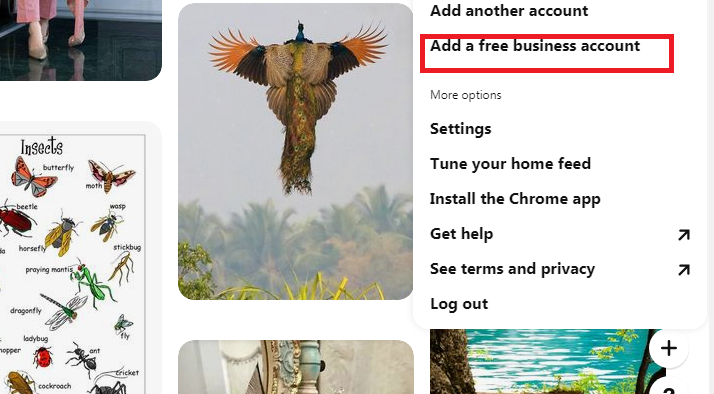
- After clicking on this button user will see a popup appeared on the screen. Now you need to enter all the basic details which are required to fill that pop-up.
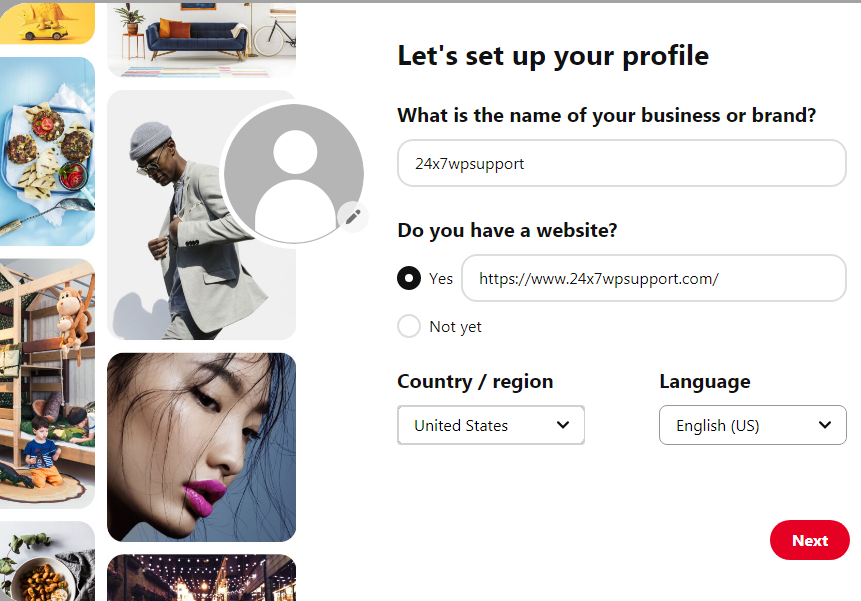
- After completing all the information now the user must click on the continue button.
- After that user, the Pinterest account will be e changed so so the account it which was personal earlier now it has become a business account.
Note- if any user wants to convert their business account into a personal account then the user can follow all these steps which are given above.
How to claim your website on Pinterest?
Now we are going to discuss how to claim your website on Pinterest? So follow all the steps which are given below.
- Follow all basic steps still login into Pinterest which are given above.
- After successfully logged in user must click on three dots which is present on the right top corner of the screen.
- After that, the context menu appears on the screen. Then the user must click on the setting option. As you can see in the image given below.

- Now a new screen appears in front of the user. On that screen, the user must click on the claim web site option which is present on the left side of the screen.
- After clicking on the claim website option a lot of options appears on the screen.
- Now the user must enter their website URL address. As you can see in the image given below.
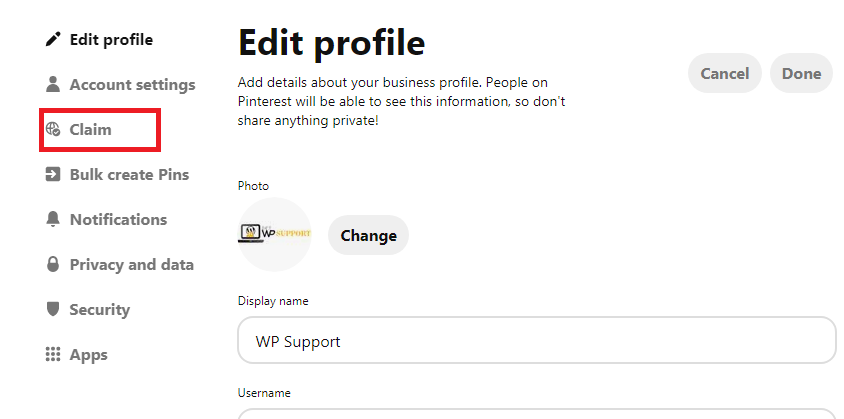
- The correct URL address has been added then the user must click on the claim website option.
- After clicking on the claim website option, then users will see a popup appear on the screen.
- At the top of their will to methods presents. Users can choose any one method according to their knowledge or benefit.
- Users choose to add HTML tags then copy that code appears in the box. And click on the Next button.
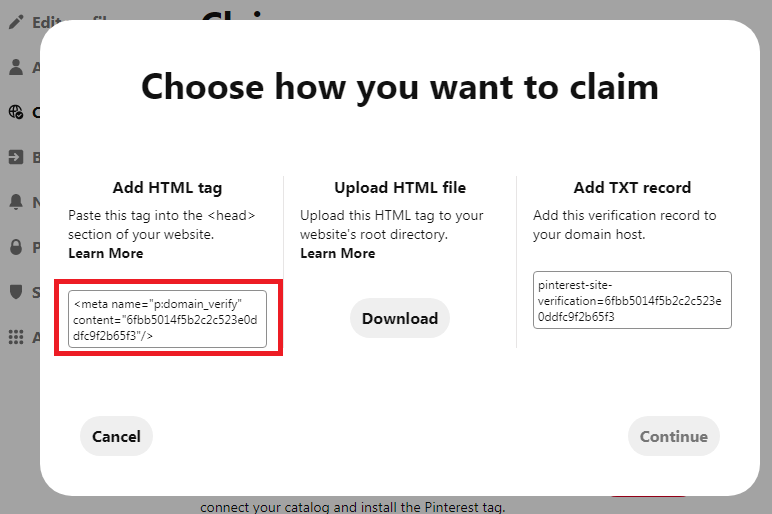
- Now users can download that HTML tag file and place that file in the root directory using FTP client-server.
How to add HTML tags in the WordPress website?
There are a lot of methods present that totally describe us how to add HTML tags in any WordPress website. The first method user can do this with the help of the Yoast SEO plugin.
Installing add HTML tag in WordPress website with the help of your SEO plugin
This is the first and basic method we can say that it is the easiest method that has been marked out by our research team. Yes, method because most of the people using your SEO plugin on their WordPress website. Follow all the tabs which are given below that will teach the user how to install HTML tag in WordPress with the help of the Yoast SEO plugin.
- First of all, users need to install and activate the Yoast SEO plugin. After that user can follow these steps.
- First of all, a user needs to login to the WordPress dashboard by using a login ID or username and password after that click on the submit option.
- Now user successfully logged in the WordPress dashboard area. User can see on the left top of the screen a dashboard context menu appear on the screen.
- Now the user must click on the Yoast SEO plugin option which is present in the context menu.
- Then a sub-context menu appears in front of the user. That sub-context menu user must click on the social options.
- After successfully clicking on the social option new screen appears in front of the user as you can see in the image given below.
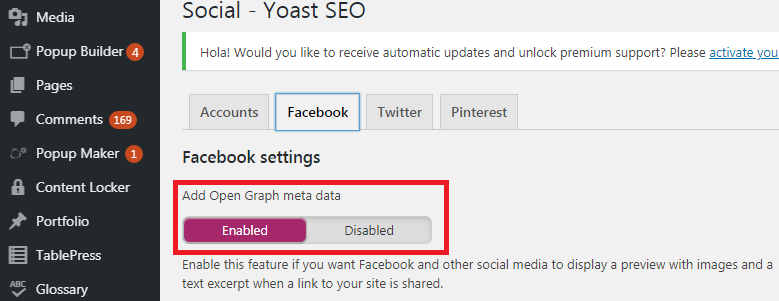
- Now the user must click on the Facebook tab, then click on enable setting.
- Now you deserve must go to the Pinterest tab and paste that HTML tag which was copied from the Pinterest website. As you can see the image given below.
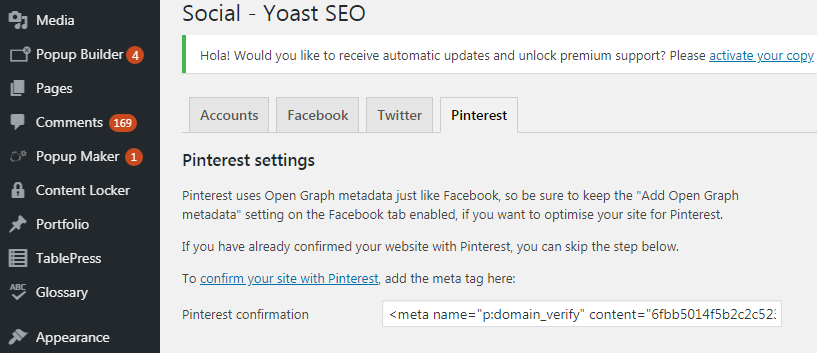
- After doing that user must click on the save changes option.
This is how we can completely upgrade your Pinterest account to WordPress. Send your valuable feedback with the help of comments.


