
How to Create an eCommerce Store in WordPress in 2026
Introduction
Starting an online store has never been more accessible. Whether you want to sell handmade goods, digital downloads, physical products, or services, WordPress paired with WooCommerce gives you everything you need to build a professional eCommerce store — without writing a single line of code. In 2026, WooCommerce powers over 30% of all online stores worldwide, making it the most popular eCommerce solution on the planet.
This guide walks you through every step of creating a WordPress eCommerce store from scratch. By the time you finish reading, you’ll have a clear roadmap for getting your store live, accepting payments, and making sales.
Why WordPress Is the Right Platform for Your eCommerce Store
Before we dive into the how-to, it’s worth understanding why WordPress is such a dominant choice for eCommerce in 2026. Unlike closed platforms like Shopify or Wix, WordPress gives you complete ownership of your store. You control your data, your design, your content, and your checkout experience. There are no revenue-based transaction fees and no artificial limits on the number of products you can list.
WooCommerce, the most popular eCommerce plugin for WordPress, is free and open-source. It turns any WordPress site into a fully functional online store with product pages, a shopping cart, checkout, inventory management, and order tracking. You can then extend its functionality with hundreds of free and premium plugins. For businesses of any size, the combination of WordPress and WooCommerce is arguably the most flexible and cost-effective eCommerce stack available today.
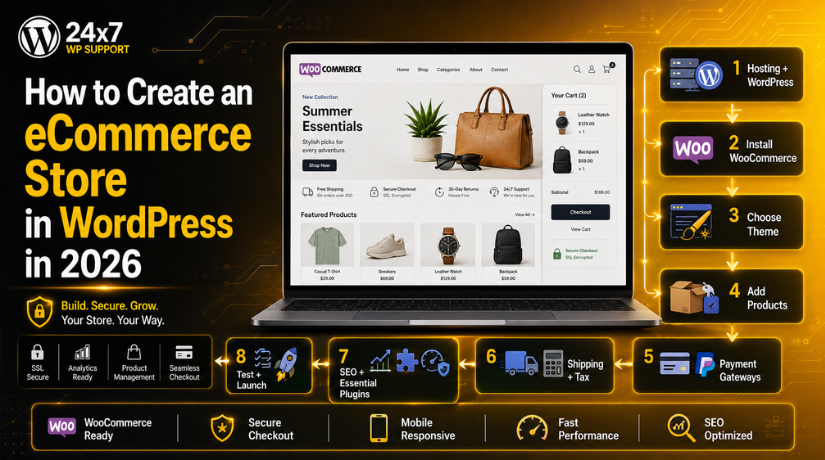
Step 1: Get Hosting and Install WordPress
Every WordPress store starts with reliable hosting. In 2026, managed WordPress hosting providers like Kinsta, WP Engine, SiteGround, and Bluehost offer plans specifically optimised for WooCommerce. Look for a host that offers SSL certificates (required for secure checkout), daily backups, and at least 2GB of RAM for smooth performance as your store grows.
Most quality hosts include a one-click WordPress installer, so getting WordPress up and running takes under five minutes. Once installed, log into your WordPress admin dashboard at yourdomain.com/wp-admin and you’re ready to start building.
Step 2: Install and Configure WooCommerce
With WordPress installed, head to Plugins → Add New in your dashboard, search for “WooCommerce,” and click Install, then Activate. After activation, WooCommerce launches a setup wizard that walks you through the core configuration steps — your store location, currency, and the types of products you plan to sell.
During setup, you’ll be asked to select your industry and whether you sell physical goods, digital products, or subscriptions. You’ll also connect to payment processors and set up basic shipping options. Don’t rush through this wizard — the choices you make here affect how your entire store functions.
If you need a deeper walkthrough of the integration process, check out our guide on how to integrate WooCommerce with WordPress for a comprehensive look at setup options and best practices.
Step 3: Choose a WooCommerce-Compatible Theme
Your theme controls the visual appearance of your store — the layout, typography, colours, and how product pages look on mobile and desktop. In 2026, hundreds of themes are built specifically for WooCommerce, ranging from free options in the WordPress theme directory to premium themes that offer advanced customisation.
When evaluating themes, look for these qualities: mobile-responsive design, fast loading times (page speed directly impacts conversions), compatibility with the WordPress block editor (Gutenberg), and regular updates from the developer. Popular WooCommerce themes include Astra, Flatsome, Kadence, and OceanWP — all of which are lightweight and highly customisable.
Installing a theme takes about a minute. Go to Appearance → Themes → Add New, search for your chosen theme, install it, and activate it. Most themes come with a demo importer so you can start with a pre-built store layout and customise from there.
Step 4: Add Your Products
This is where your store really comes to life. In WooCommerce, go to Products → Add New to create your first product. For each product, you’ll fill in a product name, description, price, product images, and choose a product type (simple, variable, grouped, or external/affiliate).
Writing Product Descriptions That Convert
Product descriptions are one of the most overlooked aspects of eCommerce success. Rather than listing features alone, describe the benefits and explain how the product solves a problem or improves the buyer’s life. Use clear, concise language and break up text with bullet points where appropriate. Include dimensions, materials, or compatibility details that shoppers need to feel confident making a purchase.
Using High-Quality Product Images
In online retail, images do much of the selling. WooCommerce supports multiple product images and a gallery format. Use clean, high-resolution photos with a consistent background. For physical products, show multiple angles, and if relevant, show the product in use. Image quality directly affects trust — blurry or inconsistent photos signal an unprofessional store to potential buyers.
Organising Products with Categories and Tags
As your catalogue grows, keeping products organised becomes critical for both user experience and SEO. Create logical product categories that mirror how your customers think. If you sell clothing, categories like “Men’s Tops,” “Women’s Dresses,” and “Accessories” make navigation intuitive. Tags allow for cross-category grouping — for example, tagging items as “Sale” or “New Arrival.”
Step 5: Set Up Payment Gateways
A payment gateway is the service that processes credit card and digital wallet transactions on your store. WooCommerce supports dozens of payment gateways, from global solutions to local processors.
In 2026, the most commonly used payment options for WooCommerce stores include Stripe (ideal for accepting credit cards, Apple Pay, and Google Pay), PayPal (trusted by over 430 million users globally), WooPayments (WooCommerce’s own payment solution), and Square (popular for stores with both online and physical locations). Each gateway has different transaction fees and setup requirements, so compare them based on your target market and expected sales volume.


To configure payment gateways, navigate to WooCommerce → Settings → Payments and toggle on the gateways you want to accept. Always test your checkout in sandbox mode before going live to make sure payments process correctly and confirmation emails are triggered.
Step 6: Configure Shipping and Tax Settings
Shipping and taxes are two areas where many new store owners make avoidable mistakes. Getting them right from day one prevents customer complaints and accounting headaches later.
Setting Up Shipping Zones and Rates
WooCommerce uses a shipping zone system that lets you define different rates for different geographic regions. You can offer flat-rate shipping, free shipping (often tied to a minimum order value), or real-time carrier rates via plugins for FedEx, UPS, or USPS. Think carefully about how shipping costs affect your product pricing — many stores bake shipping costs into their product prices and offer “free shipping” as a marketing incentive.
Configuring Tax Rules
Tax rules vary significantly by country, state, and product type. WooCommerce has a built-in tax engine that lets you manually define tax rates, or you can use a plugin like Avalara or WooCommerce’s own TaxJar integration to automatically calculate taxes based on buyer location. If you sell internationally, this automated approach is almost essential for staying compliant.
Step 7: Install Essential WooCommerce Plugins
One of WooCommerce’s greatest strengths is its extensibility. While the core plugin handles most store functions, a handful of additional plugins can significantly improve your store’s performance, security, and customer experience.
Some plugins worth considering in 2026 include a page builder (like Elementor or the block editor) for custom product layouts, an SEO plugin like Yoast SEO to optimise your product and category pages for search, a security plugin like Wordfence, a caching plugin like WP Rocket or LiteSpeed Cache for performance, and an email marketing integration like Mailchimp for WooCommerce to build your customer list.
If you’re exploring a dropshipping model for your store, our dedicated guide to the best dropshipping plugins for WooCommerce covers the tools that make fulfilment hands-free and scalable.
Step 8: Optimise Your Store for SEO and Performance
A beautiful store that no one can find online won’t generate sales. SEO (Search Engine Optimisation) is how you attract organic traffic from Google and other search engines without paying for ads.
Start by installing Yoast SEO or Rank Math and optimising each product page with a focus keyword, an SEO-friendly title and meta description, and clean URL slugs. Use descriptive alt text on all product images — search engines can’t see images, but they can read alt text. Create a blog to publish informational content that answers questions your potential customers are searching for. Internal linking between blog posts and product pages passes authority and helps search engines understand your site structure.
For performance, choose a fast hosting plan, compress images before uploading them (tools like TinyPNG work well), use a CDN (Content Delivery Network) to serve assets from servers close to your visitors, and minimise unused plugins. A store that loads in under two seconds will convert significantly better than a slow one.
Step 9: Test Everything Before You Launch
Before you announce your store to the world, spend time thoroughly testing it. Place a test order using WooCommerce’s built-in “Cheque” payment method or your gateway’s sandbox mode to verify that the entire checkout flow works — from adding a product to cart, through checkout, to receiving a confirmation email. Test on both desktop and mobile devices.
Check that all product images load correctly, all links work, tax and shipping calculations are accurate, and your return/refund policy is clearly visible. Ask someone else to browse your store and attempt a purchase — fresh eyes catch things you’ll miss. Once you’re satisfied everything works as expected, it’s time to go live.
Need help installing or troubleshooting WooCommerce? Our step-by-step guide on how to install and uninstall WooCommerce from WordPress covers common setup issues and how to resolve them.
Common Mistakes to Avoid When Building a WordPress eCommerce Store
Even experienced developers run into avoidable pitfalls when setting up WooCommerce stores. Here are the most common mistakes and how to sidestep them. First, skipping SSL — an SSL certificate (the padlock in the browser) is non-negotiable for any store that processes payments. Most hosts include it free, but make sure it’s active before taking your first order. Second, using too many plugins — each additional plugin adds potential for conflicts and performance slowdowns. Install only what you genuinely need and evaluate each plugin against your specific requirements. Third, neglecting mobile optimisation — over 60% of eCommerce traffic in 2026 comes from mobile devices. Test every page on multiple screen sizes. Fourth, ignoring page speed — a one-second delay in page load time can reduce conversions by up to 7%. Use Google PageSpeed Insights to identify and fix performance issues. Fifth, not setting up analytics — install Google Analytics (via the Site Kit plugin or directly) before you launch so you have data from day one to understand where your traffic comes from and how visitors behave.
Ready to Launch Your WordPress eCommerce Store?
Building a WordPress eCommerce store in 2026 is within reach for anyone, regardless of technical experience. With WooCommerce handling the heavy lifting, your main job is to focus on what makes your store unique — great products, compelling content, and outstanding customer service. Follow the steps in this guide, take your time with setup and testing, and you’ll have a store ready to accept orders and grow with your business.
If at any point you feel overwhelmed or need professional help configuring your WooCommerce store, the team at 24×7 WP Support is here for you. We offer hands-on WordPress and WooCommerce support, from initial setup to ongoing maintenance, so you can focus on running your business while we handle the technical side. Get in touch with our WordPress experts today and let’s build something great together.
Related posts:

Brian is a WordPress support specialist and content contributor at 24×7 WP Support. He writes practical, easy-to-follow guides on WordPress troubleshooting, WooCommerce issues, plugin and theme errors, website security, migrations, performance optimization, and integrations. With a focus on solving real website problems, Brian helps business owners, bloggers, and online store managers keep their WordPress sites running smoothly.
