
How to Use Contentful with WordPress Websites (Complete Guide)
Introduction
Many website owners now need more than a basic content system. They want faster updates, cleaner structure, and better control. A normal WordPress setup works well for many websites. Still, some projects grow beyond a simple dashboard flow. Teams may need to publish content across many pages and channels. They may also need content for apps, landing pages, and campaigns. In these cases, structure becomes very important. This is where How to Use Contentful with WordPress becomes a useful topic. Contentful helps teams manage content in a more organized way. WordPress still helps power and display the website. Together, they can create a flexible workflow for modern websites. This setup is often called a Headless CMS WordPress approach. It gives more control over how content is stored and shown. It also helps teams separate writing work from design work. That makes content updates easier on complex websites.
Many website owners now need more than a basic content system. They want faster updates, cleaner structure, and better control. A normal WordPress setup works well for many websites. Still, some projects grow beyond a simple dashboard flow. Teams may need to publish content across many pages and channels. They may also need content for apps, landing pages, and campaigns.
What Contentful Is and How It Differs from Regular WordPress
Contentful is a content platform built for structured publishing. It is not a normal website builder like WordPress. It focuses on storing content in clean content models. That means your content is broken into useful fields. For example, a blog post can have a title, slug, image, excerpt, body, and SEO fields. This structure helps teams stay organized as websites grow. Contentful does not mainly control the full page design. Instead, it focuses on managing content in a flexible way. That is why many teams use it as a headless platform. In many projects, this becomes part of a Contentful CMS tutorial because beginners need to understand this first. Contentful is made for teams that want better content control. It works especially well for websites with many content types. It also fits brands that publish across different channels.
The biggest difference is how both systems handle content. WordPress usually combines content and presentation together. Contentful separates content from how it is displayed. WordPress is often called a traditional CMS. Contentful is often called a headless content platform. In WordPress, content is usually tied closely to the website theme. In Contentful, content stays more independent and flexible. That means developers can use the same content in many ways. They can show it on websites, apps, or custom tools. This is a major reason teams choose headless systems today. When people compare Contentful vs WordPress CMS, this is the key point. WordPress is easier for all-in-one website management. Contentful is stronger for structured, reusable, and scalable content. Both tools are powerful in different ways. The right choice depends on the project’s needs.
When Using Contentful with WordPress Is a Good Idea
Best Situations Where Using Contentful with WordPress Makes Real Sense
Not every website needs a complex content setup from day one. Many websites work well with normal WordPress alone. But some projects need more flexibility as they grow. They may have many content types, many pages, and many team members. They may also need to publish the same content in different places. This is where How to Use Contentful with WordPress becomes more useful. A business may run a website, mobile app, and landing pages together. In that case, one structured content source helps a lot. Contentful can store and organize content in a cleaner way. WordPress can still handle the website display and layout. This makes the setup strong for growing digital brands. It is also helpful for websites with custom design needs. If your project needs flexible structure, better reuse, and cleaner workflows, then Contentful WordPress integration can be a smart choice.
Situations Where Contentful with WordPress May Not Be the Best Choice
This setup is not the best choice for every website. A small blog may not need this level of structure. A simple company website may work better with WordPress only. A solo website owner may prefer fewer systems to manage. Contentful plus WordPress needs planning and technical support. It is not always the easiest path for beginners. If your website only needs standard pages and blog posts, regular WordPress may be enough. If you do not need content reuse across many platforms, then the extra setup may not add much value. This is why Contentful vs WordPress CMS should be viewed carefully. The better option depends on the size of the project. It also depends on the team, budget, and future goals. If simplicity is your main goal, then a normal WordPress setup may still be the better choice.
Important Questions to Ask Before Choosing Contentful with WordPress
Before you start, ask a few clear questions first. Do you want content to appear on more than one platform. Do you need better structure than standard post and page fields. Do you need reusable content blocks across many pages. Do you have a developer or support team available. Do you expect the website to grow more complex soon. These questions help you choose the right system early. They also prevent future setup mistakes and wasted effort. A good Contentful CMS tutorial always starts with planning first. It is better to check business needs before building anything. If your project needs flexibility, scale, and structured content, then the answer may be clear. If not, then a simple WordPress workflow may save time. The main goal is not to use a trendy system. The real goal is choosing a setup that fits your website well.
How to Use Contentful with WordPress Websites (Step By Step Guide)
Step 1: Decide What Content You Want to Manage in Contentful
- Start by planning your content first.
- Decide what should be managed in Contentful.
- This may include blog posts, landing pages, FAQs, and authors.
- You can also move reusable sections into Contentful.
- Keep your website design and theme inside WordPress.
- This keeps the setup clean and easier to manage later.
Step 2: Create Your Contentful Account, Space, and Environment
- Create your Contentful account first.
- Then create a new space for your project.
- After that, create the right environment for development or live use.
- This space will store all your structured content.
- It becomes the main content source for your website.
Step 3: Build the Right Content Model in Contentful
- Now create the content structure properly.
- Add fields like title, slug, excerpt, and featured image.
- Add body content, category, and SEO fields too.
- Keep field names clear and simple.
- A good structure helps WordPress show the content correctly later.
- This step is very important for a smooth setup.
Step 4: Add Sample Content Entries for Testing
- After building the content model, add a few test entries.
- Create one or two blog posts or pages.
- Upload images and connect related entries if needed.
- This helps you test the full flow before using real content.
- It also helps you catch setup issues early.
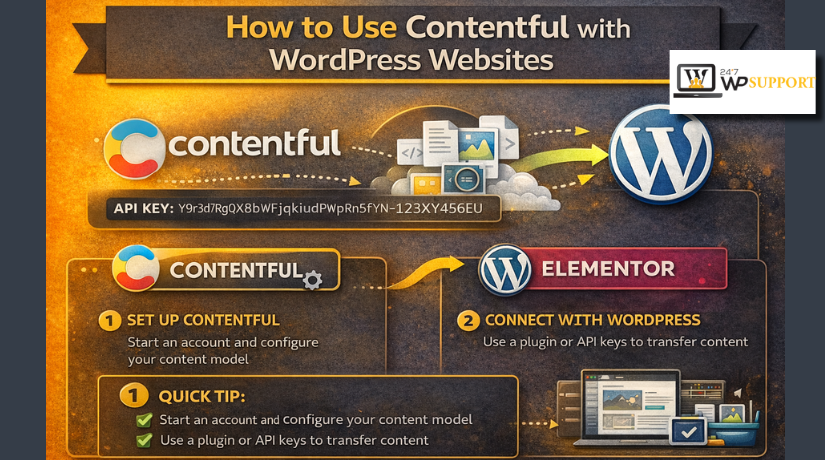
Step 5: Get the Required API Details from Contentful
- Next, collect the main API details from Contentful.
- These usually include the Space ID and Environment ID.
- You also need the Delivery Token and Preview Token.
- These details help WordPress fetch content from Contentful.
- Without them, the connection will not work properly.
Step 6: Prepare Your WordPress Website for Integration
- Now move to the WordPress side.
- Decide how you want to connect both platforms.
- You can use custom theme code, a custom plugin, or a hybrid method.
- Most setups use API calls inside theme or plugin files.
- This is where the integration process begins.
Step 7: Connect WordPress to Contentful Using the API
- Use the Contentful API to fetch content into WordPress.
- Map the Contentful fields to your WordPress templates carefully.
- The Contentful title should appear as the page heading.
- The body field should show as the main content.
- The image field should display as the featured image.
- Proper mapping keeps the frontend clean and accurate.
Step 8: Set Up Draft Preview and Published Content Correctly
- Now separate preview content from live content.
- Use the Preview Token for draft content.
- Use the Delivery Token for published content.
- This helps editors review changes before going live.
- It also keeps the live website safe and clean.
Step 9: Handle Images, Rich Text, and SEO Properly
- Make sure images display in the correct size.
- Render rich text content cleanly on the frontend.
- Add support for SEO title and meta description.
- Also support slug and image alt text.
- This step improves user experience and search visibility.
Step 10: Test the Full Workflow Before Final Launch
- Finally, test everything from start to end.
- Create content in Contentful.
- Check if WordPress shows it correctly.
- Test images, links, SEO tags, preview mode, and updates.
- Once everything works well, start using the setup on your live website.
Common Problems People Face When Using Contentful with WordPress Websites
Content Sometimes Does Not Show on the WordPress Website After Integration
One common issue appears when the content does not load at all. This usually happens because the API token is wrong or expired. Sometimes the wrong environment is selected inside the request. In other cases, the entry is still in draft mode. A field name may also be mapped incorrectly in WordPress. When this happens, WordPress cannot find the right data. That is why clean mapping and testing matter so much.
Draft Preview Does Not Work Properly in a Contentful and WordPress Setup
Draft preview often fails when the preview setup is incomplete. Many users mix live content logic with draft content logic. Some use the wrong preview token by mistake. Others forget to build a separate preview path in WordPress. Cache can also create confusion during testing. Editors may think preview is broken when old content is still loading. A clear preview flow helps teams review updates safely before publishing them on the live website.
Rich Text Content Looks Broken or Unclear on the Frontend
Rich text can look messy if WordPress does not render it properly. Headings may lose style and spacing. Lists may appear as plain text. Links may not display in a clean format. Embedded content may also break the page structure. This problem often appears when raw data is printed directly. A proper rendering method solves this issue. Rich text should always be tested on different page types before moving the setup to production.
Images Do Not Display Correctly on the WordPress Website
Image issues are very common in this type of setup. The image URL may be missing or mapped wrongly. The website may also load images in the wrong size. Some images look stretched, blurry, or too large. Mobile display can also break when responsive image handling is missing. This creates a poor user experience on the frontend. Image output should always be tested on desktop and mobile. Correct sizing improves both design quality and page speed.
SEO Data Is Missing from Pages in a Headless Content Setup
Sometimes the page content loads, but the SEO data does not. This happens when SEO fields were never created in Contentful. It also happens when WordPress does not output those fields correctly. The slug may work, but the title tag may stay empty. Meta descriptions may also fail to appear in page source. This weakens search visibility over time. SEO should never be added as an afterthought. It should be planned during the setup stage.
Content Updates Do Not Appear Quickly After Publishing New Entries


Many users expect instant updates after pressing publish. But sometimes the old content still appears on the website. This often happens because of cache on the WordPress side. A CDN may also keep older content longer than expected. In some cases, the API response is cached too aggressively. The result is delayed updates on live pages. This problem can confuse both editors and clients. A smart cache plan helps reduce this issue and keeps updates more reliable.
Editors Sometimes Feel the Full Workflow Is Confusing
Editors may struggle when the workflow is not explained clearly. They may not know which fields are required. They may also feel confused by too many content fields. Some may not know when to save, preview, or publish. If WordPress and Contentful roles are not defined, confusion grows faster. This creates slow work and more mistakes. A simple workflow guide helps a lot. Good labels, clear field names, and training make content entry easier for everyone.
Hybrid Websites Become Hard to Manage Over Time
A hybrid setup can become messy if no clear rules exist. Some content may stay in WordPress. Other content may live in Contentful. After some time, editors forget where each section should be updated. This creates repeated work and inconsistent content. Developers may also waste time checking both systems. The problem grows more when the site becomes larger.
Best Practices for Using Contentful with WordPress Websites in a Better Way
Plan the Full Content Model Before Building Anything on the Live Website
A strong setup always starts with planning. Do not rush into integration too early. First decide which content types the website needs. Then decide what fields each content type should include. Clear planning prevents changes later. It also keeps the content model clean and useful. When the content structure is planned early, both editors and developers work faster. This is one of the best ways to make the full setup stable and easy to maintain.
Use Separate SEO Fields Instead of Mixing SEO Data with Main Content
SEO fields should stay separate from the main body content. This makes the website easier to manage later. Keep fields for SEO title, meta description, and canonical URL separate. You can also add image alt text and social image support. This helps WordPress output the right metadata correctly. It also keeps editors from placing SEO details in random places. A structured SEO setup improves search visibility and reduces technical mistakes across important website pages.
Keep Field Names Clear and Consistent for Editors and Developers
Field names should be simple and easy to understand. Avoid confusing labels or overly technical names. Use clear names like title, slug, body, excerpt, and featured image. This helps editors enter content with less confusion. It also helps developers map fields faster in WordPress. Consistent naming improves the full workflow over time. When field names stay clean, onboarding new team members becomes easier. Good naming may look small, but it improves long-term content quality a lot.
Start Small First Before Expanding the Full Integration Across the Website
Do not begin with every page type at once. Start with one content type first. A blog post is often the easiest starting point. Build it, test it, and improve it carefully. After that, move to landing pages or reusable blocks. This step-by-step approach helps teams avoid bigger mistakes. It also makes debugging easier when issues appear. A small first launch creates confidence. Then the project can grow in a stable and organized way without extra confusion.
Use Clean Field Mapping Between Contentful Entries and WordPress Templates
Each field should have one clear purpose on the frontend. The title should always map to the page heading. The body should always map to the content area. Images should have clear placement rules inside templates. Avoid duplicate logic across many files. Clean field mapping makes the setup easier to debug later. It also helps developers update the site faster. When mapping stays organized, the WordPress output becomes more reliable and much easier to manage over time.
Set Up Preview and Publishing Rules Early in the Project Workflow
Preview rules should be decided before the team starts publishing content. Editors should know how draft preview works. Reviewers should know how to approve updates before launch. Developers should also know how preview links behave on WordPress. This keeps the workflow smooth and predictable. It also reduces the chance of draft content showing live by mistake. When preview and publishing rules are clear, teams work with more confidence and fewer errors during everyday content operations.
Optimize Images and Content Delivery for Better Website Speed and Experience
Website speed matters in every setup. Large images and repeated API calls can slow pages down fast. Use the right image sizes for each page type. Avoid loading large files where small images are enough. Cache content smartly to reduce repeated requests. Keep templates clean and lightweight too. These small steps improve performance a lot. They also help users browse the site more easily. Better speed supports user trust, page quality, and stronger overall website results.
Document the Workflow Clearly So the Full Team Understands the Process
Documentation saves time on every growing project. It tells editors where content should be created. It tells developers where output logic is located. It also explains how preview, publishing, and updates should happen. Without documentation, teams repeat the same questions again and again. This slows progress and creates mistakes. A short internal guide is often enough. Good documentation makes the setup easier to use, easier to scale, and easier to hand over to future team members.
Test Every Important Content Type Before Moving the Setup Fully Live
Do not test only one page and assume everything is fine. Each content type behaves differently on the frontend. Blog posts, landing pages, FAQs, and author sections may all need different logic. Images and rich text may also behave differently in each section. That is why every important content type should be tested carefully. This improves trust in the setup. It also helps teams catch hidden issues before real users see them on the live website.
Review the Full Setup Regularly to Keep the Website Stable Over Time
A good setup still needs regular review after launch. Check whether the content model still fits the website needs. Review page speed, broken mappings, and missing SEO output. Also review editor experience from time to time. Some fields may need simplification later. Some templates may need better logic after growth. Regular review keeps the setup healthy. It also helps teams improve slowly without rebuilding everything. Long-term success depends on small checks done at the right time.
Conclusion
Using Contentful with WordPress can be a smart and flexible solution. It works especially well for websites that need structured content and custom frontend control. Contentful helps organize the content in a cleaner way. WordPress helps display that content on a live website. Together, they create a strong workflow for growing digital projects. But this setup works best when the content model, preview flow, SEO output, and field mapping are planned carefully from the beginning.
Start small and test everything step by step. Build one content type first and make it work well. Then improve the preview flow, image handling, and SEO output. After that, move to more complex sections. This keeps the setup easier to manage and easier to fix. A planned workflow always performs better than a rushed one. Clear structure, clean mapping, and regular testing make the biggest difference in long-term website success.
If you want help with Contentful WordPress integration, custom frontend setup, API connection, content structure planning, SEO handling, or fixing headless workflow issues, 24x7wpsupport can help. Our team can support you with WordPress development, custom integration work, website performance improvements, and technical troubleshooting. Whether you need to connect Contentful to WordPress from scratch or improve an existing setup, 24x7wpsupport can help you build a smoother and more reliable website workflow.
Related posts:
How to Enable or Disable WordPress Lazy Loading (Complete Guide)
How to Fix WordPress Site That Is Down Quickly (Complete Guide)
How To Transfer WordPress.com Site To WordPress.org [Self-hosted]?
How to Use the ActivityPub Plugin On WordPress: Complete Beginner's Guide
How To Use Page Builder In WordPress

Brian is a WordPress support specialist and content contributor at 24×7 WP Support. He writes practical, easy-to-follow guides on WordPress troubleshooting, WooCommerce issues, plugin and theme errors, website security, migrations, performance optimization, and integrations. With a focus on solving real website problems, Brian helps business owners, bloggers, and online store managers keep their WordPress sites running smoothly.
