
How to Upload Your Own Theme to WordPress
Introduction
A WordPress theme controls your website’s look, layout, and style. It decides how your pages, posts, menus, and widgets appear. Many users start with a free theme from the WordPress dashboard. But sometimes, you may need a premium theme, custom design, or downloaded theme file.
That is when you need to know how to upload theme in WordPress correctly. The process is simple, but the file must be prepared properly. If the theme file is wrong, WordPress may show an error during upload.
Learning how to add theme in WordPress also gives you more design freedom. You can use a theme that matches your brand, business, or blog style. A good theme can improve user experience, page layout, and website trust.
You may upload a theme for many reasons, such as:
- You purchased a premium WordPress theme.
- A developer created a custom theme for your site.
- You downloaded a theme from a trusted marketplace.
- You want a better design than your current theme.
- You want more layout and styling options.
Before uploading any theme, always check the theme file first. A small mistake can break the upload process.
Before You Upload a Theme to WordPress
Before you learn how to install a WordPress theme, complete a few important checks. These steps help you avoid upload errors and website issues.
First, make sure your theme file is in .zip format. WordPress accepts theme uploads only in ZIP file format. Do not upload a normal folder directly through the dashboard.
Next, download the theme only from a trusted source. Avoid unknown websites, free cracked themes, or unsafe downloads. These files may contain harmful code or broken theme files.
You should also check theme compatibility with your WordPress version. Some old themes may not work with newer WordPress updates. This can cause layout problems or plugin conflicts.
Before you upload WordPress theme from zip file, create a full website backup. Your backup should include website files and database. This keeps your site safe if anything goes wrong.
Also, use a staging site when possible. A staging site lets you test the theme first. You can check the design before making it live.
Check these points before uploading:
- Confirm the theme file is a .zip file.
- Make sure the ZIP contains the actual theme folder.
- Check theme details and update history.
- Create a full backup before upload.
- Test the theme on staging when possible.
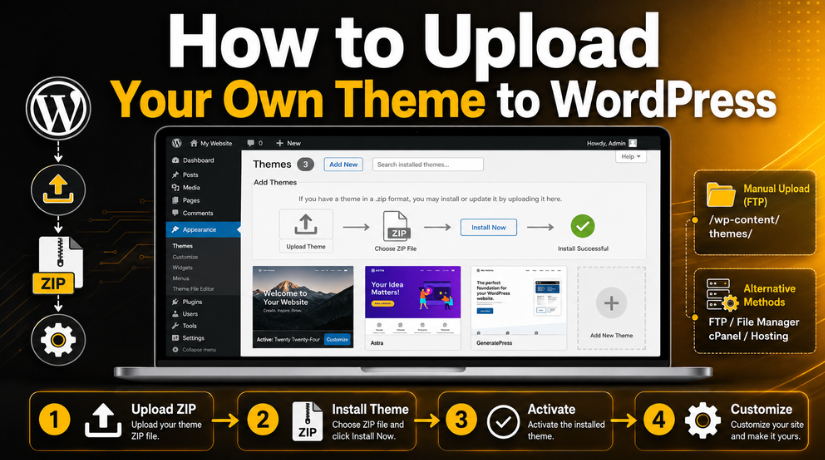
How to Upload Your Own Theme from the WordPress Dashboard
The WordPress dashboard gives you the easiest upload method. You do not need FTP, cPanel, or server access. This method works well for premium themes and downloaded theme files. It also works when you need to upload WordPress theme from zip file.
Before starting, keep your theme ZIP file ready on your computer. Before uploading the file to WordPress, do not extract it. The dashboard upload tool only accepts a proper .zip theme file.
Step 1: Log in to Your WordPress Dashboard
First, open your WordPress admin login page. Enter your username and password to access the dashboard. For this task, an administrator account is required. Other user roles may not show theme installation options.
After login, check that your dashboard loads properly. If your site has security settings, complete any extra login steps.
Step 2: Go to Appearance > Themes
From the left-side menu, click Appearance. Then click Themes under that menu. This page shows all themes already installed on your website.
You will also see your current active theme there. The active theme controls your live website design. Do not remove it before testing your new theme.
Step 3: Click Add New
At the top of the Themes page, click Add New. This option lets you add another WordPress theme.
This page usually shows free themes from the WordPress directory. You can search, preview, or install free themes from here. But for your own theme file, you need the upload option.
This step is important when learning how to add theme in WordPress properly.
Step 4: Click Upload Theme
Now click the Upload Theme button at the top. WordPress will show a file upload box. This box allows you to upload a theme from your computer.
Use this option for premium themes, downloaded themes, or custom themes. This is the main step in how to upload theme in WordPress using the dashboard.
Step 5: Choose the Theme ZIP File
Click Choose File and select your theme ZIP file. Make sure you select the correct theme package. Some theme downloads include extra files, guides, or demo content.
If the main ZIP fails, open the downloaded package. You may find another theme-only ZIP file inside it. That file is usually the correct one to upload.
Step 6: Click Install Now
After selecting the file, click Install Now. WordPress will upload and install the theme automatically. The process may take a few seconds.
If the file is too large, your hosting upload limit may block it. In that case, manual installation may be needed.


Step 7: Activate the Theme
After installation, WordPress will show an Activate button. Click it to make the theme live on your website.
You can also click Live Preview before activation. This helps you check the design safely. After activation, visit your website and review the layout.
How to Install a WordPress Theme Manually
Sometimes, the dashboard upload method may not work correctly. This can happen because of hosting limits, file size issues, or upload errors. In that case, you can install WordPress theme manually through cPanel or FTP.
This method gives you direct access to the theme folder. It is useful when WordPress cannot upload the theme ZIP file. However, you should follow each step carefully. A wrong folder location can stop the theme from appearing.
Get into your hosting control panel first. You can use any FTP tool or cPanel File Manager. Next, access the primary WordPress installation folder on your website.
Now go to this path:
/wp-content/themes/
This folder stores all installed WordPress themes. Upload your theme ZIP file inside this folder. After upload, extract the ZIP file there. Make sure the extracted folder contains files like style.css and functions.php.
Do not leave only the ZIP file inside the themes folder. WordPress cannot read the theme until it is extracted.
Follow these manual upload steps:
- Open cPanel File Manager or FTP.
- Go to /wp-content/themes/.
- Upload the theme ZIP file.
- Extract the theme folder.
- Delete the ZIP file after extraction.
- Open your WordPress dashboard.
- Go to Appearance > Themes.
- Activate the uploaded theme.
This method is helpful when you cannot use normal dashboard upload.
How to Upload a Custom WordPress Theme Safely
A custom theme is usually created for your business needs. It may include special layouts, custom functions, or brand styling. So, you must test it before making it live.
Before you upload custom theme WordPress files, ask your developer for the final theme ZIP. The file should contain only the usable theme folder. It should not include design drafts, notes, or extra folders.
Also, confirm that the theme follows WordPress coding standards. Poorly coded themes can slow your website or cause errors. They may also create plugin conflicts after activation.
Use a staging site for testing whenever possible. This helps you check the theme without affecting visitors.
Before making the theme live, review these items:
- Homepage layout and section design.
- Header, footer, and menu structure.
- Contact forms and buttons.
- Blog post and page layouts.
- Mobile and tablet view.
- Speed, plugins, and basic SEO settings.
Turn on the theme on your live website after testing. This makes how to install a WordPress theme safer and more controlled.
Common WordPress Theme Upload Errors and Fixes
Even a simple theme upload can sometimes show errors. These errors usually happen because of wrong files, server limits, or broken theme folders. If your WordPress theme upload failed, check the issue carefully before trying again.
The package could not be installed
When the uploaded ZIP file is incorrect, this error frequently occurs. Some theme downloads include documentation, demo files, and license details. WordPress needs only the actual theme ZIP file. Open the downloaded package and find the correct theme file.
Missing style.css stylesheet
WordPress themes must include a style.css file. This file tells WordPress that the folder is a valid theme. WordPress cannot install the theme if this file is absent. It is possible that you submitted the incorrect ZIP file.
File size upload limit issue
Large theme files may fail during dashboard upload. Your hosting server may have a small upload limit. You can raise the upload limit in this situation. You can also install WordPress theme manually through cPanel or FTP.
Theme upload failed
A theme upload may fail because of a broken file. It can also fail due to slow hosting or server timeout. Download a fresh copy of the theme. Then try to upload the correct ZIP file again.
White screen after activation
A white screen may appear after activating a faulty theme. This can happen due to plugin conflict or bad theme code. Disable plugins first. Then switch back to your old theme if needed.
What to Do After Activating Your WordPress Theme
After activation, check your website carefully. A new theme can change design, menus, widgets, and layouts. You should review all important areas before regular visitors use the site.
Check these items after theme activation:
- Review your homepage design and main sections.
- Check the header, footer, and menu links.
- Add or update your logo and site identity.
- Test the website on mobile and tablet screens.
- Check contact forms, buttons, and call-to-action links.
- Review blog posts, pages, and sidebar layouts.
- Check speed, SEO settings, and schema options.
These checks help you find issues early. They also keep your website clean and user-friendly.
Conclusion
Uploading your own theme to WordPress is easy with the right steps. You can use the dashboard method or manual upload method. Always use the correct ZIP file and test your theme first.
If you need help with theme upload, setup, or errors, contact 24×7 WP Support. Our experts can fix upload errors, activate custom themes, and make your WordPress design work properly.
FAQs
1. How do I upload my own theme to WordPress?
You can upload your own theme from the WordPress dashboard. Go to Appearance > Themes > Add New > Upload Theme. Then choose your theme ZIP file and click Install Now. After installation, click Activate to make the theme live on your website.
2. Can I upload a WordPress theme from a ZIP file?
Yes, you can upload a WordPress theme from a ZIP file. WordPress accepts theme uploads in .zip format only. Make sure the ZIP file contains the actual theme folder. If the wrong package is uploaded, WordPress may show an installation error.
3. Why did my WordPress theme upload fail?
Your WordPress theme upload may fail due to a wrong ZIP file, missing style.css, low upload limit, or server timeout. First, check the theme package. Then try uploading the correct theme ZIP file. You can also install the theme manually through cPanel or FTP.
4. How can I install a WordPress theme manually?
You can install a WordPress theme manually through cPanel or FTP. Go to /wp-content/themes/ and upload the theme ZIP file. Then extract the theme folder there. After that, open Appearance > Themes in WordPress and activate the uploaded theme.
5. Should I back up my site before uploading a theme?
Yes, you should always back up your website first. A theme can change layouts, menus, widgets, and settings. You can swiftly restore the website with the help of a backup. Additionally, it is preferable to test the theme on a staging site before going live.
Related posts:

Brian is a WordPress support specialist and content contributor at 24×7 WP Support. He writes practical, easy-to-follow guides on WordPress troubleshooting, WooCommerce issues, plugin and theme errors, website security, migrations, performance optimization, and integrations. With a focus on solving real website problems, Brian helps business owners, bloggers, and online store managers keep their WordPress sites running smoothly.
