
How to Make a Page Private or Hidden in WordPress (Detailed Guide)
Introduction
Not every WordPress page should be visible to every visitor. Some pages are made for testing, review, or limited access. Website owners often create pages before they are ready. These pages may include service drafts, client previews, or private resources. In such cases, you may need to make the page private in WordPress using the right method. WordPress gives different options to control page visibility.
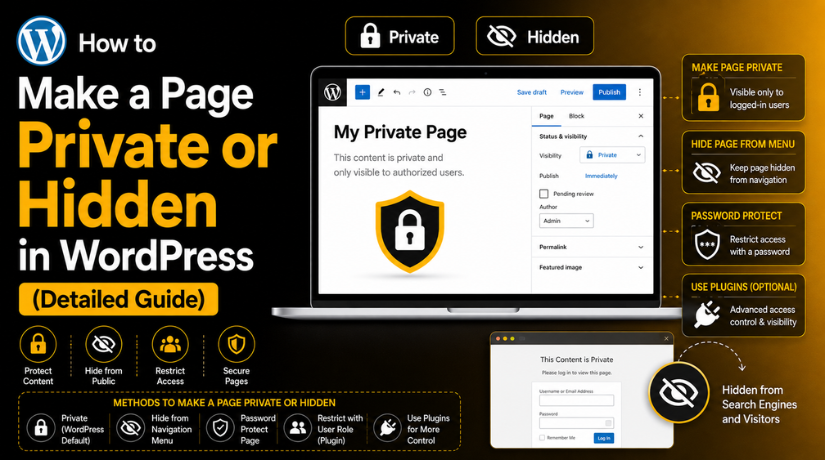
You can make a page private, hide it from menus, or restrict access. Each method works for a different purpose. A WordPress private page is not the same as a hidden page. A private page blocks normal public visitors from viewing content. A WordPress hidden page may only be removed from navigation. Visitors can still open it if they have the link.
This is why you must understand your goal first. If you want full privacy, use private settings or access control. If you only want cleaner menus, hiding the page may work. Many users also search for How to hide a page in WordPress because they want simple control. This guide explains when to hide pages and why it matters. It will help you protect content in a safer way.
When Should You Make a WordPress Page Private or Hidden?
You should make a page private when public access is not needed. You may also hide a page when it should not appear openly. This can help during updates, testing, approvals, and private sharing. It also keeps your website clean and easy to use. The right method depends on who should view the page. Some pages need admin-only access. Some need client access. Some need member-only access. You may need to Restrict access to WordPress page content for safety. Understanding the use case helps you avoid wrong settings.
Hide Pages That Are Still Under Development
Draft pages should not appear before they are ready. A new service page may need more content, images, or testing. Publishing it too early can confuse visitors and search engines. You can make the page private while your team reviews it. This helps you check layout, links, forms, and content quality. Once everything looks correct, you can publish it publicly.
Use Private Pages for Client Preview or Approval
Many designers create pages for client review before launch. In this case, public visitors should not see unfinished work. You can Password protect WordPress page content for simple access. This lets clients view the page without full admin access. It also keeps the preview page away from normal visitors. Always use a strong password and share it carefully.
Restrict Member-Only or Paid Content Pages
Membership websites often need private content for selected users. Course lessons, downloads, and paid resources should stay restricted. These pages should only open for approved members or buyers. A basic private setting may not be enough here. You may need role-based access or membership controls. This keeps paid content safe and properly managed.
Keep Internal Team or Staff Pages Private
Some pages are useful only for internal teams. These may include training notes, process guides, or staff updates. Public visitors do not need access to these pages. Making them private helps keep internal details organized. It also reduces confusion for regular website users.
Hide Thank-You and Confirmation Pages From Visitors
Thank-you pages usually appear after forms, orders, or signups. These pages should not appear in the main menu. They should only open after a user completes an action. You can hide them from navigation and avoid public display. This keeps your website journey clean and professional.
Protect Sensitive or Limited-Access Content Carefully
Sensitive pages need stronger protection than simple menu hiding. If someone has the direct URL, they may still view hidden pages. Use private settings, passwords, or access rules when needed. Also check uploaded files, because file links may remain public. Always test access before sharing any private page.
Method 1: Use Built-In WordPress Visibility Settings to Make a Page Private
The easiest way to make a page private in WordPress is using visibility settings. WordPress includes this feature inside the page editor. You do not need a plugin for this method. You also do not need custom code or server changes. This method works well for simple private content.
Step 1: Log In to Your WordPress Dashboard First
- Open your WordPress admin login page.
- Enter your correct username and password.
- Use an Administrator account for easier access.
- You can also use an Editor account if allowed.
- After login, open the main WordPress dashboard.
- This step gives you access to page visibility settings.
Step 2: Go to Pages and Open the Page You Want
- From the left dashboard menu, click Pages.
- Then click All Pages to view your pages.
- Find the page you want to make private.
- Click the page title or the Edit option.
- WordPress will open the page inside the editor.
- Check that you opened the correct page before changes.
Step 3: Find the Visibility Setting in the Page Editor
- Look at the right-side settings panel.
- Find the page status or visibility option.
- In the block editor, check the publish settings area.
- In the classic editor, check the publish box.
- Click the visibility option to open available choices.
- This setting controls public or private page access.
Step 4: Change the Page Visibility From Public to Private
- Click the current visibility option, usually marked Public.
- Select Private from the available visibility choices.
- Review the setting before saving the page.
- Make sure you are editing the correct page.
- This helps you restrict access to WordPress page content.
- It is safer than only hiding the page link.
Step 5: Click Update or Publish to Save Changes
- After selecting Private, click Update or Publish.
- WordPress will save the new visibility setting.
- If the page was live, it would become private.
- If the page was unpublished, it will be published privately.
- Wait until WordPress confirms the saved change.
- Do not close the page before saving completes.
Step 6: Test the Private Page as a Logged-Out Visitor
- Copy the page URL after saving the changes.
- Open a new incognito or private browser window.
- Paste the page URL and press enter.
- Check what a normal visitor can see.
- Public visitors should not view the private content.
- This confirms your private setting is working correctly.
This method works best for internal website needs. You can use it for admin notes and planning pages. You can also use it for unfinished service pages. It works well for layout testing and content checks. It is also useful for private team instructions. These pages should not need public visitor access.
Method 2: Use Membership or User Role Plugin to Make a Page Private
Sometimes default WordPress settings do not give enough control. A normal WordPress private page works for simple internal pages. But advanced websites need better rules for different users. You may want members, students, clients, or customers to view pages. In that case, membership or user role plugins work better.
Step 1: Decide Who Should Access the Private Page
- First, decide who should view the private page.
- This helps you choose the correct access rule.
- You may allow only paid members to view it.
- You may allow only students, clients, or customers.
- You may also allow only staff or team members.
- Clear planning helps avoid wrong access settings later.
- Before you Hide page in WordPress, define users clearly.
- This step makes your privacy setup safer and cleaner.
Step 2: Choose a Trusted Membership or User Role Plugin
- Next, choose a trusted plugin for page restriction.
- The plugin should be updated and well supported.
- Avoid old plugins with poor reviews or support issues.
- A good plugin can manage private pages easily.
- It can also control access by user role.
- Some plugins support paid memberships and content rules.
- This helps when default WordPress settings feel limited.
- Always check compatibility before using the plugin.
Step 3: Install and Activate the Plugin
- Go to your WordPress dashboard first.
- Open Plugins > Add New from the menu.
- Search for your selected membership or access plugin.
- Click Install Now to add the plugin.
- After installation, click Activate to start using it.
- The plugin may add a new dashboard menu.
- Open that menu and review all privacy options.
- Check basic settings before protecting any private page.
Step 4: Create or Select the Page You Want to Hide
- Now choose the page you want to protect.
- You can also create a new private page.
- Go to Pages > All Pages in WordPress.
- Select the page and open it for editing.
- This page may include lessons, downloads, or reports.
- It may also include private resources or client details.
- You can Make page private in WordPress for members.
- Make sure the page content is ready before restricting access.
Step 5: Set Access Rules for the Selected Page
- Find the plugin access settings inside the editor.
- Most plugins show settings below the content area.
- Some plugins show settings in the right sidebar.
- Select who can view this private WordPress page.
- You may choose Subscribers, Customers, Members, or custom roles.
- Save the settings after choosing the correct user group.
- This helps Restrict access to WordPress page content properly.
- Check the rule again before updating the page.
Step 6: Add a Redirect for Blocked Visitors
- Blocked visitors should see a clear access message.
- You can redirect them to a login page.
- You can also show a simple restricted access notice.
- For example, write, “Please log in to continue.”
- This keeps the user experience clean and helpful.
- It also avoids confusion for normal website visitors.
- A redirect works better than showing blank pages.
- Keep the message short, clear, and easy to understand.
Step 7: Hide the Page Link From Menus
- After setting rules, check your website menus.
- Remove the protected page from public navigation if needed.
- Check header, footer, sidebar, and mobile menus carefully.
- Some plugins can hide menu links automatically.
- Still, you should manually review all menu areas.
- Remember, menu hiding alone does not protect content.
- Access rules protect the page from direct URL visits.
- This creates a safer WordPress hidden page setup.
Step 8: Test the Page With Different User Roles
- Testing is important before sharing the private page link.
- First, open the page in an incognito window.
- Check whether logged-out users can view the content.
- Then test the page with an allowed user account.
- Also test it with a blocked user account.
- This confirms your access rules are working correctly.
- It also prevents private content from showing publicly.
- Test again after plugin or theme updates.
Step 9: Check File and Download Protection
- Some private pages include PDFs, videos, or downloads.
- Page protection may not always protect direct file links.
- Users may open files if they have direct URLs.
- Use file protection options for private downloads.
- This is important for paid content and client documents.
- Never rely only on page hiding for sensitive files.
- Review media file access before sharing private resources.
- Strong file protection keeps private content safer.
Step 10: Review the Setup Regularly
- Private page settings should be checked regularly.
- Plugin updates may sometimes change access behavior.
- Theme changes may also affect protected content display.
- Review user roles and private pages from time to time.
- Remove access for users who no longer need it.
- Keep your membership plugin updated for better safety.
- This keeps your WordPress hidden page system secure.
- Regular review also keeps your website organized.
Common Mistakes to Avoid When You Hide WordPress Pages
Removing the Page From the Menu Only
Many users remove a page from the menu and think it is private. This is not correct. The page is only hidden from navigation. Anyone with the direct URL can still open it. Use private visibility, password protection, or access rules for real privacy.
Using Private Pages for Client Previews
A WordPress private page may need a logged-in user account. This can confuse clients who only need quick access. For client previews, password protection is often easier. You can share the password without giving dashboard access.


Forgetting to Test the Page After Changes
Always test the page after changing visibility settings. Open the page in an incognito browser window. This shows what normal visitors can see. Testing helps you confirm that the page is hidden correctly.
Hiding Sensitive Files Incorrectly
Page privacy may not protect uploaded files. PDFs, images, or documents may still open through direct links. If files are sensitive, use proper file protection. Do not rely only on page hiding.
Using Too Many Access Control Plugins
Too many privacy or membership plugins can create conflicts. They may also slow down your website. Use one trusted plugin for access control. Keep it updated and properly configured.
Giving Users the Wrong Role
Never give Administrator access for simple page viewing. It gives users too much control. Use the lowest safe role for each user. This helps protect your website settings and content.
Best Practices for Making WordPress Pages Private or Hidden
Choose the Right Privacy Method First
Decide why you want to hide the page. Use private visibility for internal pages. Use password protection for selected visitors. Use membership tools for member-only content.
Test Access Before Sharing the Link
Always test the page before sharing it. Open it while logged out. Also use an incognito browser window. This helps confirm the correct visitor view.
Keep User Roles Simple and Safe
Give users only the access they need. Avoid giving full admin access unnecessarily. Simple roles reduce security risks. They also make user management easier.
Use Strong Passwords for Protected Pages
Use strong passwords for protected pages. Avoid simple words, names, or common numbers. Change shared passwords when access is no longer needed. This keeps private content safer.
Review Media Files Connected to Private Pages
Check all files added to private pages. Some files may still be publicly reachable. Protect private downloads with proper file settings. This is important for sensitive documents.
Check SEO and Sitemap Settings
Hidden pages should not appear publicly when not needed. Review SEO plugin settings carefully. Check whether the page is indexed or listed in sitemaps. Fix unwanted visibility before sharing links.
Keep Plugins, Themes, and WordPress Updated
Updates help fix bugs and security issues. Keep WordPress, themes, and plugins updated regularly. This is very important for membership plugins. Outdated plugins can create privacy risks.
Conclusion
Learning how to make a page private or hidden in WordPress helps you manage content safely. It also keeps unfinished, internal, or limited-access pages away from public visitors. You can use built-in visibility settings for private pages. You can also use password protection for selected users. For advanced needs, membership or user role plugins work better. Always test the page after changing access settings.
Also check menus, media files, SEO settings, and sitemaps. This helps ensure the page stays hidden in the correct way. For guidance on WordPress page privacy, access settings, or hidden page setup, you can contact 24×7 WP Support through their website. Their listed United States and Canada toll-free number is +1-888-818-9916.

Brian is a WordPress support specialist and content contributor at 24×7 WP Support. He writes practical, easy-to-follow guides on WordPress troubleshooting, WooCommerce issues, plugin and theme errors, website security, migrations, performance optimization, and integrations. With a focus on solving real website problems, Brian helps business owners, bloggers, and online store managers keep their WordPress sites running smoothly.
