
How to Transfer Your Domain from GoDaddy to WordPress
Introduction
You registered your domain with GoDaddy, but now you’re ready to use it with WordPress — either on WordPress.com or a self-hosted WordPress.org site. The good news: transferring a domain from GoDaddy to WordPress is entirely doable, and once you know the steps, it’s far less intimidating than it sounds.
This guide walks you through the complete process in 2026: from unlocking your domain at GoDaddy, to getting your authorization code, to completing the transfer and configuring your DNS. Whether you’re moving to WordPress.com’s managed platform or pointing your domain at a self-hosted WordPress install, we’ve got you covered.
Understanding the Difference: Transfer vs. Connect
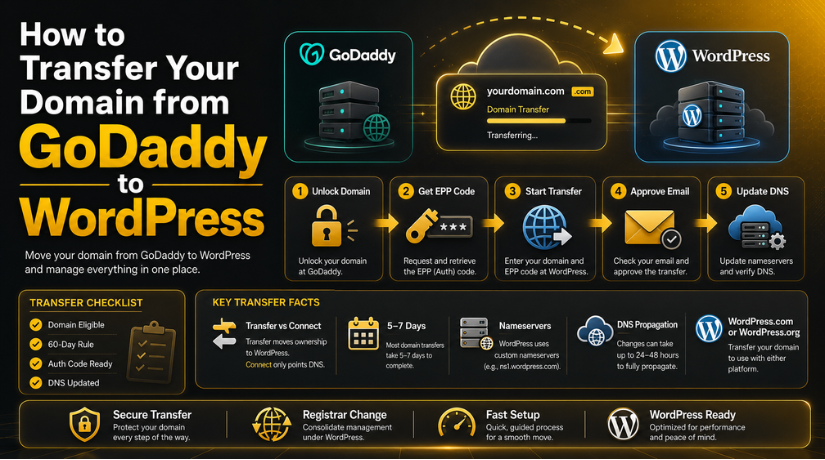
Before you start, it helps to understand what “transferring” a domain actually means — because there are two different things people often mean by this phrase.
Connecting your domain means you keep the domain registered at GoDaddy but update the DNS records to point at your WordPress site. It’s faster and simpler, but GoDaddy remains your registrar. If this is what you need, check out our guide on How to Connect a GoDaddy Domain to WordPress.
Transferring your domain means you move the domain registration itself away from GoDaddy to a new registrar — such as WordPress.com or another provider. After the transfer completes, GoDaddy no longer manages your domain at all.
This guide covers the full domain transfer. If you only need to point your GoDaddy domain at a WordPress site without moving the registration, the connect method is faster and takes effect within 24–48 hours.
Before You Start: Transfer Eligibility Rules
ICANN (the body that governs domain registrations) sets strict rules on when a domain can be transferred. GoDaddy must comply with these, so before anything else, make sure your domain is eligible.
Your domain cannot be transferred if:
- It was registered or previously transferred within the last 60 days
- Contact information was updated within the last 60 days and you opted into the ICANN transfer lock
- The domain is currently expired or in a redemption period
- It has a court-ordered lock or registrar hold applied
If none of those apply, you’re good to proceed. The transfer itself typically takes 5–7 days to complete once initiated.
Step 1 — Unlock Your Domain at GoDaddy
GoDaddy locks domains by default to prevent unauthorized transfers. You need to remove this lock before a transfer can start.
How to unlock your domain
- Log in to your GoDaddy account and go to My Products
- Find the domain you want to transfer and click DNS or Manage
- Scroll down to the Additional Settings section
- Next to Domain Lock, click Edit
- Toggle the lock to Off and confirm
GoDaddy may send a confirmation email when you unlock the domain. Keep an eye on your inbox — you’ll need access to the administrative email address tied to your domain throughout this process.
Step 2 — Get Your Authorization (EPP) Code
Every domain transfer requires an authorization code, also called an EPP code or auth code. This is a unique string of characters that proves you own the domain and authorize the transfer.
Requesting the auth code from GoDaddy
- In your GoDaddy account, go to My Products → Domains
- Select the domain you want to transfer
- Click Transfer → Transfer to Another Registrar
- Click “Click here to see Authorization Code”
- Copy the code that appears — GoDaddy will also email it to the domain’s administrative contact
Keep this code private and use it promptly. Auth codes typically expire within 7–30 days depending on the registrar.
Step 3 — Initiate the Transfer at Your New Registrar
This step depends on where you’re transferring your domain. The two most common destinations are WordPress.com and a third-party registrar you’ll use with self-hosted WordPress.org.
Transferring to WordPress.com
If you’re moving to WordPress.com’s managed platform:
- Log in to your WordPress.com account
- Go to Upgrades → Domains
- Click Add a Domain and type your domain name
- Choose Transfer Domain (not “Connect”)
- Enter the EPP/authorization code when prompted
- Complete checkout — WordPress.com will typically include one year of domain registration
Transferring to another registrar for WordPress.org
If you’re running a self-hosted WordPress.org site, you don’t transfer the domain to “WordPress” — you move it to a registrar of your choice (Namecheap, Cloudflare, Google Domains, etc.) and then point that domain at your hosting provider’s nameservers.
- Open an account at your chosen registrar
- Look for an Incoming Domain Transfer option
- Enter your domain name and the authorization code from GoDaddy
- Pay any transfer fee (often less than $15 for most TLDs)
- Confirm the transfer via email from both your old and new registrar
Step 4 — Approve the Transfer and Wait
Once you’ve initiated the transfer, GoDaddy will send an approval email to the domain’s administrative contact. Check that email inbox — it may not be your GoDaddy login email. It’s the WHOIS contact for the domain.
You can either:
- Approve immediately by clicking the link in the email, which speeds up the process considerably
- Do nothing — the transfer will auto-approve after 5–7 days by default
Approving immediately is strongly recommended. There’s no reason to wait, and it gets your domain pointed at WordPress sooner.


Step 5 — Update Your DNS and Nameservers
This is where many people run into trouble. Once your domain is transferred, you need to make sure it points to the right WordPress hosting server.
For WordPress.com transfers
WordPress.com automatically configures the nameservers for you after a completed transfer. Your domain should start working within a few hours. You don’t need to touch DNS settings manually unless you’re customizing email or adding external services.
For self-hosted WordPress.org
You’ll need to update the nameservers at your new registrar to point to your web hosting provider. Your host will give you two nameserver addresses (such as ns1.yourhost.com and ns2.yourhost.com). Log in to your new registrar, find the domain’s nameserver settings, and replace the defaults with those provided by your host.
DNS changes can take anywhere from a few minutes to 48 hours to propagate worldwide. During this window, some visitors may still see your old site or encounter errors. This is normal and temporary.
Need help with the technical side of your WordPress setup? Our team covers the full picture — including how to access your WordPress database on GoDaddy and everything in between.
Common Problems and How to Fix Them
Even when you follow every step correctly, domain transfers occasionally hit snags. Here are the most common issues in 2026 and what to do about each one.
Transfer denied or rejected
This usually means the domain is still locked, the auth code was entered incorrectly, or the 60-day restriction is in effect. Double-check GoDaddy’s lock status and make sure you copied the EPP code without any trailing spaces or missing characters.
Approval email went to the wrong address
The approval email goes to the domain’s WHOIS administrative contact, not necessarily your GoDaddy login email. If you can’t find it, log in to GoDaddy, update the WHOIS contact to an accessible email, then wait 24 hours before retrying — contact info changes can trigger a brief transfer lock.
Site goes down after DNS change
This is almost always a DNS propagation issue. Your site will come back once the new records spread globally — usually within 1–24 hours. If it’s been more than 48 hours, check that your nameservers are pointed correctly at your WordPress host.
SSL certificate errors after transfer
SSL certificates are tied to your domain configuration, not the registrar. After transfer, if you’re seeing certificate warnings, give your new host a few hours to provision a fresh SSL certificate. Most modern WordPress hosts do this automatically via Let’s Encrypt.
What to Do After the Transfer Is Complete
Once your domain is transferred and DNS is resolving correctly, run through this quick checklist:
- Confirm your site loads at your domain in a browser
- Check that your WordPress admin area is accessible
- Test email if it runs through the same domain (MX records should remain intact)
- Enable auto-renew at your new registrar so you don’t accidentally lose the domain
- Enable domain privacy (WHOIS protection) if your new registrar offers it
If you recently moved your entire WordPress site — not just the domain — you’ll also want to confirm your install is healthy on the new host. Our guide on how to import a WordPress site into GoDaddy covers the database and file migration process in detail, which is useful reference even if you’re moving in the opposite direction.
Transfer vs. Connect: Which One Do You Actually Need?
It’s worth revisiting this question before you commit to a 5–7 day transfer process. A full domain transfer makes the most sense if you want to consolidate everything — domain registration, DNS management, and WordPress hosting — under one provider. It simplifies renewals and billing, and it removes GoDaddy from the picture entirely.
But if you’re happy managing your domain at GoDaddy and just need it to work with a WordPress site, connecting the domain is faster, typically free, and avoids the multi-day wait. Both approaches result in a fully functional WordPress site. The only difference is where the domain registration lives.
Still not sure which route to take? You’re not alone — domain management is one of the most common sources of confusion for WordPress site owners at every experience level.
Let Us Handle Your WordPress Domain Setup
Transferring a domain sounds technical, but the real risk isn’t the process itself — it’s a misconfigured DNS record that takes your site offline, or a missed approval email that stalls things for a week. Having an expert walk you through it (or handle it entirely) makes a genuine difference.
At 24×7 WP Support, we help WordPress site owners with exactly these kinds of tasks every day — domain transfers, DNS configuration, SSL setup, hosting migrations, and everything that comes after. If your transfer isn’t going smoothly, or you’d rather not deal with it yourself, reach out to our WordPress support team and we’ll get it sorted quickly — 24 hours a day, 7 days a week.
Related posts:

Brian is a WordPress support specialist and content contributor at 24×7 WP Support. He writes practical, easy-to-follow guides on WordPress troubleshooting, WooCommerce issues, plugin and theme errors, website security, migrations, performance optimization, and integrations. With a focus on solving real website problems, Brian helps business owners, bloggers, and online store managers keep their WordPress sites running smoothly.
