
How to Access Your WordPress Database on GoDaddy
Introduction
Whether you’re troubleshooting a broken site, manually updating a plugin option, or migrating to a new host, knowing how to access your WordPress database on GoDaddy is an essential skill for any site owner. The database is the backbone of your WordPress site — it stores every post, page, user, setting, and plugin configuration.
In 2026, GoDaddy remains one of the most widely used WordPress hosting providers, but it also has a reputation for being slightly confusing when it comes to database access. That’s because GoDaddy offers multiple hosting types, each with a different path to your database. This guide walks you through every method — clearly, step by step — so you can get in without the guesswork.
Why You’d Need to Access Your WordPress Database
Most WordPress site owners never need to touch their database directly. But there are situations where direct database access becomes unavoidable — and knowing how to get there quickly can save you hours of frustration:
- You’re locked out of your WordPress admin panel and need to reset your password directly in the database
- A plugin or theme has corrupted a setting that can’t be fixed through the dashboard
- You’re manually migrating your site from GoDaddy to another host
- You want to export a full database backup before a major update or redesign
- You’re getting the dreaded “Error Establishing a Database Connection” and need to diagnose it at the source
- You need to find and replace an old domain URL after a domain migration
Whatever your reason, you should always create a full backup of your WordPress database before making any direct changes. A single accidental deletion can take your entire site offline, and without a backup, recovery can be nearly impossible.
Step One: Know Your GoDaddy Hosting Type
This is the most important step that most guides skip entirely — and it’s the reason so many people end up lost. GoDaddy offers two fundamentally different hosting environments for WordPress, and the process for accessing your database is completely different for each one.
- Managed Hosting for WordPress (Managed WordPress) — GoDaddy’s dedicated WordPress hosting product. It handles updates, backups, and security automatically and has its own proprietary control panel that looks nothing like cPanel.
- Web Hosting (cPanel) — GoDaddy’s shared hosting product that uses the industry-standard cPanel interface. This is the more traditional and flexible hosting setup.
To check which one you have: log into your GoDaddy account, click on My Products, and look at your hosting plan name. If it says “Managed Hosting for WordPress” or “Managed WordPress,” you’re on the first type. If it says “Web Hosting” or “Shared Hosting,” you’re on cPanel hosting. The steps below are organized by plan type, so make sure you’re following the right section.
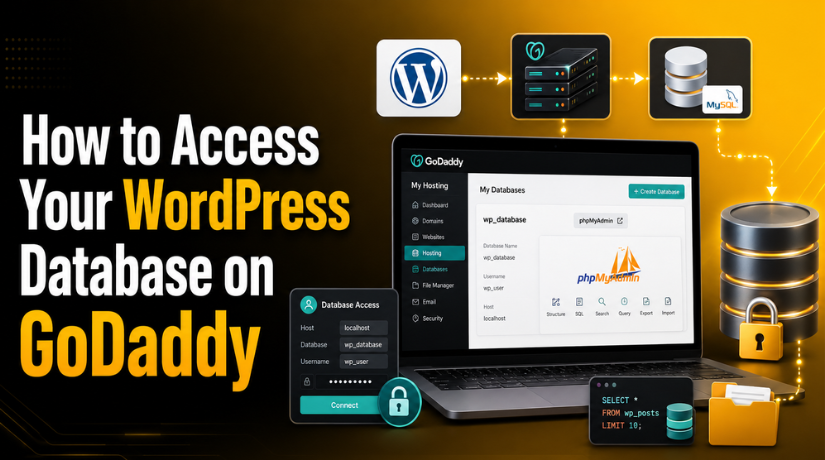
Method 1: Accessing Your Database via phpMyAdmin (Managed WordPress Hosting)
GoDaddy’s Managed WordPress plans include phpMyAdmin, but it’s tucked away inside the site settings — not immediately obvious if you don’t know where to look. Here’s the exact path:
- Log in to your GoDaddy account and go to My Products
- Next to Managed Hosting for WordPress, click Manage All
- Locate the website you want to access and select Settings from its menu
- Under the Production Site section, click Show more to expand the available options
- Find Database details and click Open phpMyAdmin
phpMyAdmin will open in a new browser tab, already logged in and ready to use. In the left sidebar, you’ll see your WordPress database name. Click on it to expand the list of tables — you’ll recognize names like wp_posts, wp_options, wp_users, and wp_usermeta.
If you need to view your raw database credentials — the name, username, password, and host — click View next to Database details on that same Settings page before launching phpMyAdmin. You’ll need these credentials if you’re connecting via an external tool or troubleshooting a database connection error.
Method 2: Accessing Your Database via cPanel phpMyAdmin (Web Hosting)
If you’re on GoDaddy’s standard Web Hosting (cPanel) plan, the route to phpMyAdmin runs through your cPanel dashboard instead. Here’s how:
- Log in to your GoDaddy account and go to My Products
- Next to Web Hosting, click Manage All
- For the site you want to access, click Settings
- In the account Dashboard, look to the right side panel for the Tools section
- Click Launch next to phpMyAdmin
You can also log in to your cPanel dashboard directly (usually at yourdomain.com/cpanel or via GoDaddy’s dashboard) and find phpMyAdmin under the Databases section.
One thing to watch on cPanel hosting: if you’re running more than one WordPress site under the same hosting account, you’ll see multiple databases listed in phpMyAdmin’s left sidebar. Make sure you select the correct database for the site you want to work on. If you’re not sure which database belongs to which site, check the wp-config.php file of your installation — that’s covered in the next method.
Once you’re inside, our detailed guide on managing your WordPress database in phpMyAdmin explains how to browse tables, run queries, and export backups step by step.
Method 3: Find Your Database Credentials in wp-config.php
Your WordPress database credentials are stored in a file called wp-config.php, located in the root directory of your WordPress installation. You’ll need these credentials when connecting via an external database tool, debugging a connection error, or migrating your site manually.
On GoDaddy Managed WordPress: The simplest way to find your credentials is through the Database details section in your GoDaddy dashboard Settings page (described in Method 1). GoDaddy’s Managed WordPress environment restricts direct file access, so this is the recommended path.
On GoDaddy Web Hosting (cPanel):
- Log in to cPanel and open File Manager
- Navigate to your WordPress installation folder — usually
public_htmlfor the primary domain, or a subdirectory for additional sites - Find
wp-config.php, right-click it, and select Edit - Scroll until you find these lines:
define('DB_NAME', 'your_database_name');
define('DB_USER', 'your_database_username');
define('DB_PASSWORD', 'your_database_password');
define('DB_HOST', 'localhost');
These four values are everything any database management tool needs to connect to your WordPress database. Keep them private — treat them with the same care you’d give a password. If your database credentials have become compromised or you need to update them, you’ll need to change the values in both wp-config.php and in the GoDaddy cPanel MySQL database settings to keep them in sync.


If you ever need to use these credentials to recover your admin access, our guide on resetting your WordPress password directly via phpMyAdmin walks you through the exact SQL query to run safely.
Method 4: Access Your Database via SSH and WP-CLI
For developers and advanced users, SSH access paired with WP-CLI (WordPress Command-Line Interface) is the most powerful and efficient way to interact with your WordPress database on GoDaddy. This method bypasses the browser entirely and lets you run database operations from the terminal — no timeouts, no UI lag, and full scripting capability.
Requirements: SSH access on GoDaddy Managed WordPress is available on Deluxe, Ultimate, and Ecommerce plans. Basic plans require an upgrade. On cPanel Web Hosting, SSH is available on most GoDaddy plans — check your account dashboard to confirm, as Basic shared hosting plans may not include it.
Enabling SSH on GoDaddy Managed WordPress:
- Go to your website’s Settings in the GoDaddy dashboard
- Find SSH access and click Enable
- GoDaddy will display your SSH credentials: hostname, username, and port
- Connect using Terminal (Mac/Linux) or PuTTY (Windows)
Once connected, WP-CLI is pre-installed on GoDaddy Managed WordPress and ready to use. Here are the most useful database commands:
wp db export backup.sql— export your entire database to a .sql filewp db import backup.sql— import a database backupwp db check— run a check on database tables for errorswp db repair— automatically repair corrupted database tableswp search-replace 'oldsite.com' 'newsite.com'— safely replace URLs in the database, including inside serialized datawp db query "SELECT option_value FROM wp_options WHERE option_name = 'siteurl'"— run a direct SQL query and return results in the terminal
WP-CLI is particularly valuable when dealing with large databases that would cause browser-based phpMyAdmin to time out during export or import operations.
Common Mistakes to Avoid When Working With Your WordPress Database
Direct database access is powerful, but it’s completely unforgiving. One wrong query or accidental table deletion can bring down your entire website. Here are the mistakes that cause the most damage:
Not creating a backup first. This cannot be stressed enough. Before you run any query, edit any table, or import any file, export a full backup of your database. In phpMyAdmin, go to the Export tab, make sure the format is set to SQL, and click Go. It takes less than a minute and can save you days of recovery work.
Editing the wrong database. On cPanel plans with multiple WordPress sites, it’s easy to accidentally open and modify the wrong database. Always verify the database name against your site’s wp-config.php before running any changes.
Forgetting the table prefix. If your WordPress installation uses a custom table prefix (anything other than the default wp_), any SQL queries that hardcode wp_ will fail or affect the wrong data. Check your wp-config.php for the $table_prefix variable first.
Using a plain REPLACE query on serialized data. If you’re doing a domain migration find-and-replace, running a raw SQL REPLACE will break PHP serialized arrays — the format WordPress uses to store complex settings. Always use WP-CLI’s wp search-replace command, which handles serialization correctly, rather than running a manual SQL query.
If you’re moving your WordPress site off GoDaddy entirely, our comprehensive guide on transferring a WordPress website from one host to another covers the full database export, import, and search-replace process in detail.
Which Database Access Method Is Right for You?
With four methods available, choosing the right one comes down to what you’re trying to accomplish and your comfort level with technical tools:
- Quick inspection or small edits → Use phpMyAdmin. It’s the most accessible option and requires no technical setup.
- Exporting or importing large databases → Use WP-CLI via SSH. Browser-based tools time out on large files; WP-CLI doesn’t.
- Finding your database credentials → Check your wp-config.php or the GoDaddy dashboard’s Database details section.
- Domain migration or URL search-and-replace → Use WP-CLI’s
wp search-replacecommand to avoid serialization problems. - Debugging a database connection error → Start with your credentials in wp-config.php, compare them to what GoDaddy shows in Settings, and then open phpMyAdmin to confirm the database is accessible and the tables are intact.
Need Expert Help With Your WordPress Database on GoDaddy?
Database work is high-stakes — there’s no “undo” button once a query runs or a table is dropped. If you’re not fully confident in what you’re about to do, or if you’ve already run into a problem and need it fixed fast, the team at 24×7 WP Support is here around the clock. We handle database access, repairs, migrations, and recovery for WordPress sites on GoDaddy and every other major host — and we do it without putting your site at risk. Reach out to our WordPress experts today and we’ll get your database sorted out quickly and safely.

Brian is a WordPress support specialist and content contributor at 24×7 WP Support. He writes practical, easy-to-follow guides on WordPress troubleshooting, WooCommerce issues, plugin and theme errors, website security, migrations, performance optimization, and integrations. With a focus on solving real website problems, Brian helps business owners, bloggers, and online store managers keep their WordPress sites running smoothly.
