
How to Connect a GoDaddy Domain to WordPress: Step-by-Step Guide
Introduction
You’ve purchased a domain on GoDaddy — great choice. Now you want to point it to your WordPress site and actually get things live. The problem is that GoDaddy and WordPress don’t automatically know about each other, so there’s a small but important configuration step in the middle.
This guide walks you through the entire process clearly, whether you’re running a self-hosted WordPress.org site on a separate hosting provider, using GoDaddy’s own hosting, or connecting to WordPress.com. We’ll cover both major methods — changing nameservers and updating an A record — so you can pick the one that fits your setup.
Understanding How Domains and WordPress Connect
Before diving into the steps, it helps to understand what’s actually happening. Your GoDaddy domain is just an address — like a street name. Your WordPress hosting account is the actual building. DNS (Domain Name System) is the directory that tells browsers where to find your building when someone types in your street name.
When you register a domain on GoDaddy but host WordPress elsewhere, you need to update those DNS directions. There are two main ways to do it:
Method 1 — Change Nameservers: This hands full DNS control over to your WordPress hosting provider. They’ll manage all your DNS records going forward. This is the most common method for self-hosted WordPress sites.
Method 2 — Update the A Record: This keeps your DNS management at GoDaddy but points web traffic to your hosting server’s IP address. It’s useful if you want to keep other services (like GoDaddy email) running without disruption.
What You Need Before You Start
Gather the following before making any changes:
Your GoDaddy login credentials are obviously required. You’ll also need either the nameservers from your hosting provider (two addresses that look like ns1.hostingcompany.com and ns2.hostingcompany.com) or the IP address of your hosting server for the A record method. Both of these are available in your hosting account’s welcome email or control panel.
If you’ve already installed WordPress on GoDaddy hosting, you may already be done — GoDaddy automatically links the domain to its own hosting in that case. This guide is primarily for situations where your domain and hosting are in different places.
Method 1: Change Your Nameservers (Recommended for Most Users)
This is the cleanest approach for self-hosted WordPress sites. When you update your nameservers, you’re telling the internet to let your hosting provider handle all DNS lookups for your domain.
Step 1: Get Your Hosting Nameservers
Log into your WordPress hosting control panel (cPanel, Plesk, or your host’s custom dashboard). Look for a section labeled “Nameservers,” “Account Information,” or “Server Details.” You’ll see two to four nameserver addresses. They typically look something like ns1.bluehost.com or ns3083.dns.com. Copy both of them exactly — even a small typo will break the connection.
Step 2: Log Into Your GoDaddy Account
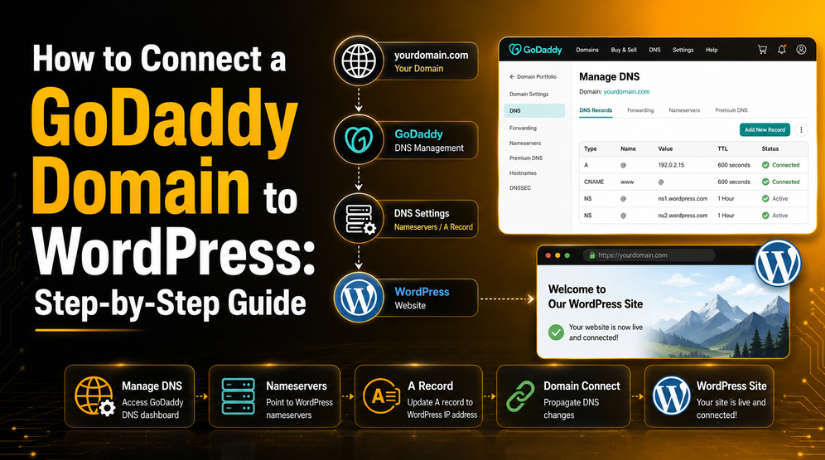
Go to godaddy.com and sign in. Click your account name in the top right corner, then select My Products from the dropdown. You’ll see a list of your domains under the “Domains” section. Click the three-dot menu next to the domain you want to update and select Manage DNS.
Step 3: Update the Nameservers
Scroll down to the bottom of the DNS Management page until you see the Nameservers section. By default, it likely shows GoDaddy’s own nameservers. Click Change. In the dialog that appears, select Enter my own nameservers (advanced). Delete the existing entries and type in your hosting provider’s nameservers — one per field. Add extra fields if your host provided three or four nameservers. Click Save when done.
GoDaddy will show a warning saying this will affect your DNS records. That’s expected — confirm the change and proceed.
Step 4: Wait for DNS Propagation
Once you save, the change starts propagating across the internet. This usually takes between 30 minutes and 48 hours, though most users see their site load within a few hours. During propagation, your site may load from one location but not another — that’s normal. You can check propagation progress using a tool like whatsmydns.net.
Method 2: Update the A Record (Keep DNS at GoDaddy)
This method is ideal if you use GoDaddy email or other GoDaddy services you don’t want to disrupt. Instead of moving DNS management to your host, you only change the record that points web traffic to your server.
Step 1: Get Your Server’s IP Address
Log into your hosting control panel and find your server’s IP address. It’s usually listed under Account Summary, Server Information, or in the welcome email from your host. It looks like a string of numbers: 185.234.XXX.XXX. Note it down.
Step 2: Access GoDaddy DNS Settings
In your GoDaddy account, go to My Products → Manage DNS for the relevant domain. You’ll see a table of DNS records. Look for the A record with the name @ (which represents your root domain). There may also be one for www.


Step 3: Edit the A Record
Click the pencil (edit) icon next to the @ A record. Change the Value field from the current IP address to your hosting server’s IP. Set the TTL (Time to Live) to 1 hour or 600 seconds for faster propagation. Click Save. Repeat this for the www A record if it exists separately.
Unlike changing nameservers, this method leaves all your other DNS records (MX records for email, TXT records for verification, etc.) exactly as they are. Only web traffic gets redirected.
Connecting a GoDaddy Domain to WordPress.com
If you’re using WordPress.com (the hosted platform rather than self-hosted WordPress.org), the connection process is slightly different and a bit easier thanks to a feature called Domain Connect.
In your WordPress.com dashboard, go to Upgrades → Domains and click Add a domain. Select Use a domain I own and type in your GoDaddy domain. WordPress.com will detect that your domain is registered at GoDaddy and offer a one-click setup option. Click Start Setup, log into GoDaddy when prompted, and click Connect. GoDaddy and WordPress.com handle the DNS configuration automatically through the Domain Connect standard.
If the automatic method doesn’t appear, you can manually update the nameservers to WordPress.com’s servers: ns1.wordpress.com, ns2.wordpress.com, and ns3.wordpress.com.
Pointing Your Domain When GoDaddy Is Also Your Host
Many users purchase both their domain and hosting through GoDaddy and use GoDaddy’s Managed WordPress hosting. In this situation, you typically don’t need to change anything at all — GoDaddy links your domain to your hosting automatically during setup. If something seems disconnected, log into your GoDaddy account, go to My Products → Web Hosting, open your hosting plan, and verify that your domain is listed as the primary domain. If it isn’t, you can assign it there.
Common Issues and How to Fix Them
The Site Isn’t Loading After 48 Hours
First, clear your browser cache and try a different device or browser. If it still doesn’t load, double-check your nameservers or A record for typos. Log back into GoDaddy’s DNS management and compare what you entered against what your host provided. A single incorrect character is usually the culprit.
If you’re seeing a browser security warning or SSL error after your domain connects, that means your WordPress SSL certificate hasn’t been activated yet. Most hosts offer free Let’s Encrypt SSL — activate it through your control panel. If you want to set up Cloudflare for additional performance and security, check out this guide on how to set up Cloudflare SSL on WordPress.
“This Site Can’t Be Reached” Error
This error often appears during DNS propagation or if the nameservers were entered incorrectly. Wait a few more hours and try again. If it persists after 48 hours, it almost certainly indicates a misconfiguration. Review our guide on how to fix the “This Site Can’t Be Reached” error in WordPress for a complete troubleshooting walkthrough.
Email Stops Working After Changing Nameservers
This is the most common side effect of the nameserver method. When you transfer DNS control to your host, GoDaddy’s default email records don’t carry over. You’ll need to re-add your MX records in your hosting provider’s DNS settings. Your email provider (whether it’s Google Workspace, Microsoft 365, or GoDaddy email) can tell you exactly what MX records to add. If you want to avoid this entirely, use the A record method instead — it preserves all your existing DNS records.
Domain Shows GoDaddy Parked Page
If you still see a GoDaddy “coming soon” or parked page after waiting 48 hours, your nameservers may not have saved properly. Go back to GoDaddy DNS management and verify that the nameservers displayed are the ones you entered (not GoDaddy’s default ones). If they reverted, save them again.
How Long Does DNS Propagation Actually Take?
Propagation time depends on the TTL (Time to Live) values previously set on your DNS records. If your domain’s TTL was set to 24 hours before you made changes, it can take that long for all internet service providers to pick up the new settings. In practice, most regions see the updated records within 2 to 4 hours for nameserver changes. A record changes with a low TTL (300–600 seconds) typically propagate within 30–60 minutes.
One thing to remember: propagation doesn’t happen simultaneously worldwide. Someone in Sydney might see your site resolve correctly while someone in Toronto still hits the old records. That’s completely normal and will resolve on its own.
Tips for a Smooth Domain Connection in 2026
A few practices make the whole process less stressful. Lower your TTL to 300 seconds (5 minutes) at least an hour before making DNS changes — this tells caches to refresh quickly and speeds up propagation after your change. Always take a screenshot of your current DNS settings before editing anything, so you can revert if needed. And if you’re migrating an existing live site rather than launching a new one, plan the DNS switch for low-traffic hours to minimize disruption.
It’s also worth noting that GoDaddy’s interface updates periodically. If the menus look slightly different from what’s described here, look for a “DNS” or “Manage DNS” link — the underlying settings remain the same even if navigation paths shift.
Ready to Get Your WordPress Site Live?
Connecting a GoDaddy domain to WordPress is a one-time task that takes about 10 to 20 minutes to configure, plus the waiting period for DNS to propagate. Once it’s done, your site is accessible at your custom domain and ready to go. If you run into any issues during the process — whether it’s a persistent DNS error, SSL certificate problems, or anything else going wrong with your WordPress setup — the team at 24×7 WP Support is available around the clock to help. Reach out and we’ll get your site sorted fast.

Brian is a WordPress support specialist and content contributor at 24×7 WP Support. He writes practical, easy-to-follow guides on WordPress troubleshooting, WooCommerce issues, plugin and theme errors, website security, migrations, performance optimization, and integrations. With a focus on solving real website problems, Brian helps business owners, bloggers, and online store managers keep their WordPress sites running smoothly.
