
How To Manage Menu In WordPress
Last updated on September 28th, 2021 at 10:03 am
Working on WordPress, there exist multiple things that you need to take care of. Starting with one, customizing your website, adding themes and plugins, embedding interface and crafting elegant designs, WordPress encompasses each and all.
Another fascinating feature rendered by WordPress is the ability to customize and manage menus. In case, you are among the owners who wish to add custom-fit navigation menus or edit them or manage these, you are at the right place. This article is specifically designed to help you manage your WordPress menus on the go.
What are Navigation Menus and why customize them?
Ever thought to give your users the ease to locate information or find suitable sections of the website, without having the need to manually browse for the same?
Well, that’s the job of navigation menus. This is apparently an important part of every website and placed adjacent to the header of the WordPress theme.
WordPress has an inbuilt navigation menu system that allows WordPress owners or the beginners to create as well as manage menus on the go. The location of the menu changes with the themes. Where some provide a single menu location, few themes offer multiple menu locations. These have the freedom to add several websites, effectively.
Another question why do you need to manage menus is the need to customize the location of the menu.
Creating menus is not the only thing that you have to do. Instead, changing the location depending upon your own convenience is also important. And that’s where the WordPress navigation menu system comes into play. It enables you to set the location of the menu, with much ease.
So, convinced?
Let’s move ahead to see how can you manage menus in WordPress?
Creating Your Navigation Menu
Creating a navigation menu is pretty easy.
- Login to the WordPress dashboard with the username and password.
- Navigate around the dashboard, click on Appearances -> Menu.
- A new window opens up. This is the Edit Menus and has two columns.
- The left column consists of custom links, pages, and categories tab. The right column is the place where you can adjust or add different items on the menu list.
Ok so how are we going to create a menu?
- Start by entering the name of the menu
- Click on create a menu and a new page opens up.
- Here, select the pages that you wish to add within your menu. You can do this by selecting the pages and clicking on add to the menu
- Now, choose the theme that you want to embed within the site and click on save.
You have just created the navigation menu.
Seems easy? It is. One thing to note here is that the order of the items displayed in the menu can always be modified and changed.


All you need to do is drag and drop the items and place them in the order, you want them to be displayed over the website.
That’s all about creating a navigation menu for WordPress. Next, we see how to manage these. It might so happen that after a few days, you plan to alter or change the navigation menu in a way that they are nested or have a dropdown option. This is when you would need to modify the navigation menu.
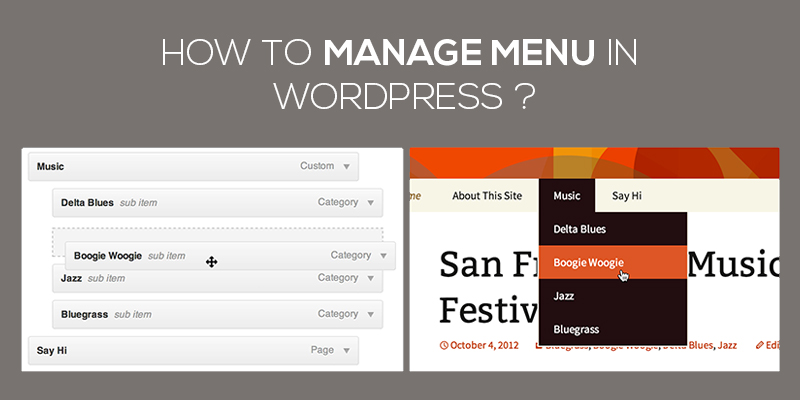
Creating Nested Menus
Nested or the dropdown menus are the ones that follow the parent-child relationship. Every time a user places the cursor on the parent item, the dropdown shows up, revealing the child category items.
Adding dropdown menus are an excellent way to structure all the display items of the website.
To do so, you would need to follow the given below steps:
- Login to the WordPress dashboard.

- Move to the left of the dashboard, go to Appearance and then click on menus.

- Click on manage location and under the theme location, click on the location.

- Now, under the option of the assigned menu, select the menu in a particular location using the drop-down menu and then click on manage location.

- You can then see the Primary Menu is set on the top Menu Location whereas others on the Secondary menu.

- Click on Save Changes.
And your job is done!

Brian is a WordPress support specialist and content contributor at 24×7 WP Support. He writes practical, easy-to-follow guides on WordPress troubleshooting, WooCommerce issues, plugin and theme errors, website security, migrations, performance optimization, and integrations. With a focus on solving real website problems, Brian helps business owners, bloggers, and online store managers keep their WordPress sites running smoothly.
