
How to Fix WordPress Allowed Memory Size Exhausted Error in Websites
Last updated on June 26th, 2025 at 05:54 am
Introduction
If you’ve ever seen a message saying “Allowed memory size exhausted” while working on your WordPress site, you’re not alone. This is a common error that many site owners face, especially when their site begins to grow or run heavier plugins and themes.
This error usually appears when your website needs more memory to run than what’s currently allowed by your hosting server. WordPress runs on PHP, and every server sets a limit for how much memory PHP scripts can use. When your site crosses that limit, it triggers this memory error.
You might encounter it during tasks like:
- Installing or activating a plugin
- Uploading large files
- Importing content
- After moving your site to a new server
- Or even while just loading a complex page in the admin area
No worries—this error is quick and simple to fix. In this guide, we’ll explain step by step how to increase the memory limit, prevent future problems, and keep your site running smoothly.
Let’s start by understanding what this error really means and why it happens.
What Is the 'Allowed Memory Size Exhausted' Error in WordPress?
When your WordPress site tries to do something that needs more memory than it’s allowed to use, this error appears. It usually shows up as a white screen or a message that looks like:
Fatal error: Allowed memory size of 134217728 bytes exhausted (tried to allocate 12345 bytes)…
This simply means WordPress has hit the limit of how much memory it can use on the server. Just like your phone or computer can slow down when too many apps are open, your website can crash when it runs out of memory.
WordPress runs on a programming language called PHP, and the memory it uses comes from the hosting server. Every server sets a limit for how much PHP memory a website can use. If your site tries to use more than that, the process stops and this error appears.
When and Why This Error Happens
This error doesn’t always show up immediately. It usually appears when your website is doing something that uses more memory than normal. Here are some common times when this error might happen:
- During the first install of WordPress.
- While adding a new plugin or theme.
- After moving your site to a new hosting provider.
- If your site has too many posts or plugins.
- When you’re using large images or files.
- If you install a poorly built plugin that uses too many resources.
- When multiple plugins with similar features conflict with each other.
- If your WordPress version doesn’t match your plugins or theme.
This issue doesn’t mean your website is broken forever. It just means it’s asking for more power than it’s allowed. The fix is to give it a bit more room to work.
How to Check the Current Memory Limit in WordPress
Before fixing the error, it’s a good idea to check how much memory your WordPress site is allowed to use right now. This will help you understand whether your site is running close to the limit.
There are a few simple ways to find this out, even if you’re not a developer.
1. Check Using the Site Health Tool (Easiest Method)
WordPress has a built-in tool called Site Health that shows important information about your website.
Follow these steps:
- Go to your WordPress Dashboard.
- Click on Tools > Site Health.
- Now click on the Info tab.
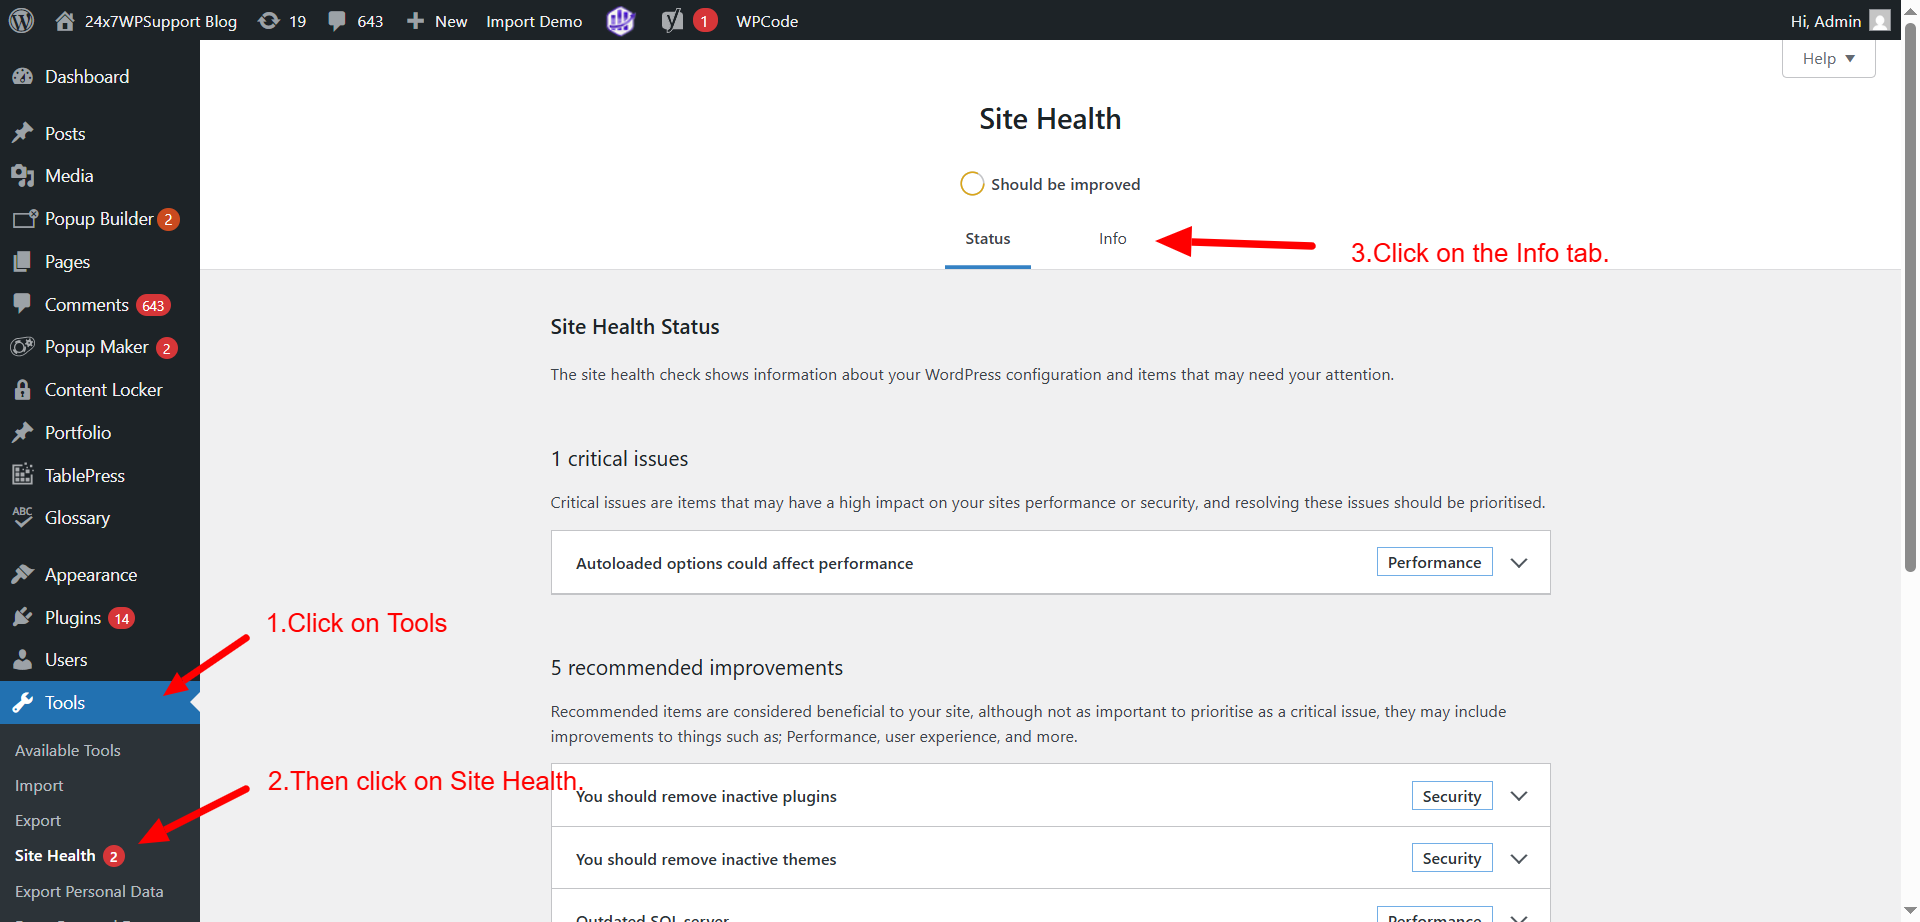
- Scroll down and open the Server section.
- Look for something like PHP memory limit.

You’ll see a number like 128M or 256M. That’s the memory your site is currently allowed to use.
If it’s low (like 64M or 128M), increasing it can solve the problem.
2. Check Using a Plugin
If you’re not comfortable checking settings manually, you can install a plugin like:
- WP Server Info
- WP-Optimize
- Health Check & Troubleshooting
Once installed, these plugins show memory details right on your dashboard, often under a “Server Info” or “Site Info” section.
3. Check via Hosting Panel (Advanced Option)
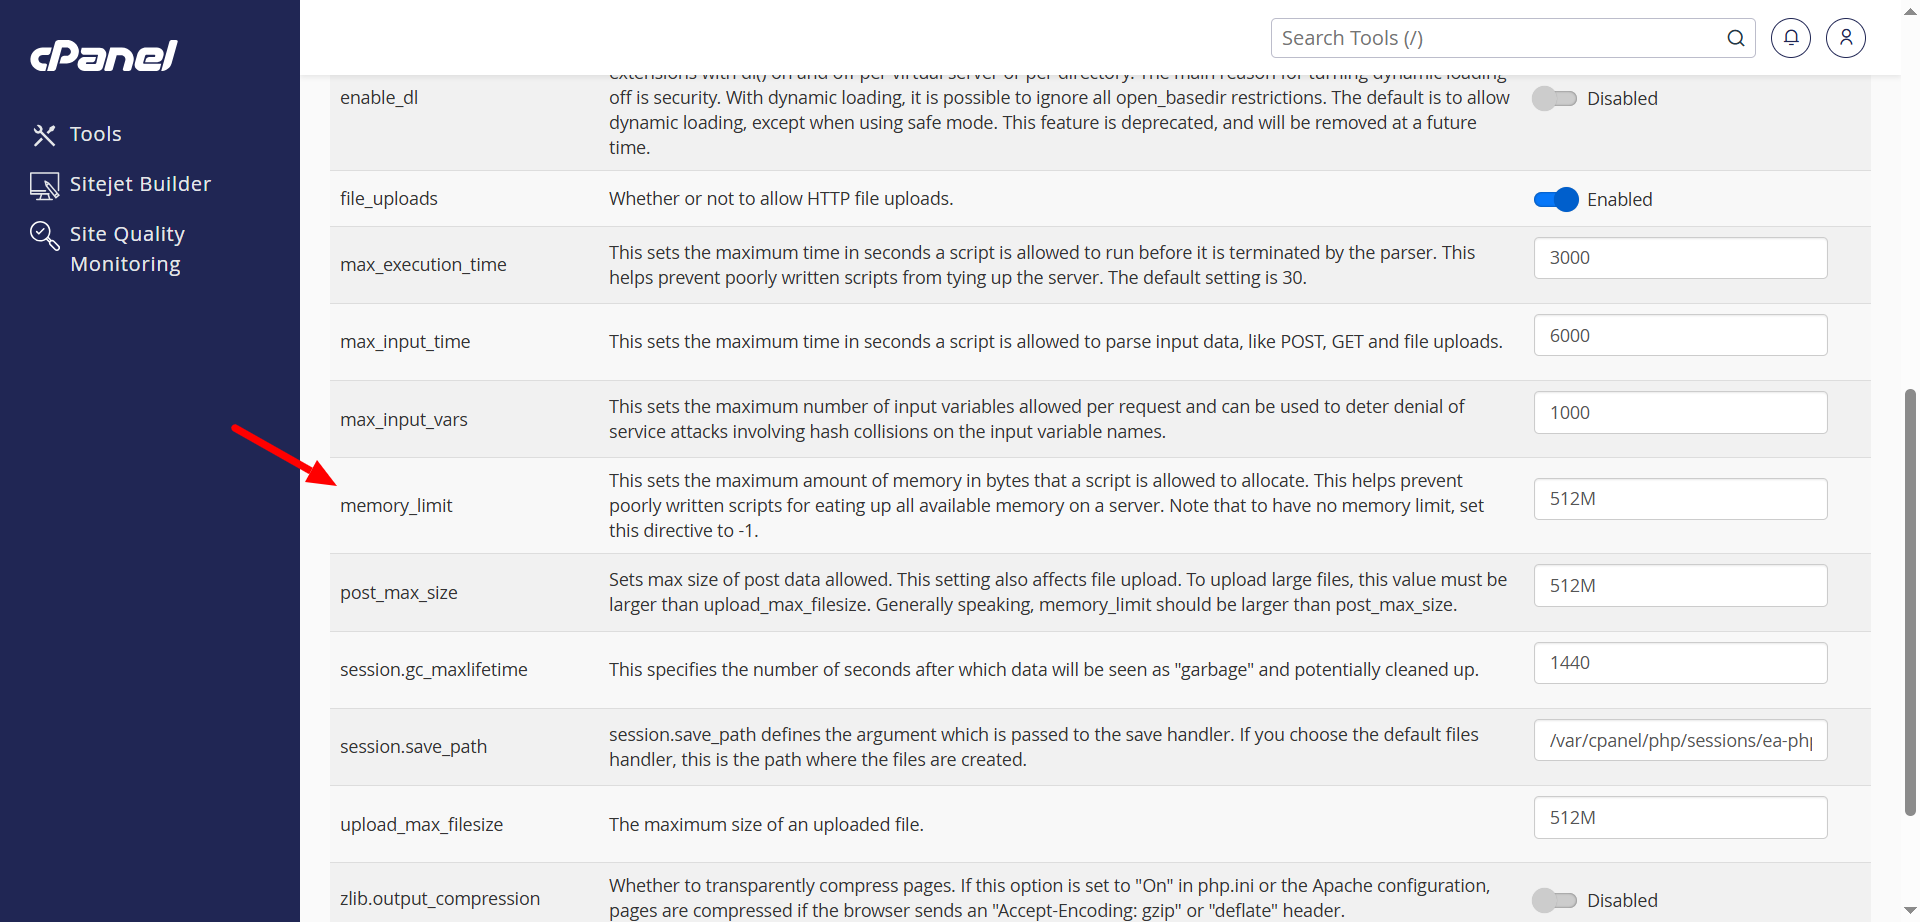
If you have access to your hosting control panel (like cPanel, Plesk, or a custom dashboard), you might find the PHP memory limit under the PHP Settings or PHP Info section.
Look for:
- memory_limit = 128M (or another number)
This method works well if your host gives you full access to settings.
Why It Matters
If your memory limit is already high (like 256M or more), and you still see the error, the problem could be with a plugin or theme using too much memory.
If the limit is low (like 64M), you likely just need to increase it — we’ll explain how in the next part.
Step-by-Step Methods to Fix the Error
Now that you understand what the error means and how to check your memory limit, it’s time to fix it. This error is often solved by increasing the memory limit of your WordPress site. Below are simple methods to do that.
🧩 Method 1: Increase Memory Using wp-config.php File
This is one of the easiest and most commonly used ways.
Follow these steps:
- Open your website files using File Manager from your hosting panel or use FTP.
- Find a file named wp-config.php in the main folder of your website.
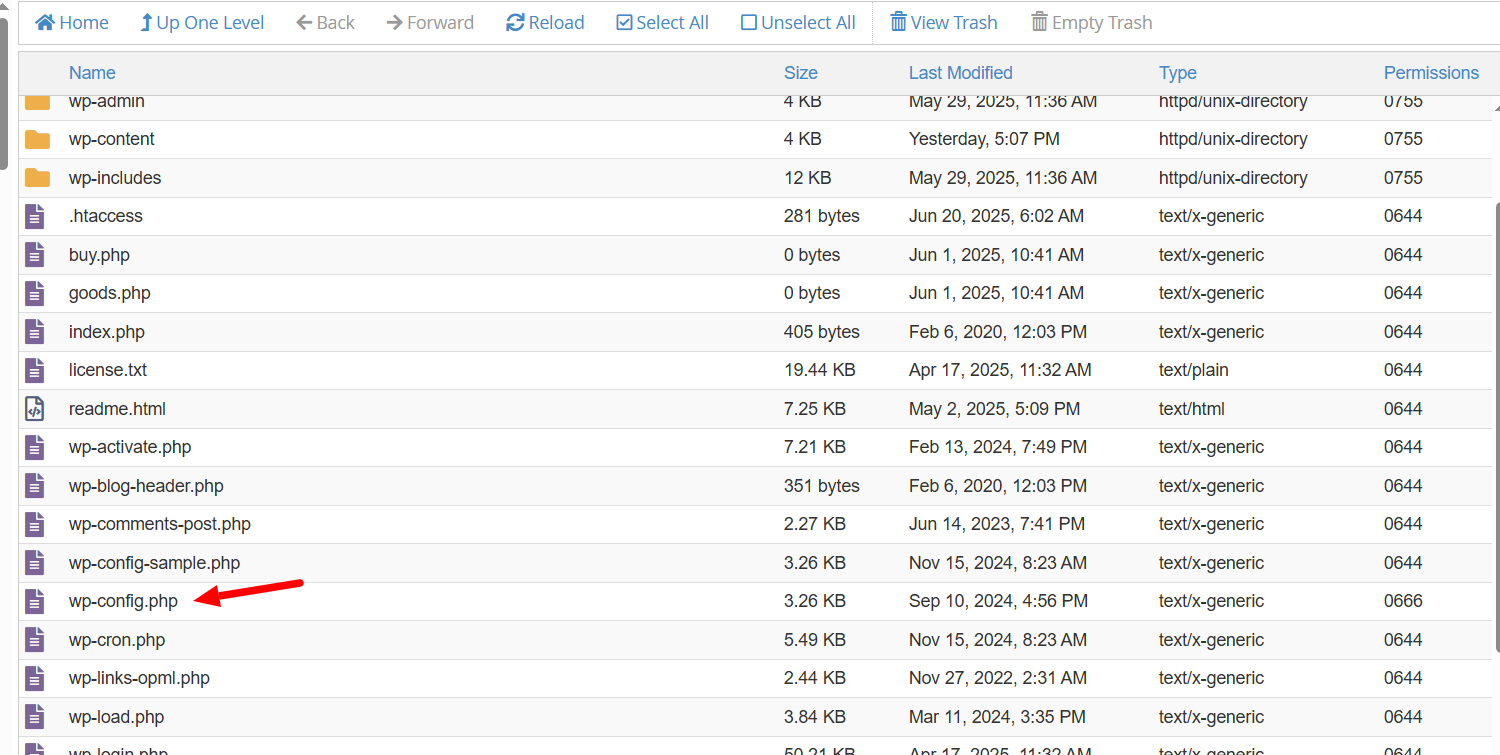
- Right-click the file and choose Edit.
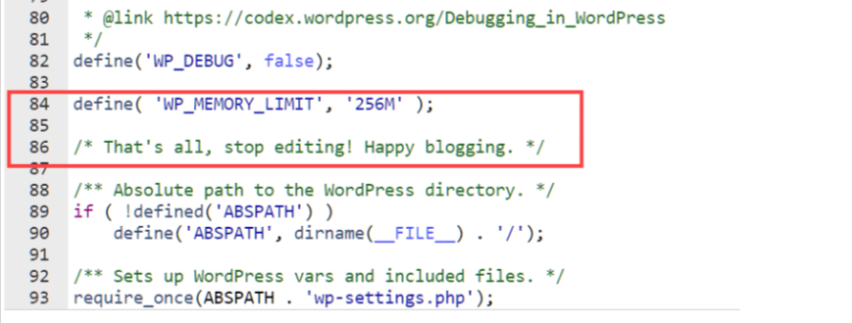
- Scroll down and look for this line:
/* That’s all, stop editing! Happy blogging. */
- Just above that line, add this code:
define(‘WP_MEMORY_LIMIT’, ‘256M’);
- Save the file and refresh your website.
This tells WordPress to use more memory, which often fixes the error.
🧩 Method 2: Increase Memory Using php.ini File
Some hosting providers allow you to edit a file called php.ini. This file controls memory settings for your site.
Steps to follow:
- Go to your hosting panel (like cPanel).
- Find or create a file called php.ini inside your website’s root folder.
- Add this line:
memory_limit = 256M
- Save the file and check your site again.
If your host allows changes through this file, the error should disappear.
🧩 Method 3: Update the .htaccess File
Another way to increase memory is through the .htaccess file.
Here’s how:
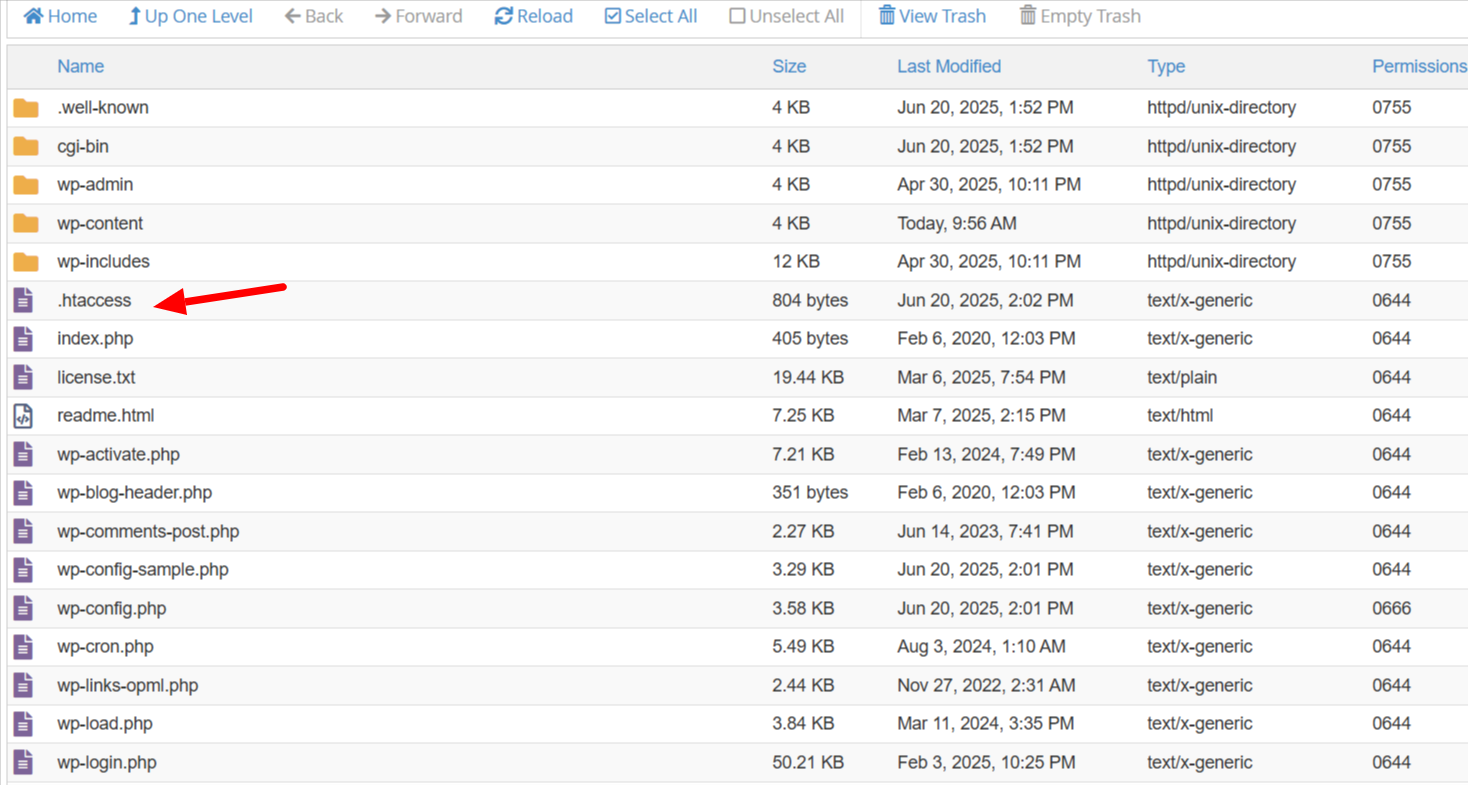
- Open the root folder of your website (where wp-config.php is located).
- Find the file named .htaccess. If you don’t see it, enable hidden files.
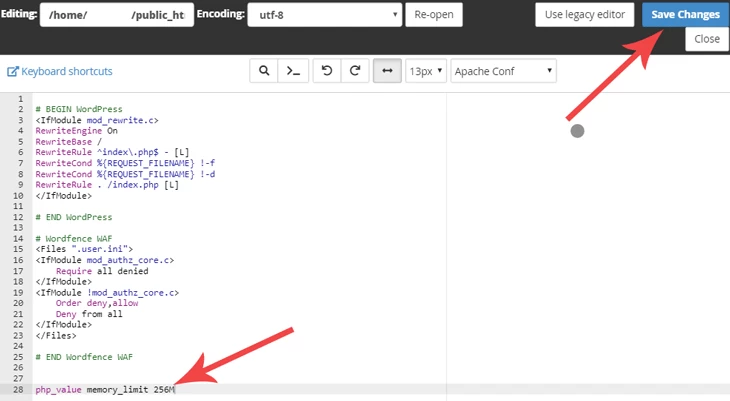
- Add this line at the bottom:
php_value memory_limit 256M
- Save and close the file.
⚠️ Note: Some servers don’t allow this method. If your site shows a white screen after this change, remove the line and try another method.
🧩 Method 4: Ask Your Hosting Provider for Help
If none of the above methods work, your hosting provider may have locked memory settings. In that case:
- Open a support ticket or use live chat.
- Ask them to increase your PHP memory limit to at least 256M.
Good hosts usually fix this for you within a few minutes.


🛡️ Still Seeing the Error? It Could Be Something Else
If you’ve increased the memory and still see the error, it may be caused by:
- A faulty plugin using too much memory.
- A theme with poor design or too many features.
- Multiple plugins doing the same job.
We recommend turning on WordPress Debug Mode (explained in the next part) to find out the exact source.
Enable Debug Mode to Find the Real Problem
If you increased the memory limit and still see the error, there might be something else causing it. Some plugins or themes can use too much memory or create conflicts that lead to this issue.
To figure out what’s going wrong, you can turn on a special tool in WordPress called debug mode. This tool shows hidden error messages in the background and helps you spot the real problem.
How to Enable Debug Mode in WordPress
Here’s how you can turn it on step by step:
- Open your website files using File Manager or FTP.
- Look for the file named wp-config.php in the root folder.
- Right-click the file and choose Edit.
- Find the line that says:
define(‘WP_DEBUG’, false);
- Change it to:
define(‘WP_DEBUG’, true);
- Below that line, also add:
define(‘WP_DEBUG_LOG’, true);
define(‘WP_DEBUG_DISPLAY’, false);
- Save the file.
Now, WordPress will start saving error messages to a file called debug.log, which you can find in the /wp-content/ folder.
What to Do With This Log
Once debug mode is on:
- Visit the page where the error happens.
- Then go to /wp-content/debug.log and open the file.
- Look at the recent lines to see if any plugin or theme name appears.
- If you see a plugin in the log, it might be using more memory than allowed.
- Try deactivating that plugin and see if the issue goes away.
Important Tip
Once you’re done checking, always turn off debug mode by changing:
define(‘WP_DEBUG’, true);
Back to:
define(‘WP_DEBUG’, false);
This keeps your site secure and clean for your visitors.
This debug feature doesn’t fix the error directly, but it helps you see the exact cause so you can remove or fix the item that’s creating trouble.
How to Prevent This Error in the Future
Fixing the memory issue once is great—but making sure it doesn’t happen again is even better. If you take a few smart steps now, you can avoid this error and keep your WordPress site running smoothly.
1. Keep Your Website Clean and Light
Try not to install too many plugins, especially ones that do similar jobs. More plugins mean more memory usage. Remove any plugin or theme you’re not using. A clean website loads faster and uses fewer resources.
2. Use Updated Plugins and Themes
Always keep your themes and plugins updated. Updates often fix bugs and make them work better with WordPress. Outdated tools may use more memory or cause errors when working with newer versions of WordPress.
3. Choose Quality Over Quantity
Use plugins and themes from trusted developers only. Some free tools look helpful but are not well-coded and can consume too much memory. Check reviews and ratings before installing anything new.
4. Optimize Images and Media Files
Uploading large images can make your site slower and use more memory. To avoid this, resize and compress your images before uploading them. Free tools like TinyPNG or ImageOptim work well. You can also install plugins such as Smush or EWWW Image Optimizer to automatically compress images on your site.
5. Upgrade to a Better Hosting Plan
Shared hosting plans usually have limited memory. If your site is growing or uses heavy tools like WooCommerce or page builders, consider upgrading to a hosting plan that offers more resources. Managed WordPress hosting is a good option for busy sites.
6. Test Before Installing New Tools
Before adding new plugins or themes, test them on a staging site or check if they work well with your current setup. This avoids memory issues caused by sudden conflicts or large file loads.
7. Avoid Duplicate Plugins
Avoid using more than one plugin for the same purpose, such as two caching tools or multiple backup plugins. They often clash and demand more memory. Choose the best one and remove the rest.
8. Use a Monitoring Tool
Some hosting providers or plugins offer resource tracking tools. These show how much memory your website is using in real-time. Keeping an eye on usage helps you act before errors happen.
By following these simple tips, you can reduce the chance of facing the “Allowed Memory Size Exhausted” error again—and enjoy a faster, more stable WordPress experience.
Conclusion
Getting the “Allowed Memory Size Exhausted” error can be confusing, especially if it suddenly appears while you’re updating your site or adding new features. But the truth is, this issue is quite common—and it’s also easy to fix with a few simple steps.
Most of the time, the error happens because your website needs more memory to work properly. You can solve this by increasing the memory limit through a small change in your website files. If you’re unsure how to do that, your hosting company can usually help.
Still, it’s just as important to prevent this error in the future. Keeping your site clean, using trusted tools, updating everything regularly, and choosing the right hosting plan will help your website run smoothly without memory problems.
Remember, your website grows as your content and visitors grow, so giving it enough room to work is a smart move.
💬 Need Help Fixing WordPress Errors? We’re Just a Click Away!
Still need help? Our experts are available 24×7 to assist you.
✅ Live Chat Support: Start a chat now
📞 Call Us Anytime:
- US & Canada: 888-818-9916
- UK: 800-069-8778
- Australia: 1800-990-217
Whether it’s a memory error or any other WordPress problem, we’re ready to help!
Looking for more WordPress/WooCommerce help? Subscribe to our YouTube Channel for expert video tutorials. Join us on Twitter and Facebook for updates, tips, and insights.
