
How to Host WordPress on a VPS: Complete Setup Guide
Introduction
Running WordPress on shared hosting might get you started, but if your site is growing, experiencing traffic spikes, or simply feels slow, it’s time to look at a Virtual Private Server. Hosting WordPress on a VPS gives you dedicated resources, full root access, and the flexibility to configure your server exactly the way you want — without paying the premium that managed cloud plans charge.
This guide walks you through the entire process of setting up WordPress on a VPS in 2026: from picking a provider and configuring your server environment, to installing WordPress, locking down security, and keeping performance optimised long-term. Whether you’re comfortable on the command line or just getting started, this walkthrough gives you a solid, repeatable setup you can rely on.
Why Choose a VPS for WordPress Hosting?
The core difference between shared hosting and a VPS is resource isolation. On shared hosting, your site competes with hundreds of others on the same physical machine. One neighbour site getting a traffic spike can drag down your load times, and you have no way to stop it.
A VPS allocates a guaranteed slice of CPU, RAM, and storage to your account. No one else can eat into it. You also get root access, which means you can install any software, modify server configs, choose your PHP version, and implement caching strategies that aren’t available on shared plans.
In 2026, entry-level VPS plans are genuinely affordable — starting around $6–$12 per month — while delivering performance that would have required a dedicated server just a few years ago. For most growing WordPress sites, the jump to VPS is one of the highest-ROI upgrades you can make.
The other major advantage of VPS hosting is predictability. With shared hosting, your site’s performance can swing dramatically depending on what other tenants are doing. Traffic bursts on a neighbouring site can cause your response times to spike without any warning or recourse. On a VPS, your allocated resources are yours alone, so your performance baseline stays consistent whether it’s 3am on a Tuesday or the middle of a peak sales period.
What You Need Before You Begin
Before you dive in, make sure you have a few things ready. First, a registered domain name — you’ll need to point this at your VPS IP address once the server is live. Second, an SSH client — on Windows, you can use PuTTY or the built-in Windows Terminal; on Mac and Linux, the terminal works natively. Third, a VPS running Ubuntu 22.04 or 24.04 LTS — this guide uses Ubuntu, which has excellent community support and long-term stability. Fourth, basic command-line familiarity — you don’t need to be a sysadmin, but you should be comfortable typing commands and reading their output.
Most VPS providers will send you a root password via email when your server is first provisioned. Use that to log in initially, then set up SSH keys as soon as possible for ongoing access — more on that in the security section below.
Step 1 – Choose the Right VPS Provider and Plan
Popular VPS providers in 2026 include DigitalOcean, Vultr, Linode (now Akamai Cloud), Hetzner, and Cloudways. Each has its strengths, but for a WordPress-focused setup, the key specs to look for are:
RAM: At least 1 GB for a small blog, 2–4 GB for a content-heavy or WooCommerce site. CPU: 1–2 vCPUs is sufficient for most sites under 50,000 monthly visitors. Storage: 25 GB SSD minimum — NVMe-backed plans load significantly faster than standard SSD. Location: Pick a data centre close to your primary audience to reduce network latency.
Once you’ve signed up and launched a server, make note of your VPS IP address. You’ll use it for every step that follows. Some providers also offer one-click WordPress stacks, but building your own from scratch gives you more control over exactly what’s installed and how it’s configured.
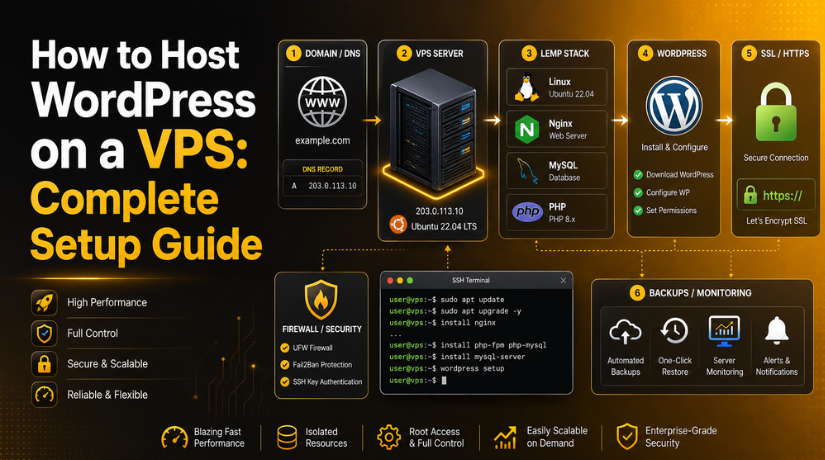
Step 2 – Set Up the LEMP Stack
LEMP stands for Linux, Nginx, MySQL, and PHP — the recommended stack for WordPress on a VPS in 2026. Nginx handles web requests more efficiently than Apache under concurrent load, and PHP 8.3 brings meaningful performance improvements over older versions. Here’s how to install each component.
Update Your Server First
SSH into your VPS and run these commands to bring all packages up to date before installing anything:
sudo apt update && sudo apt upgrade -yInstall Nginx
sudo apt install nginx -y
sudo systemctl enable nginx
sudo systemctl start nginx
Visit your VPS IP address in a browser — you should see the default Nginx welcome page, confirming it’s running correctly.
Install PHP 8.3
sudo apt install php8.3-fpm php8.3-mysql php8.3-xml php8.3-curl php8.3-gd php8.3-mbstring php8.3-zip php8.3-intl -yPHP-FPM (FastCGI Process Manager) lets Nginx hand PHP processing off efficiently. The additional extensions cover WordPress’s core functionality and the requirements of most popular plugins.
Install MySQL
sudo apt install mysql-server -y
sudo mysql_secure_installation
Follow the prompts to set a root password, remove anonymous users, and disable remote root login. Then create a dedicated database and user for WordPress:
sudo mysql -u root -p
CREATE DATABASE wordpress_db;
CREATE USER 'wp_user'@'localhost' IDENTIFIED BY 'StrongPasswordHere';
GRANT ALL PRIVILEGES ON wordpress_db.* TO 'wp_user'@'localhost';
FLUSH PRIVILEGES;
EXIT;
Step 3 – Configure Nginx for WordPress
Create a new server block configuration for your domain. Replace yourdomain.com with your actual domain throughout:
sudo nano /etc/nginx/sites-available/yourdomain.comPaste this configuration block:
server {
    listen 80;
    server_name yourdomain.com www.yourdomain.com;
    root /var/www/yourdomain.com;
    index index.php index.html;

    location / {
        try_files $uri $uri/ /index.php?$args;
    }

    location ~ \.php$ {
        include snippets/fastcgi-php.conf;
        fastcgi_pass unix:/run/php/php8.3-fpm.sock;
    }

    location ~ /\.ht {
        deny all;
    }
}
Enable the config and test it before reloading:
sudo ln -s /etc/nginx/sites-available/yourdomain.com /etc/nginx/sites-enabled/
sudo nginx -t
sudo systemctl reload nginx
Step 4 – Install WordPress
Download and configure WordPress directly from the command line:
sudo mkdir -p /var/www/yourdomain.com
cd /var/www/yourdomain.com
sudo wget https://wordpress.org/latest.tar.gz
sudo tar -xzf latest.tar.gz --strip-components=1
sudo rm latest.tar.gz
sudo chown -R www-data:www-data /var/www/yourdomain.com
sudo chmod -R 755 /var/www/yourdomain.com
Next, set up your WordPress configuration file:
sudo cp wp-config-sample.php wp-config.php
sudo nano wp-config.php
Fill in the database name, username, and password you created in Step 2. Also replace the WordPress authentication keys and salts — visit the WordPress secret key generator online and paste the fresh values into the config file. This step is often skipped by beginners and leaves sites unnecessarily exposed.
Once done, open your domain in a browser. The WordPress installation wizard should appear. Follow the prompts to set your site title, admin username, and password.


Step 5 – Secure Your VPS
A freshly provisioned VPS is not secure by default. These steps close the most common attack surfaces.
Enable HTTPS with Let’s Encrypt
sudo apt install certbot python3-certbot-nginx -y
sudo certbot --nginx -d yourdomain.com -d www.yourdomain.com
Certbot automatically modifies your Nginx config to enable SSL and schedules automatic certificate renewal every 90 days. In 2026, HTTPS is non-negotiable — browsers flag HTTP sites as insecure, and Google uses HTTPS as a ranking signal.
Harden SSH Access
Disable password-based SSH login and use key pairs instead. Edit /etc/ssh/sshd_config and set PasswordAuthentication no. Make sure you have already added your public key to ~/.ssh/authorized_keys before doing this, otherwise you’ll lock yourself out of the server completely.
Configure a Firewall
sudo ufw allow OpenSSH
sudo ufw allow 'Nginx Full'
sudo ufw enable
This allows SSH and web traffic while blocking all other incoming connections by default. Run sudo ufw status verbose at any time to see a clear list of active rules. For extra protection, consider changing the default SSH port from 22 to a non-standard value — automated scanners target port 22 constantly, and moving it reduces brute-force noise significantly.
Step 6 – Optimise Performance
Raw server setup only takes you so far. These optimisations make a measurable difference to real-world WordPress performance.
Enable PHP OPcache — OPcache stores compiled PHP bytecode in memory, so each script only needs to be parsed and compiled once rather than on every request. It’s enabled by default in PHP 8.3 but worth confirming in /etc/php/8.3/fpm/php.ini. Look for opcache.enable=1 and remove the leading semicolon if it’s commented out.
Install Redis for object caching — Redis caches the results of expensive database queries in memory. On high-traffic or WooCommerce sites, this can reduce database load by 60–80%, which shows up directly in faster page response times. Install the redis-server package and connect it to WordPress using the Redis Object Cache plugin.
Use a page caching plugin — WP Super Cache or W3 Total Cache generates static HTML files for your published pages. Nginx can serve these files without involving PHP or MySQL at all, making cached page loads nearly instant for anonymous visitors.
If your WordPress admin is running slowly even on your new VPS, our guide on how to fix a slow WordPress admin dashboard covers additional database and plugin tuning steps that apply to any hosting environment.
For front-end performance, enable lazy loading for images so above-the-fold content loads first. Our step-by-step post on enabling WordPress lazy loading explains exactly how to configure this without layout issues.
Step 7 – Set Up Monitoring and Backups
Once your VPS is live and serving traffic, you need visibility into what’s happening on it. Monitoring tools alert you when disk usage spikes, when your site goes down, or when unusual traffic patterns emerge.
For uptime monitoring, UptimeRobot (free tier available) checks your site every five minutes and sends email or SMS alerts if it goes offline. For server-level monitoring, Netdata provides a real-time dashboard of CPU, RAM, disk I/O, and network throughput without needing complex configuration. Both integrate well with VPS setups and take less than 30 minutes to configure.
For backups, never rely solely on your VPS provider’s automated snapshots — they are not a substitute for application-level backups. Set up UpdraftPlus to send daily WordPress database and file backups to S3, Google Drive, or Dropbox. Also run weekly MySQL dumps and back up your Nginx configuration files to a separate location. A sound backup strategy follows the 3-2-1 rule: three copies of your data, stored on two different media types, with at least one copy kept offsite.
For a thorough breakdown of your monitoring options, our round-up of the best WordPress website monitoring tools covers both free and paid solutions well-suited to VPS environments.
Keeping WordPress Updated on Your VPS
Update management is one of the areas that trips up self-managed VPS users most often. On shared or managed hosting, core WordPress updates often happen automatically. On a VPS, that’s your responsibility.
Schedule a weekly review of WordPress core, plugin, and theme updates. Before applying them to your production site, test on a staging environment first — you can set one up on the same VPS using a subdomain and a duplicate of your WordPress database. Add the following line to your wp-config.php to enable automatic minor security releases without manual action:
define('WP_AUTO_UPDATE_CORE', 'minor');This applies critical security patches automatically while leaving major version upgrades under your control. For agencies managing multiple WordPress sites from a single VPS, tools like MainWP let you apply updates in bulk and roll back individual plugins if an update breaks something.
When Managed Hosting Makes More Sense
A self-managed VPS is powerful, but it comes with real responsibility. You handle server updates, security patches, PHP version upgrades, and troubleshooting when something breaks. If that workload doesn’t fit your schedule, managed WordPress hosting from providers like Kinsta, WP Engine, or Cloudways gives you VPS-level performance without the server maintenance burden.
For hobbyists, developers, and budget-conscious site owners who want full control, the self-managed setup in this guide is hard to beat on value. For agencies and business sites where downtime is expensive and developer time is better spent elsewhere, managed hosting often delivers better ROI despite the higher monthly cost.
Get Expert Help When You Need It
Setting up WordPress on a VPS gives you serious control over your site’s performance, security, and costs. But server configuration has a lot of moving parts — and when something goes wrong, getting back on track quickly matters. Whether you’re dealing with a misconfigured Nginx block, a broken WordPress installation, a security incident, or a performance problem you can’t track down, the team at 24×7 WP Support is available around the clock to help. Reach out today and get expert WordPress support whenever you need it, from server-level troubleshooting to plugin optimisation and everything in between.

Brian is a WordPress support specialist and content contributor at 24×7 WP Support. He writes practical, easy-to-follow guides on WordPress troubleshooting, WooCommerce issues, plugin and theme errors, website security, migrations, performance optimization, and integrations. With a focus on solving real website problems, Brian helps business owners, bloggers, and online store managers keep their WordPress sites running smoothly.
