A guide to add a cost calculator for a WordPress website
People have started embracing online shopping since the explosion of online payment systems and online stores. The shoppers have changed their shopping patterns.
Some major factors that have attributed to the growth of e-Commerce are:-
- Improved internet connectivity
- COVID-19 pandemic
- Advent shopping events like Cyber Monday, Black Friday, etc.
Easy accessibility and e-shopping convenience has encouraged shoppers to make their purchase online. In fact, the numbers have risen to 2.14 billion in 2021 alone.
So, it is a good time to start an e-store and add a cost calculator for a WordPress website.
Not convinced? Read ahead to find out:-
Shoppers love to buy their favorites without leaving the comfort of their couch. They look for a tailored shopping experience and choose from a plethora of delivery options. They will have a detailed check on the product information.
Most customers check the customer’s reviews before making their purchase. Online shopping is an everyday chore for most people. Statista has forecasted that e-Commerce sales will be amounted to 7.4 trillion dollars by the year 2025.

Don’t you think it is excellent news for the business? You just require a plugin and order form for WordPress. This will help you to handle your eCommerce store the best way.
Beware!! If you are depending on basic order forms that do not have a payment option and price calculator. You will suffer big time.
Why should you add a cost calculator for a WordPress website?
You should add a cost calculator for a WordPress website because it will improvise the bottom line. It will allow your potential clients to easily and quickly determine how much services or products will cost.
This will in fact help them in the process of decision-making. So, there are high chances that they will choose your business over competitors.
There are numerous ways to add the basic functionality of cost estimation to your website. You can use CSS or widgets. But it is best to use Cost Calculator Plugins. They provide a more versatile and elegant way.
Importance of price calculators for WordPress website
It is good to let clients pick things such as colors or quantities when purchasing an item. But if your website does not have the form to calculate the things that the shoppers look for, it can be dreadful.
Not forcing, it is entirely your decision!!
But please remember you have to manually visit & log every order form. It is a non-ending work, visiting again and working for cost estimation.
Indeed plenty of legwork for busy businesses. Moreover, it will take plenty of time for clients who are used to getting instant results. They will visit the other store because of convenience. You don’t want this from your shoppers, right?
Cost calculator applications
It is essential to add a cost calculator for a WordPress website. Here are some business domains that can make use of a cost calculator:-
- Web hosting companies
- Spas, beauty parlors, and salons
- Equipment and rental agencies
- Lumber mills
- Flooring companies
- Bricklayers, painters, plasterers, etc
- Housekeeping and cleaning services
- Web hosting companies
- Medical service providers
- Professional services like Bookkeeping, Copywriting, and many more
- Print services
Benefits of adding a cost calculator for your WordPress website
Cost calculators are the best source to capture leads and effectively engage the customers. Let’s have a close look at the benefits of adding a cost calculator for your WordPress website.
- Customers will have a comprehensible idea of your pricing structure
They will have clarity on the structure of services or the product that you are featuring in your store.
It will assist the shopper to pick components and avoid the others (that they do not need). For instance, a customer can choose a price package or product variation that suits their requirements.
- Improve customer engagement
You shoppers will spend more time on your store if you add a cost calculator for a WordPress website. They may visit your business website for price checking.
The shoppers will be familiar with your business website. This will enhance future purchase possibilities. There are high chances that they will be aware of the services/products you sell.
- Helps in bounce rate and website traffic
It is an assurance that the website traffic will improve naturally when you add a cost calculator for a WordPress website. The shoppers will be spending more time. Hence, the bounce rate reduces.
So, add a cost calculator for a WordPress website- save your customer and your time. Follow the steps below, it will automatically allow you to calculate product options.
Steps to add a cost calculator for a WordPress website?
There are many cost calculator plugins available for WordPress websites. We are using the plugin, “Cost Calculator for WordPress” to give you a rough picture. You can choose any plugin. But please remember to check whether it is apt for your business.
We are using the plugin’s free version from the repository of WordPress.
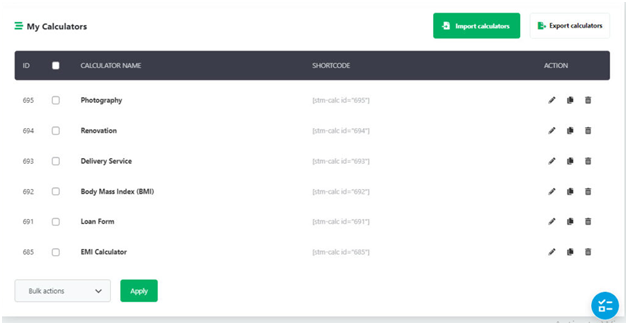
Go to the settings of the plugin once you have installed it. Navigate to “WordPress dashboard” and press “Cost Calculator”.
Check the screenshot below to know how well the settings page will look like.
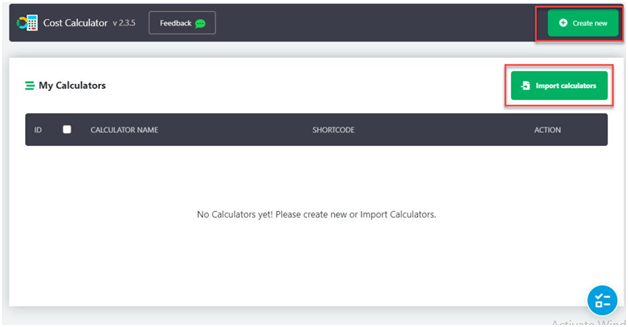
On this same page, you need to:-
1. Import the calculators
2. Creating a new calculator
1. How do import the calculators?
You have to go through too many hassles while building a new calculator. The plugin can assist you with templates. This is for various use-cases.
On the dashboard of the plugin, tap the button “Import Calculators”.
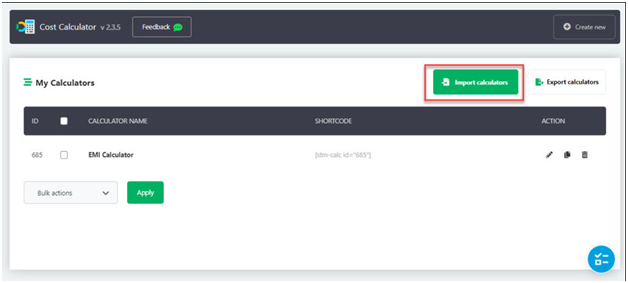
We get the two options.
Option #1. We can import the calculator if it is saved on the computer.
Option #2. Tap the button “Run Default Demo Import” to employ the calculator given by the plugin.
It will initiate the process of Import. You will get a Calculator range for various models. This will be added to the website.
Make sure to edit these to suit your business requirement. Or else, you can copy the shortcode and use them directly on your page.
2. How to create a new calculator?
For the demonstration, we will build an EMI calculator to create a new calculator.
First, we will press the button “Create new. We will name the calculator and tap “+”. Please see this next to the field name.
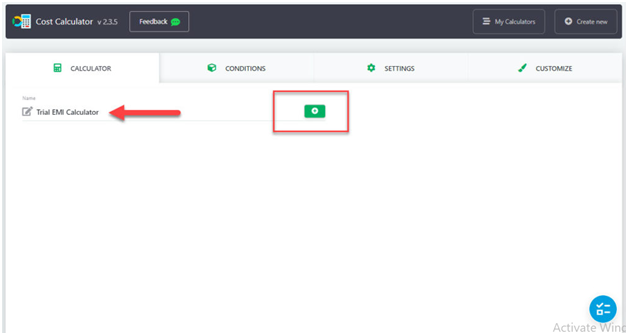
You can see varied field elements.
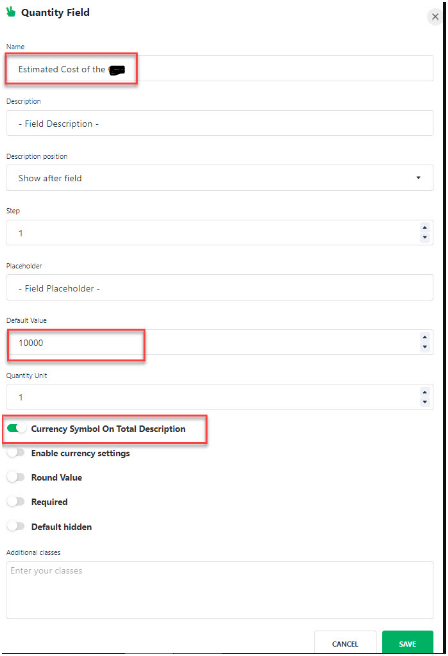
The settings will open up for the specific field element when you drag it to the form builder. We will drag an element “Quantity”.
In the settings of the field, we will give the name to the field. You have to toggle the symbol on for currency and a default value. This is the cost estimation of the product.
In the same way, we added the quantity field for loan payment and estimated the down payment.
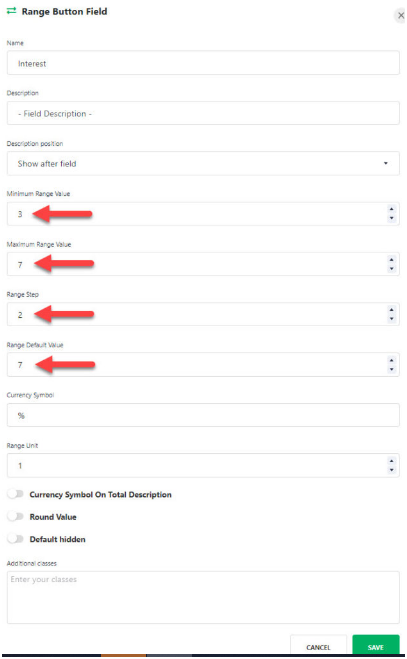
Next, we chose Range Slider. This will allow the shoppers to pick the interest rate. We selected the maximum and minimum specified (default) range values. Next, we set the Range Default value and Range Step.
Lastly, we added the field “Total”. For the final output, we specified how the other value fields must be considered.
To give you a clear picture, we have added how Total field calculations will look like.
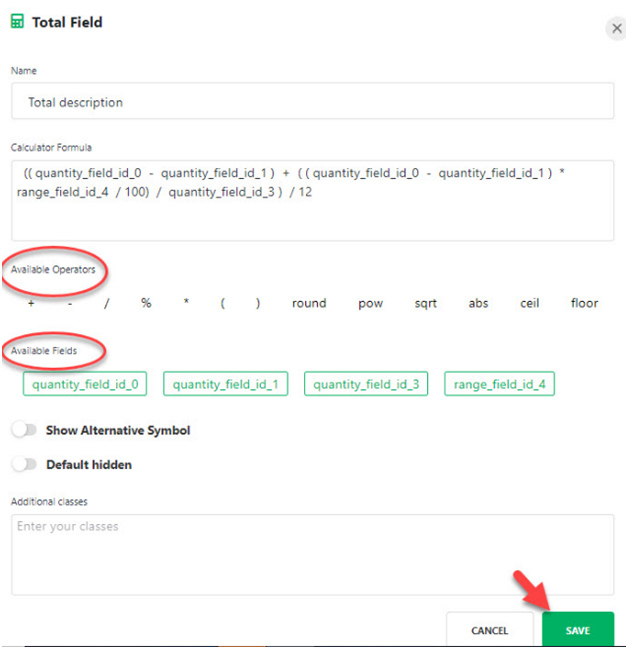
We have set the required calculation for the form from the “Operators in Total Field” and “Available Field”.
Next, click the button “Save” for the Total field once we have correctly added the formula.
Since we are okay with the form we have created, we will tap “Save”.
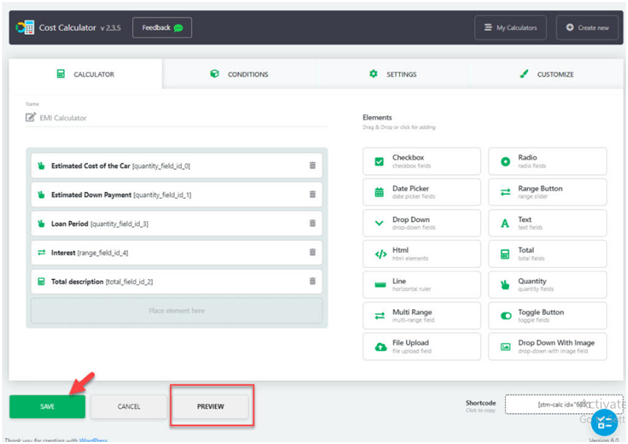
Embedding cost calculator to the page
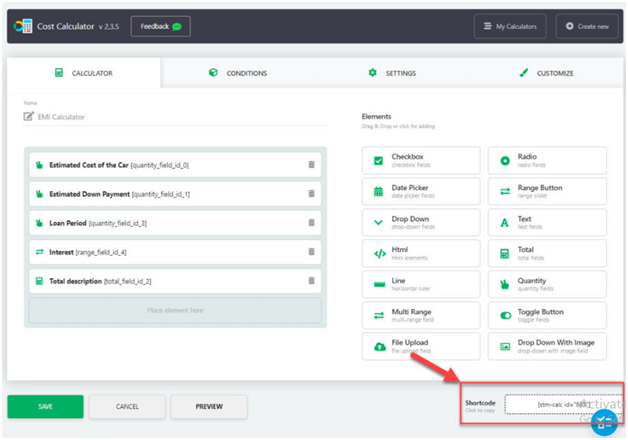
We placed a cost calculator on a page on your website. The plugin offers a shortcode for this. This you can find on the form page’s bottom right corner.
We have copied the shortcode and placed it on the page.
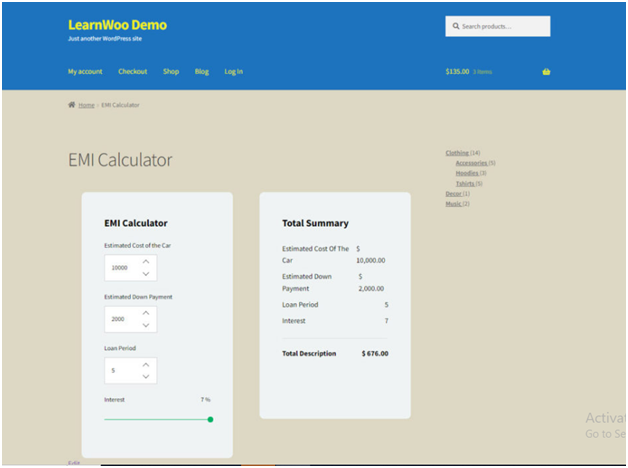
The Cost Calculator will be visible to the client once the customers click the page. Now, the customers can add the custom value of their choice and get output.
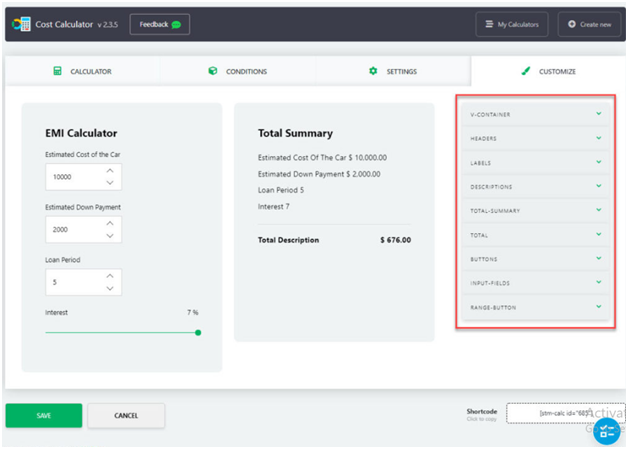
Customization of cost calculator’s appearance
We just saw the basic calculator in the demonstration above.
Here, you can also customize different aspects of visuals like shadows, borders, colors, etc.
Steps for WooCommerce Cost Calculator integration
You can use the plugin’s premium version to integrate with WooCommerce. It provides you the scope to employ a cost calculator on the checkout page and product pages.
Please remember some plugin only works with simple products.
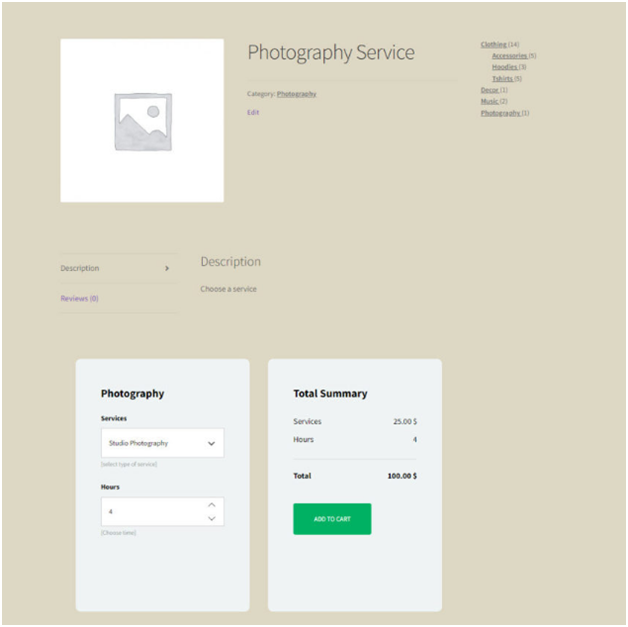
We are using -Photography as a demo calculator template. It offers three types of photography services. They are:-
- Wedding photography
- Nature Photography
- Studio Photography
The users get the privilege to choose their service and share the hours that are required. According to this only, the cost calculator will showcase the price.
Firstly, we will create a product for the WooCommerce naming Photography service.
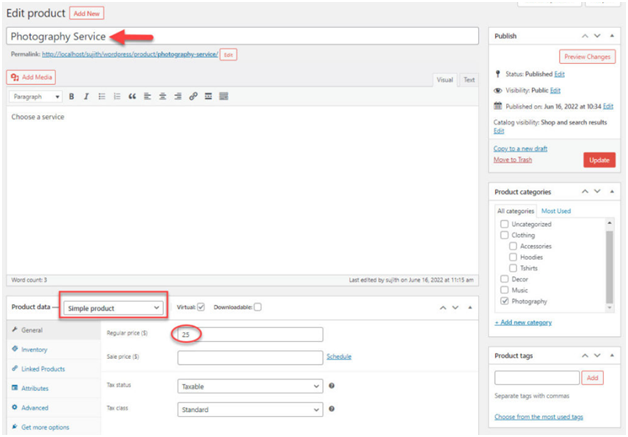
Visit “Cost Calculator” and click the icon “Edit” for the Photography calculator.
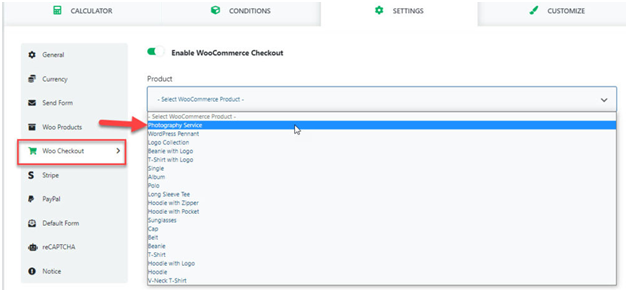
Go back to “Woo Checkout”. Make sure to enable “WooCommerce Checkout”. Pick the item name by scrolling the dropdown.
Next, enable the “Calculator for WooCommerce Products” after navigating to “Woo Products”.
You can choose the category and specify the position of the calculator. Next, link the meta link of WooCommerce to the field of calculator.
Normally, “Total Field” will be the field, and “Price” the WooCommerce meta.
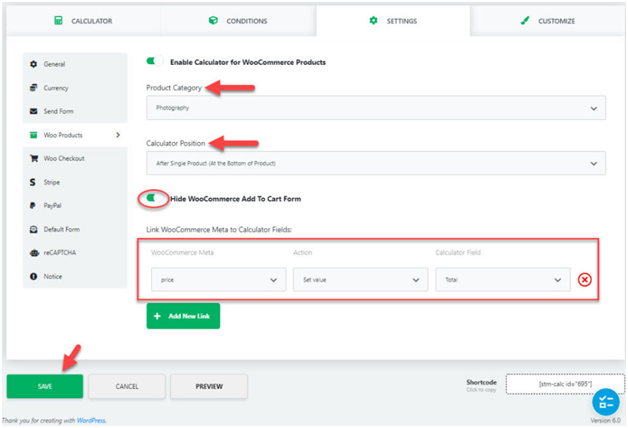
Lastly, click the button “Save” after you are done setting. You will have a calculator with great appearance and power on your site.
The customers get the upper hand to choose their checkout and service. The following is the image of how will your customer see the output on their screen.
