
WordPress Robots.txt Explained- Where To Put It And How To Use It
Last updated on August 11th, 2021 at 07:35 am
What is WordPress robots.txt file?
This is a very genuine question that comes to every user’s mind. So in this section, we are going to discuss the robot.txt file. before going ahead or in deep breathing should know how the robot.txt file looks like so check out some examples which are given below. after looking towards these examples used to make clear about robots.txt file.
- User-agent: *
- Disallow: /wp-admin/
- Allow: /wp-admin/admin-ajax.php
We know that every day more than thousands of websites are to be published over the internet. to make it easy for the user to search regarding some kind of information over in Google search engine or Browser. to make it easy for the user Google crawls each and every website and provides a particular index of each website.
How you can say that a search both can land to our website. to know this thing in depth before that user must be aware of the website XML sitemap. In the next step, Google’s boat is not only to crawl and index website pages but also to go for content that is present on the website. If we can say that it is a wordpress website then Google bots also crawl the complete wp-admin folder. If the user does not want to scroll their own website then the user just needs to instruct the robot.txt file.
What are the benefits of creating an optimized robots.txt file?
The main reason behind that user allowed the complete website to scroll and get indexed in the search engine Browser this all thing can be done with the help of the robots.txt file. but the user did not want that it can be accessed by the admin folder, theme folder, category, and pages of their own website.
A complete website that has been crawled into any search engine can be known as crawl quota. The crawl quota can allow a maximum number of pages that a website has and also show the capability to crawl complete website pages at a single time.
Where is the robots.txt file located?
In the all about section will learn about the robots.txt file but now in this section, we are going to discuss in detail where this type of file is going to be found. For this user needs to follow all the steps which are given below.
- First of all, users need to log in to a WordPress admin panel with the help of an email ID or username and password. after putting all these credentials in a correct manner then use a successfully logged-in into the WordPress admin panel.
- Now the user needs to open the next tab or a new tab in the search engine browser and their own website URL. after the website URL user needs to add “/ robots.txt”.
- check out the complete URL address code which is given below with the help of an example.
- Example – https://mywebsite.com/robots.txt
- Instead of “mywebsite.com” users need to enter their own website URL. check out the image given below.

How to create a robots.txt file in WordPress?
We know that creating robots.txt files into WordPress is a straight-through process and a very easy way to create it. Users need to follow all the complete steps carefully which are given below and they are really very helpful to create robots.txt files into any WordPress website. This thing can be done manually as well as installing a plugin. So in this article, we are going to discuss both ways.
Creating robots.txt file with the help of your site SEO plugin
- First of all, users need to visit the WordPress admin panel with the help of entering the correct credentials which are required. details that are required for login into the WordPress admin panel are username or Email Id and password.
- After successfully logged in to the WordPress admin panel, users need to click on the “Plugin” option.
- Now the supporter’s menu appears in front of the user but with lots of options but the user needs to click on the “ Add New Plugin” option.
- A new tab appears in front of the user now the user needs to add a Keyword in the search box panel which appears on the right side of the page.
the user list appears in front of the user who needs to click on the first option from the list. After that, the user needs to click on the install option. - Now the SEO plugin successfully installs into the WordPress directory of the user but the user needs to click on the activate button at the same time after installation.
- After successfully activating the Yoast SEO plugin.
- Now users need to click on the “SEO” option which is present on the left side of the screen.
Now the sub-context menu appears in front of the user with lots of options but the user needs to click on the “Tools” option. check out the image given below

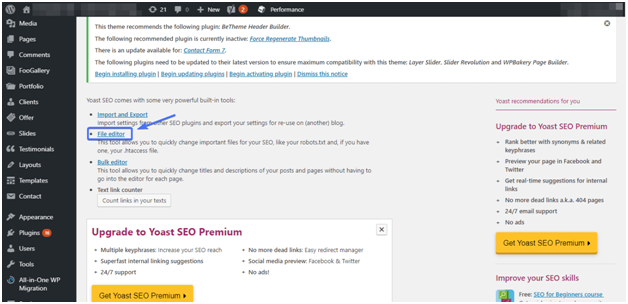
- Now the user needs to click on the “File editor” option in the Yoast dashboard. Check the image given below.
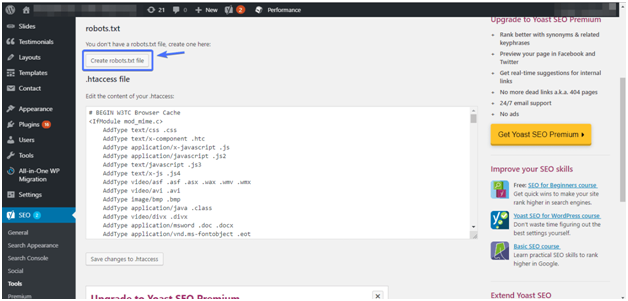
- After that option will take you to the page where the user needs to create a robots.txt file. For that thing, the user needs to click on the “Create” button. Check out the image given below.
- After that option user will reach the WordPress “robots.txt” file editor. Check out the image to map your all steps.
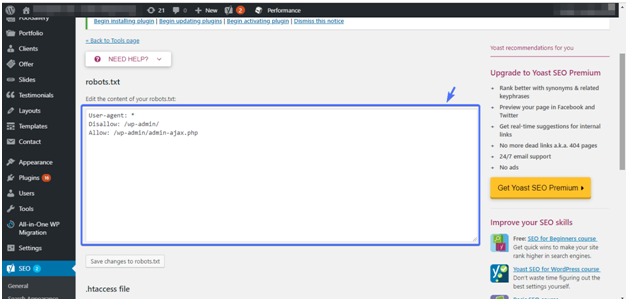
- If the user needs to edit, the user can edit and click on the save options.
How to test your created robots.txt file in the Google search console?
Now we finally created a robots.txt file with the help of a Yoast SEO plugin. Now it’s time to test our created robots.txt file. According to our expert technical developer, there is no better way to explore or test the robots.txt file but the clear way is using a robots.txt tester tool. For that user needs to follow all the basic steps which are given below carefully.
- The user needs to visit the Google search console account after that user needs to sign up or login by using the correct credentials that are asked for login.
- Users can create a google search console account if the user does not have that account.
- Users need to visit the old version for that user to click on the “old version ” option which is present on the left side of the computer screen. Check out the image given below.
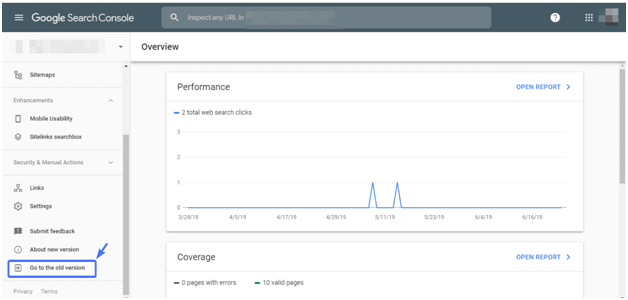
- Once the user in the old version, the User needs to click on the navigate to crawl option.
- After that a sub-context menu appears in front of the user then the user needs to click on the robots.txt tester option. Check out the image given below.
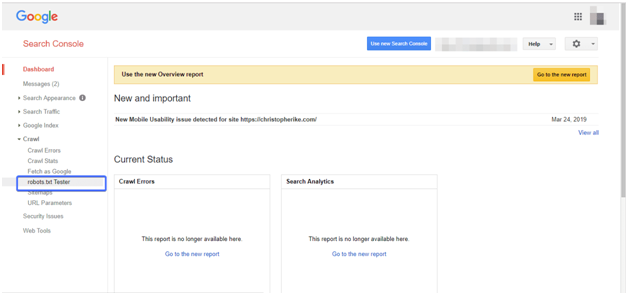
- Now the user can paste all types of the rules that the user needs to paste. Take help from the image which is given below.
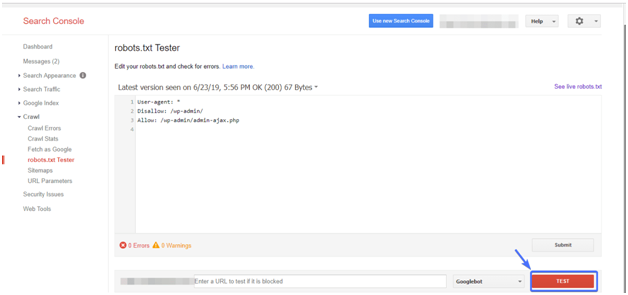
- After doing changes the user doesn’t forget to click on the done options. Live Chat


