
How to Permanently Delete a WordPress Site
Introduction
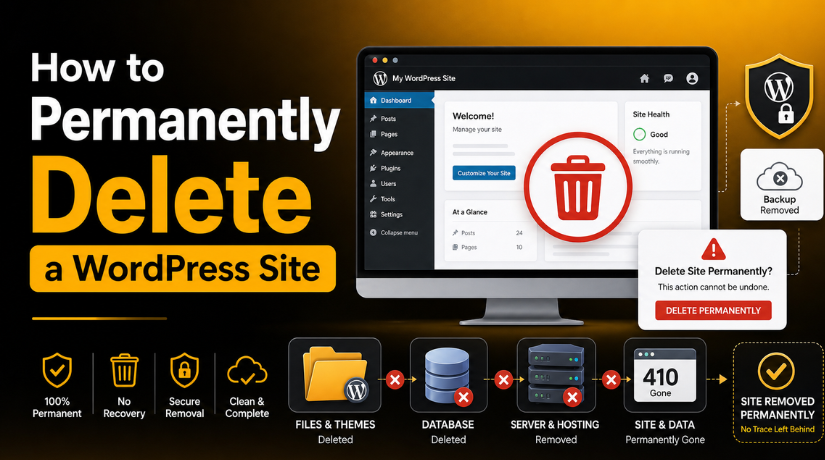
Deleting a WordPress site is a serious and final step. Many users remove pages and think the site is gone. But WordPress keeps files, database records, media, themes, and plugins. Some pages may also stay visible in Google search results.
If you want to know how to permanently delete a WordPress site, you must follow each step carefully. A complete deletion means removing the full website from hosting, database, backups, and search engines. This guide will help you understand the right process before deletion begins.
This article covers both self-hosted WordPress websites and WordPress.com websites. Both platforms work differently. So, the deletion process also changes based on your setup.
Before You Delete Your WordPress Site
Before learning how to delete a WordPress site, you must prepare properly. This helps avoid data loss, business issues, and unwanted mistakes.
Confirm You Really Want Permanent Deletion
First, decide what you really want to remove. Some users only want to hide their website. Others want to delete old pages or stop search engines.
Permanent deletion is different. It removes the full site structure. You may lose posts, pages, media files, users, forms, and settings. Once removed, recovery may not be possible without a backup.
Take a Full Backup First
Always create a full backup before deleting anything. This gives you one safe copy for future use.
Your backup should include:
- WordPress files
- Website database
- Media uploads
- Theme files
- Plugin files
- Important form entries
Store the backup on your computer or cloud storage. Do not keep it only inside the same hosting account.
Check Connected Services
Your WordPress site may connect with many outside tools. Check them before deleting the website.
Review services like Google Analytics, Google Search Console, payment gateways, email tools, CDN, and security tools. This prevents broken tracking, billing issues, or active services after deletion.
How to Permanently Delete a Self-Hosted WordPress Site
A self-hosted WordPress site runs on your own hosting account. You manage its files, database, domain, and server settings. So, you must remove each part carefully. This helps you delete WordPress site completely without leaving unused data behind.
Step 1: Log In to Your Hosting Account
Start by logging in to your web hosting account. Most hosting companies offer cPanel, Plesk, or a custom dashboard. You need access to the correct hosting account before deleting anything.
If you manage many websites, check the domain name first. This helps you avoid deleting the wrong website by mistake.
Step 2: Open File Manager or FTP
Next, open File Manager from your hosting dashboard. You can also use FTP if you prefer. WordPress files are usually stored inside a main website folder.
Common file locations include:
- public_html
- A domain-specific folder
- A subfolder like /blog/
- A subdomain folder
Open the correct folder before selecting any files. Check the folder path carefully.
Step 3: Delete WordPress Files
Now select the WordPress files and folders inside that location. These files control the visible website, themes, plugins, and uploads.
Common WordPress files include:
- wp-admin
- wp-content
- wp-includes
- wp-config.php
- .htaccess
Delete these files only after confirming the correct folder. If your hosting keeps deleted files in trash, empty it too.
Step 4: Delete the WordPress Database
WordPress stores most website content inside the database. This includes posts, pages, users, settings, comments, and plugin data.
Open MySQL Databases or phpMyAdmin from your hosting panel. Find the database linked to your website. You can check the database name inside the wp-config.php file before deleting files.
Delete the correct database after confirmation. This step is important when learning how to delete WordPress site from cPanel safely.
Step 5: Remove Database User If Not Needed
After deleting the database, check its database user. Remove that user if no other website uses it. This keeps your hosting account clean and more secure.
How to Delete WordPress Site from cPanel
Many hosting companies provide cPanel for website management. It gives you access to files, databases, domains, and installers. If you want to know how to delete WordPress site from cPanel, follow each step carefully. This helps you remove the site without affecting other websites.
Delete WordPress Files from File Manager
Start by logging in to your cPanel account. Open File Manager from the main dashboard. Then go to the folder where WordPress is installed.
This may be:
- public_html
- A domain folder
- A subfolder like /blog/
- A subdomain folder
Open the correct folder and review the files inside it. You should see WordPress folders like wp-admin, wp-content, and wp-includes.
Select the WordPress files and folders. Then click the delete option. Some cPanel accounts move files to trash first. Empty the trash to remove them fully.
Delete the Database from MySQL Databases
After deleting files, remove the connected database. WordPress uses the database to store site content. This includes posts, pages, users, comments, and settings.
Before deleting it, confirm the database name. You can check it inside the wp-config.php file. Look for the database name value there.


Then open MySQL Databases in cPanel. Find the same database name and delete it. Also check the database user linked to it. Remove the user if no other website uses it.
This step helps you remove old content from your hosting account.
Remove WordPress from Softaculous or Auto Installer
Many users install WordPress through Softaculous or similar installers. If you used one, open that installer inside cPanel.
Find your WordPress installation list. Select the correct website and remove the installation record. This clears installer data and avoids future confusion.
Do this only after confirming the domain name. It keeps your hosting dashboard clean and organized.
How to Delete a WordPress.com Site Permanently
WordPress.com works differently from a self-hosted WordPress website. You do not manage server files or cPanel there. WordPress.com hosts the website for you. So, you must delete the site from your WordPress.com account.
Log In to WordPress.com
First, log in to your WordPress.com account. Make sure you use the correct login details. If you manage many sites, choose the right website carefully.
Go to your site dashboard and open the site settings area. Look for the option to delete or remove the site permanently.
Export Content Before Deleting
Before deletion, export your important website content. This gives you a safe copy for future use.
You may export:
- Posts
- Pages
- Comments
- Media files
- Important site data
This step is helpful if you may reuse content later. Once deleted, recovery may not always be possible.
Confirm Permanent Site Deletion
WordPress.com may ask you to confirm the site address. This helps stop accidental deletion. Read each warning message before you continue.
If you want to know how to delete WordPress.com site permanently, never skip the confirmation screen. It protects you from deleting the wrong site.
Cancel Paid Plans or Domains
Check active plans, custom domains, and renewals before deletion. Cancel any paid plan you no longer need. Also review domain settings if your domain connects elsewhere.
How to Remove Your Deleted WordPress Site from Google
Deleting the website does not remove Google results instantly. Google may still show old links for some time. So, you must handle search removal separately.
Use Google Search Console Removal Tool
Open Google Search Console and use the removal tool. This can hide selected URLs from search results temporarily.
Return Proper 404 or 410 Status Codes
Deleted pages should show a proper 404 or 410 status. These codes tell Google the pages no longer exist.
Remove Sitemap Links
Remove old sitemap links from Google Search Console. This stops Google from checking deleted sitemap URLs again.
Wait for Google to Recrawl
Google needs time to recrawl deleted pages. This is important when learning how to remove WordPress site from Google safely.
What to Check After Deleting the WordPress Site
After deletion, check that the website is fully removed. This final review helps you delete WordPress site completely without leaving hidden data behind.
Use this simple checklist:
- Open the domain in a browser.
- Confirm the WordPress site no longer loads.
- Check all subfolders and subdomains.
- Confirm the database is removed.
- Review Softaculous or installer records.
- Remove old backups if they are not needed.
- Check Google Search Console for old URLs.
If any old page still opens, some files may remain. Check the correct folder again inside your hosting account.
Common Mistakes to Avoid When Deleting a WordPress Site
Many users delete only visible pages from WordPress. This does not remove the full website. WordPress files, uploads, plugins, and database tables may still exist.
Avoid these common mistakes:
- Deleting pages instead of full website files.
- Forgetting to remove the WordPress database.
- Removing files from the wrong domain folder.
- Keeping old backups with private data.
- Expecting Google results to disappear immediately.
A careful review protects your hosting account and data.
When Should You Ask a WordPress Expert for Help?
You should ask an expert if the website is important. This is also wise when many sites share one hosting account.
Get help for:
- Business websites
- WooCommerce stores
- Client websites
- Malware-affected websites
- Sites with spam results in Google
24x7WPSupport can help you remove WordPress safely. Our team can check files, databases, backups, and Google-indexed links.
Conclusion
Deleting WordPress takes more than removing pages from the dashboard. You must remove website files, database records, backups, installer records, and indexed URLs. Each step matters because leftover data can create security, privacy, or search issues later.
Before you start, always create a full backup. This gives you a safe copy if you need old content again. After deletion, check your domain, hosting folder, database, and Google Search Console. This confirms the site is fully removed.
If you are not sure about any step, get expert help. A careful process helps you permanently delete your WordPress site without harming other websites.

Brian is a WordPress support specialist and content contributor at 24×7 WP Support. He writes practical, easy-to-follow guides on WordPress troubleshooting, WooCommerce issues, plugin and theme errors, website security, migrations, performance optimization, and integrations. With a focus on solving real website problems, Brian helps business owners, bloggers, and online store managers keep their WordPress sites running smoothly.
