
How To Create Menu And Sub Menu In WordPress
Last updated on August 11th, 2021 at 07:04 am
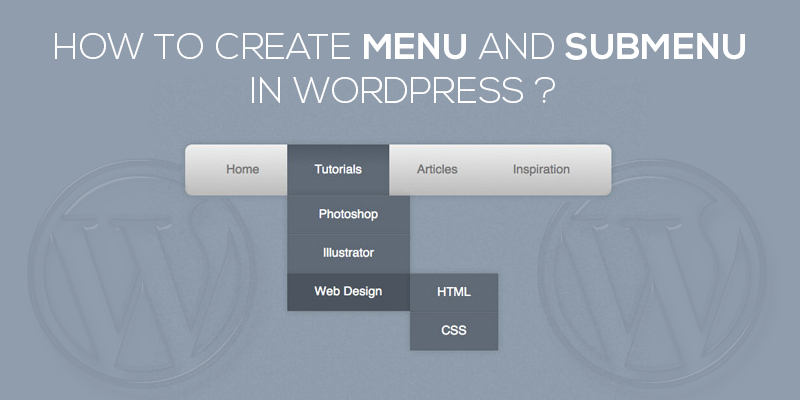
Often, websites have so much to provide to the customers that accommodating every single link or a pinning every keyword in the single page becomes cumbersome. Even if you plan to keep things spacious, it would still have a lot. Here, what’s best you can do is create a menu and sub-menu. WordPress offers this exquisite feature where you can create both a menu as well as a Sub-menu without actually coding for any of it.
It simply requires you to drag and drop elements to deploy custom-fit menus. Easy, right? But do you really need to create sub-menu?
Why do you need to embed sub-menus?
The majority of the time, it so happens that we keep debating on the need of menus and sub-menus, not knowing that such menus have the ability to give your WordPress website a more organized and sophisticated look.
Whether you are a blogger or an eCommerce website owner, the appearance of the website is the first thing that a user engages and it should be alluring enough to strike a deal, right?
Well, that’s something you can do with menus. Align different elements of the website and structure the content in a manner that the user doesn’t have to wander around to trace something. In fact, they can get access to every other link in few clicks.
So, what do you think? Do you need to create menus and sub-menus?
I guess yes! Now, once you are convinced, let’s move ahead and see how can you add menu and sub-menu within your WordPress website.
How to Create Menu and Sub-menu In WordPress?
There are different ways by which you can create a menu and sub-menu on a WordPress website. You can either do it manually through the admin dashboard or integrate plugins to achieve the same.
Without wasting much time, we now see the methods you can undertake to create a menu and Sub-menu.
Through WordPress Menu Systems
We start by logging to the WordPress admin dashboard.
- Enter the login credentials to validate the identity and enter the admin dashboard.

- Here, navigate to the left side. Click on Appearances and then select the menu
Creating a New Menu
We will first create a menu and then add Sub-menu within it
- A new page opens up. You will see a link that says create a new menu.

- Enter the name of the new menu that you wish to display on the WordPress website and then click on the create menu.
Modify Menu Location
After creating a new menu, we would next need to designate a position or assign a location to the same.
- Under the Menu Settings tab, you will see multiple options to assign a location. The best thing to do here is to assign the place of the main menu to our test menu.

- To do so, you need to check the box that says: Main Menu.
- Don’t forget to click on the save menu in order to update the changes.
Now that we have created a menu and assigned a location, we next add an item as the parent menu item.
- On the left side, you will see the Test menu appearing under the pages section.
- Select the same and click on add to the menu.

- Once you do this, the item automatically appears on the right side as a menu item.
- You can add as many pages you want to, under the menus.


- You can also edit the properties of the pages.
Creating Sub-menus
After you have added items under the menus, it’s time to create sub-menus.
- To create submenus, follow the above-stated process.
- Click on them and then select add to the menu.
- You will see all of the items displayed on the right window. To create Sub-menu, drag the child to place it below the parent and slide it to the right.

- This turns the newly added item the child of the one right above.

- You can create sub-menu of sub-menu, pursuing the same method and shifting them right to the sub-menu.

- Click on save to update the changes.

- An easy and excellent way to create menus and sub-menu in WordPress.
Using Plugins
WordPress allows the website owners to customize their site, add plugins and enhance the overall functionality. While there are plugins to ease payment process, to track inventory, and to support faster check out, surprisingly WordPress also supports plugins that give you the ease to create menus and Sub-menu on the go.
Few clicks and your job is done.
Uber Menu
Ubermenu is a WordPress plugin that is both easy to use and user-friendly. It has out of the box features that make the whole process of creating a menu and Sub-menu in WordPress, easier.
The plugin is fully customized and has an inbuilt column grid system that eases the process of creating menus and Sub-menu in WordPress.
How to use ubermenu in WordPress?
- Log in to the dashboard and click on plugins -> add new.
- Here search for ubermenu.
- Click on install and activate the plugin.
- In case you don’t have a menu yet, move to appearance and menus to create one and then assign a specific location to your menu.
- Automatically integrate submenu.
- Appearance->Ubermenu
- Main UberMenu Configuration > Integration > Automatic Integration Theme Location
- Click on the box next to the theme location
- Save the changes
- To edit the changes or configure the menus, click on UberMenu Control Panel > Main UberMenu Configuration
- For configuration of Sub-menu, click on Appearance-> menu.
- Click on Uber
- On the left, appear several settings.
- You can edit them as you want.
What makes this plugin best is the fact that it is totally automated and can create menus on the go! So, use it and create/arrange your menu items the way you want.

Brian is a WordPress support specialist and content contributor at 24×7 WP Support. He writes practical, easy-to-follow guides on WordPress troubleshooting, WooCommerce issues, plugin and theme errors, website security, migrations, performance optimization, and integrations. With a focus on solving real website problems, Brian helps business owners, bloggers, and online store managers keep their WordPress sites running smoothly.
