
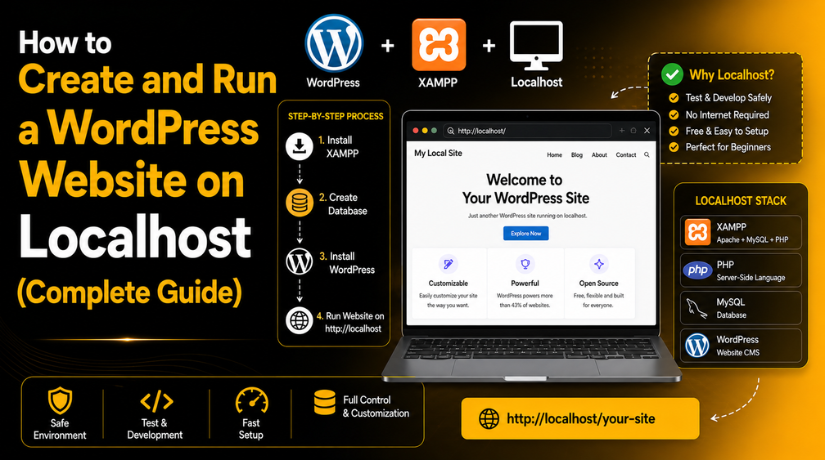
How to Create and Run a WordPress Website on Localhost (Complete Guide)
Introduction
Creating a website directly on live hosting can feel risky. One wrong setting can break the website for visitors. That is why many users prefer a WordPress localhost setup before launching online. Localhost lets you build and test WordPress on your own computer. You do not need hosting or a domain at first.
This makes the process simple, safe, and cost-friendly for beginners. A localhost setup is useful for students, bloggers, developers, agencies, and business owners. You can test themes, plugins, pages, layouts, and custom code safely. If something breaks, your live website stays safe. You can also learn WordPress without pressure or public mistakes.
This guide will help you create a WordPress site on localhost with clear steps. It works as a simple WordPress installation guide for local website building. You can use it to practice, test, or prepare a full website. Once your local website is ready, you can move it live.
What Is a Localhost WordPress Website in Simple Words?
A localhost WordPress website runs on your own computer. Your computer works like a private web server. Instead of loading files from online hosting, WordPress loads local files. The database also stays inside your computer system. This setup lets you run WordPress locally without public access. Visitors cannot open your localhost website from another device. It stays private until you move it to live hosting. This is why localhost is great for testing and learning.
A normal website opens through a live domain name. For example, users may visit https://example.com online. A localhost website may open through http://localhost/mysite. Some local tools also create URLs like https://mysite.local. Both examples mean the website is running privately.
Why Should You Create WordPress on Localhost Before Going Live?
Creating WordPress on localhost gives you a safe testing space. You can build your website without affecting real visitors. This makes your WordPress localhost setup useful for learning and testing. You can try new ideas before making them public. It also helps you avoid mistakes on a live website.
Build Your WordPress Website Without Hosting Cost
You can create a WordPress site on localhost without buying hosting first. This is helpful for beginners and small business owners. You can plan pages, menus, and website design locally. You only need hosting when the website is ready. This saves money during the early development stage. It also gives you more time to improve your website.
Test Themes and Plugins in a Safe Environment
A localhost website lets you test themes and plugins safely. You can install plugins without breaking your live website. If a plugin causes errors, only the local site breaks. This makes WordPress local development safer and easier. You can also compare themes before choosing the final one. This helps you build a better website with confidence.
Learn WordPress Without Pressure or Public Mistakes
A local website is perfect for learning WordPress basics. You can create pages, posts, menus, and categories freely. You can also test settings without worrying about visitors. This makes a Localhost WordPress tutorial useful for new users. You can repeat steps until you understand everything clearly.
Fix Website Issues Before Publishing Online
Localhost helps you find issues before the website goes live. You can test forms, buttons, layouts, and mobile views. You can also check plugin conflicts and design problems. This makes your WordPress installation guide more practical and useful. It helps you launch a cleaner and safer website.
Work Faster During Website Development
When you run WordPress locally, pages often load faster. Files run directly from your computer, not remote hosting. This helps developers complete design and testing work quickly. A WordPress offline installation also helps during internet issues. You can continue working on your website without public access.
Things You Need Before Creating a WordPress Website on Localhost
Before you start your WordPress localhost setup, prepare a few basic things. This will make the process smooth and simple. A local website works from your computer system. So, your computer must support the needed files and tools. You do not need advanced coding knowledge for this setup. You only need the right tool and clear steps. This section will help you prepare everything before installation.
Use a Good Computer or Laptop for Local WordPress Setup
You need a working computer or laptop for local setup. It can be Windows, macOS, or Linux based. The system should have enough storage and memory. WordPress files, themes, plugins, and images need local space. If your system is very slow, setup may feel difficult. Close extra programs before starting the installation process.
Choose a Simple Local WordPress Tool for Beginners
You need a local tool to run WordPress locally. This tool creates a private server on your computer. It also manages PHP, database, and WordPress files. LocalWP is a good option for most beginners. It creates websites quickly and avoids many manual steps. WordPress Studio is another useful option for simple testing.
Prepare Your WordPress Admin Login Details
Before you install WordPress on localhost, prepare admin details. You will need these details during website creation. Keep your username simple but not too common. Use a strong password for better safety. Add an email address you can access easily. You should also prepare your website name before starting.


Keep Enough Storage Space for Website Files
A localhost WordPress website stores data on your computer. This includes WordPress files, themes, plugins, images, and backups. If you upload many images, storage use can increase quickly. Keep enough free space before starting your setup. This helps your website work without sudden system issues.
Create a Clear Website Plan Before Installation
A clear website plan saves time after installation. You should know what type of website you need. It may be a blog, business site, portfolio, or store. Create a basic page list before starting the setup. This helps you build the site in proper order. Also prepare your logo, brand colors, and content ideas
How to Create and Run a WordPress Website on Localhost
Now you can start the actual website setup process. This section works as a simple Localhost WordPress tutorial. It explains each step in an easy way. You can follow these steps using LocalWP or similar tools. LocalWP is easier because it handles most setup tasks. It creates the database and installs WordPress automatically.
Step 1: Choose the Right Local WordPress Tool
- First, choose a tool to run WordPress locally.
- LocalWP is a simple option for beginners.
- It helps you create a local WordPress website quickly.
- You can also use WordPress Studio for local testing.
- For beginners, LocalWP is the easiest choice.
Step 2: Download and Install the Local Tool
- Go to the official website of the tool.
- Download the correct version for your computer.
- Open the downloaded setup file.
- Follow the steps shown on your screen.
- Open the tool after installation.
Step 3: Create a New Local WordPress Website
- Open the local WordPress tool.
- Click the option to create a new site.
- Add your website name.
- Use a simple name like my-test-website.
- The tool will create your local website setup.
Step 4: Choose the Environment Settings Carefully
- The tool may ask for environment settings.
- Beginners should choose the preferred option.
- This option uses ready-made settings.
- You do not need to change PHP or database settings.
- This makes the setup easier and faster.
Step 5: Add Your WordPress Admin Information
- Now add your WordPress login details.
- Enter your username.
- Enter a strong password.
- Add your admin email address.
- Save these details safely.
- You need them to log in later.
Step 6: Start the Local WordPress Website
- After adding details, start the setup process.
- The tool will install WordPress for you.
- It will also create the database.
- Wait until the setup is complete.
- Now your local WordPress site is ready.
Step 7: Log In to the WordPress Dashboard
- Open the admin area from the tool.
- Enter your username and password.
- You will see the WordPress dashboard.
- From here, you can manage your website.
- You can add pages, posts, themes, and plugins.
Step 8: Configure the Basic WordPress Settings
- Go to the WordPress settings area.
- Add your site title.
- Add your tagline.
- Set the correct timezone.
- Go to permalink settings.
- Choose the “Post name” option.
- Remove sample content if not needed.
Step 9: Choose a Lightweight WordPress Theme
- Go to Appearance → Themes.
- Choose a clean and simple theme.
- Pick a theme that works well on mobile.
- Avoid heavy themes during testing.
- You can change the theme anytime.
Step 10: Install Only the Required WordPress Plugins
- Go to Plugins → Add New.
- Install only the plugins you need.
- You may install an SEO plugin.
- You may install a contact form plugin.
- You may also add backup and security plugins.
- Avoid adding too many plugins.
Step 11: Create the Important Website Pages
- Now create the main website pages.
- Start with the home page.
- Then create the about page.
- Add service pages if needed.
- Create a blog page.
- Add a contact page.
- Add a privacy policy page.
Step 12: Test Your Local WordPress Website Properly
- Open your website frontend.
- Check all pages carefully.
- Test menu links.
- Check buttons and forms.
- Review images and layout.
- Test the website on mobile view.
- Fix issues before moving the website live.
- This helps you launch a better WordPress website.
Common Localhost WordPress Problems and Easy Fixes
Even a simple WordPress localhost setup can show some issues. Most problems happen because local tools, files, or settings need changes. The good thing is that these issues are usually easy to fix. You should check one problem at a time. This helps you find the exact cause quickly. A careful check makes your Localhost WordPress tutorial more useful.
WordPress Website Is Not Opening on Localhost
Sometimes your local WordPress site may not open. First, check if your local tool is running properly. If you use LocalWP, start the site again. Also check the local website URL carefully. A small typing mistake can stop the page from loading. Restart the local tool if the issue continues. This often fixes basic loading issues quickly.
Database Connection Error Appears During Local Setup
A database error means WordPress cannot connect to its database. This can happen when the database service stops working. Restart your local website tool and check again. If needed, open the database tool from your local app. Make sure the database was created correctly during setup. This issue is common during WordPress offline installation.
WordPress Login Page Is Not Working Properly
You may sometimes face login issues on localhost. First, check your username and password carefully. Make sure there are no extra spaces. If you forgot the password, reset it from WordPress. Some local tools also allow password reset from database access. Keep login details saved safely during WordPress local development.
Permalinks Show 404 Error on Local Website
Permalink issues are common after setup or migration. Go to Settings and open the Permalinks page. Choose the “Post name” option for clean URLs. Then click the save button once again. This refreshes WordPress URL rules inside the local site. It usually fixes local page 404 errors.
Plugins Do Not Work Correctly on Localhost
Some plugins need live server access to work fully. Payment plugins, email plugins, and API tools may fail locally. License-based plugins may also need online verification. Test only important plugin features during local development. Final testing should happen after moving the site live.
Emails Are Not Sending From Local WordPress
Localhost websites usually cannot send emails by default. Contact forms may submit but emails may not arrive. You can use SMTP tools or email testing plugins. These tools help check form messages safely. This is useful before launching the live website.
Conclusion
Creating a WordPress website on localhost is a safe and smart starting point. It gives you space to build, test, and improve your website privately. You can check themes, plugins, pages, menus, forms, and layouts before visitors see them. This helps you avoid many common live website problems. It also gives beginners more confidence while learning WordPress.
A localhost setup is also useful for developers and website owners. You can test updates, fix design issues, and review plugin conflicts first. Once everything works well, you can move the website to live hosting. This creates a smoother launch process and reduces technical risks.
For more information about WordPress setup, migration, error fixing, or website testing, you can visit 24×7 WP Support You can also call their United States and Canada toll-free number at +1-888-818-9916 for WordPress-related guidance.

Brian is a WordPress support specialist and content contributor at 24×7 WP Support. He writes practical, easy-to-follow guides on WordPress troubleshooting, WooCommerce issues, plugin and theme errors, website security, migrations, performance optimization, and integrations. With a focus on solving real website problems, Brian helps business owners, bloggers, and online store managers keep their WordPress sites running smoothly.
