
What Is Ninja Forms in WordPress? Is It Free and How to Use It
Introduction
A WordPress website needs clear ways to connect with visitors. A contact form is one of the easiest options. It helps users send questions, service requests, feedback, or booking details. It also helps website owners collect useful information without showing an email address publicly.
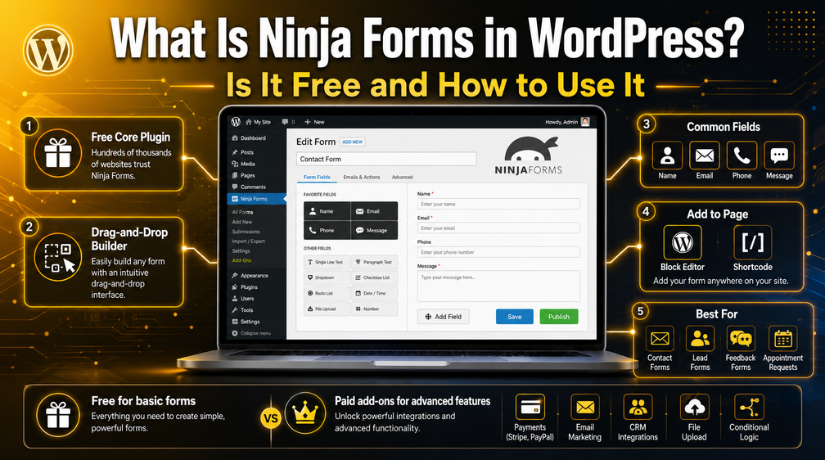
Ninja Forms in WordPress is a simple plugin for creating forms. It is useful for beginners, small business owners, bloggers, and service websites. Users can build basic forms without writing code. This makes it a helpful choice for websites that need quick contact options.
Many USA business websites use forms to collect leads and support requests. A good form should be easy to fill out. Additionally, it must to function properly on both desktop and mobile platforms. When a form is simple, users are more likely to submit it.
This guide explains what Ninja Forms is and why people use it. It also helps beginners understand its main purpose before creating a form.
Understanding Ninja Forms and Its Main Purpose
Ninja Forms is a plugin for creating forms in WordPress. It helps users create forms inside the WordPress dashboard. The main purpose is to make form creation simple and flexible. To create a functional form, users do not need to know how to code.
Common form fields are simple to add with Ninja Forms. These fields may include name, email, phone number, message box, dropdowns, and checkboxes. Each field can be edited based on the website’s needs. This gives users better control over the form layout.
Here are some common uses of Ninja Forms:
- Contact forms for customer questions
- Service inquiry forms for business leads
- Feedback forms for visitor opinions
- Appointment request forms for service websites
- Simple lead forms for follow-up calls
Understanding what Ninja Forms is helps users choose it for the right purpose. It is best for websites that need clean and simple forms. It also supports better communication between visitors and website owners.
Is Ninja Forms Free for WordPress Users?
Many beginners first ask whether Ninja Forms is free. The simple answer is yes, the core plugin is free. It can be installed by WordPress users from the WordPress plugin directory. This free version is useful for basic form needs.
The free plugin works well for simple contact forms. It can also support basic inquiry forms and feedback forms. This gives most small websites a good starting point. A business can collect names, emails, phone numbers, and messages. This helps website owners connect with visitors easily.
But it’s crucial to recognize the boundaries. Some advanced features might not be available in the free version. Some business websites need more options as they grow. These extra features may require paid add-ons or plans.
Paid features may be useful for:
- Online payment forms
- Email marketing connections
- CRM integrations
- Advanced form layouts
- File upload options
- Conditional form logic
- Extra design controls
So, whether Ninja Forms is free depends on your needs. For basic forms, the free plugin can work well. For advanced business forms, paid options may be needed.
This makes Ninja Forms a flexible choice for many users. The free plugin is a good place to start. Later, you can upgrade only when your website needs more features. This is helpful for small businesses, bloggers, and service websites.
Before using any form plugin, check your website goals. A simple contact page may not need paid tools. But a lead form with payments may need extra support. Choosing the right setup helps avoid future problems.
How to Install Ninja Forms in WordPress
Before you access Ninja Forms, you need to install it first. The process is simple and can be done from the WordPress dashboard. Coding expertise is not required for this stage.
Log in to your WordPress admin area first. Then, go to the left-side menu and click Plugins. After that, click Add New. In the search box, type Ninja Forms. WordPress will show the plugin in the search results.
Click the Install Now button next to the Ninja Forms plugin. After the installation is complete, click Activate. Once activated, the plugin will be ready to use on your website.
After activation, you should see the Ninja Forms option in your WordPress dashboard menu. From there, you can create forms, manage settings, and check submissions.
If the plugin does not appear, refresh your dashboard first. You should also check if the plugin was activated correctly. Your user role might not have admin access if you are still unable to locate it.
Where You Can Find Ninja Forms in the WordPress Dashboard
After installation, you can access Ninja Forms from the WordPress dashboard. Once the plugin is active, it usually appears in the left admin menu. This menu helps you manage forms from one place.
This is the main area for form setup and control. From there, you can create new forms, edit old forms, and manage settings. You can also check form submissions if your setup stores them.
If you want to know how to access Ninja Forms, follow this path. Access your WordPress admin area by logging in. Take a look at the menu on the left. Find the option named “Ninja Forms.” Click it to open the forms dashboard.
Inside the Ninja Forms area, you can usually manage:
- Existing forms
- New form creation
- Form settings
- Email notifications
- Form submissions
- Add-ons or extensions
If you cannot see Ninja Forms, check a few things. First, confirm the plugin is installed. Next, make sure it is activated. Also, check whether your user role has admin access.


Sometimes, a website may hide menu items for some users. This can happen on managed WordPress websites. In that case, an administrator should check access rights.
Using the dashboard correctly makes form management easier. It also helps you update forms without editing code. This is one reason many beginners prefer Ninja Forms.
How to Create Your First Form with Ninja Forms
Ninja Forms makes it easy to learn how to construct a form. The plugin gives users a clear form-building area. You can add fields, change labels, and save the form quickly. This makes it helpful for beginners and business website owners.
First, log in to your WordPress dashboard. Then, go to the Ninja Forms menu from the left side. Click the option to add a new form. You may see a blank form option or ready-made templates. A blank form gives more control. A template can save time for basic needs.
Start with the fields your website really needs. Add only the fields that are necessary for a basic contact form. Too many fields can make users leave the page. A short form is often easier to complete.
You can add these basic fields:
- Name field
- Email address field
- Phone number field
- Message box
- Dropdown field, if needed
- Checkbox field, if needed
After adding fields, edit each field label clearly. A label tells users what details to enter. For example, use “Your Name” instead of only “Name.” Use “Your Email Address” instead of “Email.” Clear labels reduce mistakes and improve form quality.
Next, decide which fields should be required. Only mark important fields as required. Usually, name, email, and message fields are enough. Avoid making every field required. This can make the form feel hard to complete.
Then, check the email notification settings. These settings decide where form messages are sent. Add the correct business email address. This helps ensure you receive every form submission. Also, review the email subject line. A clear subject helps identify form messages quickly.
After setting the fields and notifications, save the form. Then, use the preview option before placing it on a live page. Previewing helps you find small issues early. Check the form layout, field labels, and button text. Also, test the form on mobile if possible.
A good form should be simple, clear, and easy to submit. It should ask only for useful details. This improves user experience and can increase form submissions. With Ninja Forms, WordPress users can create basic forms without coding. This makes it a practical tool for contact pages, service pages, and lead forms.
How to Add a Ninja Form to a WordPress Page
Publishing your form is the next step after developing it. Many beginners want to know how to add it to a page. Ninja Forms makes this process simple inside WordPress.
First, navigate to Pages on your WordPress dashboard. Select the page on which you wish the form to be displayed. Another option is to make a new contact page. After opening the page editor, click the add block option. Search for the Ninja Forms block and select it.
Now, choose your form from the available form list. WordPress will place the selected form inside the page. If necessary, you can move the block. Put it in a visible location for guests. A contact form usually works well below short page content.
Some websites may use the classic editor or another page builder. If so, you might require a shortcode. Ninja Forms usually provides a shortcode for each form. Paste that shortcode into the page editor after copying it. Next, make changes to the page or publish it.
Open the page on the front end after publishing. Examine how users see the form. Submit a test message to confirm everything works.
Basic Checks Before Making the Form Live
Before using the form on your live website, test it carefully. Small checks can prevent missed messages and user problems.
Review these points before sharing the page:
- Check all form fields
- Confirm required fields
- Test the email notification
- Review the confirmation message
- Check the mobile view
- Submit one test entry
These checks help protect important business leads. They also improve the visitor experience on your website.
When You May Need WordPress Support for Ninja Forms
Sometimes, a form may not work as expected. The form may not display on the page. Emails may not reach your inbox. Submissions may also fail due to plugin conflicts.
Caching, theme issues, or mail settings can also create problems. If the form collects business leads, quick fixing is important. 24×7 WP Support can help review Ninja Forms setup, display issues, and email delivery problems.
Conclusion
Ninja Forms in WordPress is useful for creating simple forms. It helps users build forms without coding skills. The free version can handle many basic needs. You can create a form, add it to a page, and test it easily.
A working form supports better communication with website visitors. It also helps collect leads and support requests. Always test your form before using it live.

Brian is a WordPress support specialist and content contributor at 24×7 WP Support. He writes practical, easy-to-follow guides on WordPress troubleshooting, WooCommerce issues, plugin and theme errors, website security, migrations, performance optimization, and integrations. With a focus on solving real website problems, Brian helps business owners, bloggers, and online store managers keep their WordPress sites running smoothly.
