
What Is LiteSpeed in WordPress and How to Install It
Introduction
Website speed is very important for every WordPress website. A slow website can frustrate visitors and reduce engagement. It can also affect leads, sales, and user trust. When pages take too long to load, users often leave. This can increase bounce rate and reduce conversions.
For business websites, speed is even more important. Visitors expect quick pages and smooth browsing. Search engines also consider page experience when ranking websites. That is why many website owners look for better speed solutions.
LiteSpeed is one such solution for WordPress performance. It helps websites load faster by improving server response and caching. Many hosting providers now use LiteSpeed because it handles WordPress sites well. It works especially well with the LiteSpeed Cache WordPress plugin.
In this guide, we will explain What is LiteSpeed in WordPress. We will also cover how it supports faster loading. Later sections will explain installation, setup, and safe configuration
What Is LiteSpeed in WordPress?
LiteSpeed is a high-performance web server technology. It helps a hosting server deliver website files quickly. In simple words, it controls how your website responds to visitors.
Many people think LiteSpeed is only a WordPress plugin. That is not fully correct. LiteSpeed is mainly server software used by hosting companies. The plugin is a separate tool inside WordPress.
A LiteSpeed WordPress setup works best when both parts connect properly. The server handles website requests at hosting level. The plugin controls cache and optimization from your dashboard.
LiteSpeed can store ready-made versions of your web pages. This means your server does not rebuild pages every time. Instead, it sends a saved page copy to visitors. This process helps reduce loading time and server load.
It is useful for many WordPress websites, including:
- Business websites
- Blogs and news websites
- WooCommerce stores
- Service-based websites
- High-traffic landing pages
LiteSpeed is also different from common server options like Apache. It focuses strongly on speed, caching, and better resource handling. This makes it a popular choice for WordPress performance improvement.
How LiteSpeed Works With WordPress
WordPress loads pages by using PHP files and database queries. Each time someone visits your site, WordPress collects fresh data. It checks the theme, plugins, content, menus, and database details. This process can take time on large or busy websites.
LiteSpeed helps reduce this repeated work. It creates cached versions of your website pages. A cached page is a ready-made copy of a page. When visitors open that page, LiteSpeed serves the saved version. This makes the page load much faster for most users.
A LiteSpeed WordPress setup works at the server level. This means caching happens before WordPress processes every request. It can reduce pressure on PHP and the database. As a result, your hosting server can respond more quickly.
The LiteSpeed Cache WordPress plugin makes this easier to manage. It gives you cache controls inside your WordPress dashboard. You can clear cache, manage page rules, and adjust speed settings. You can also control image, CSS, and JavaScript settings.
Why Use LiteSpeed for a WordPress Website?
LiteSpeed is useful because speed affects every visitor’s experience. Fast pages help users browse more pages without waiting. This can improve trust, engagement, and lead generation.
For WooCommerce stores, speed can affect product views and checkout flow. A slow cart or checkout page can lose buyers. LiteSpeed helps reduce delays when settings are configured correctly.
Main benefits include:
- Faster page loading for normal visitors
- Lower server load during traffic spikes
- Better handling for blogs and business websites
- Improved browsing on desktop and mobile devices
- Helpful support for WooCommerce performance
- Better technical base for SEO performance
The best LiteSpeed cache settings for WordPress depend on your website. A simple blog may need basic cache settings only. A WooCommerce store needs safer rules for cart and checkout pages. So, LiteSpeed should be tested after every major setting change.
LiteSpeed Web Server vs LiteSpeed Cache Plugin
Many beginners confuse LiteSpeed Web Server with the plugin. Both are connected, but they are not the same. LiteSpeed Web Server works at the hosting server level. It helps your server deliver website files faster.
The LiteSpeed Cache WordPress plugin works inside your WordPress dashboard. It gives you simple controls for cache and speed settings. You can manage page cache, image settings, and file optimization. You can also clear cache after editing your website.
A full LiteSpeed WordPress setup works best with both tools. The server handles caching at a deeper level. The plugin gives you control from the WordPress admin area. This combination improves speed without complex server work.
Here is the simple difference:
- LiteSpeed Web Server is managed by your hosting provider.
- LiteSpeed Cache plugin is managed inside WordPress.
- Best performance comes when both work together.
- Server-level cache needs LiteSpeed or OpenLiteSpeed hosting.
Before Installing LiteSpeed in WordPress
Before starting the LiteSpeed Cache setup WordPress process, check your hosting. Ask your hosting provider if your server supports LiteSpeed. Some features work only on LiteSpeed or OpenLiteSpeed hosting.
You should also take a full website backup first. Cache settings can affect layout, scripts, and forms. A backup helps you restore the site if needed.
Also, disable other cache plugins before installing LiteSpeed Cache. Running many cache plugins together can create conflicts. It may cause broken design or old content display.
Before installation, check these points:
- Confirm LiteSpeed support with your hosting company.
- Take a full backup of files and database.
- Disable other cache or speed plugins.
- Update WordPress, themes, and plugins.
- Use a staging site if your host provides one.
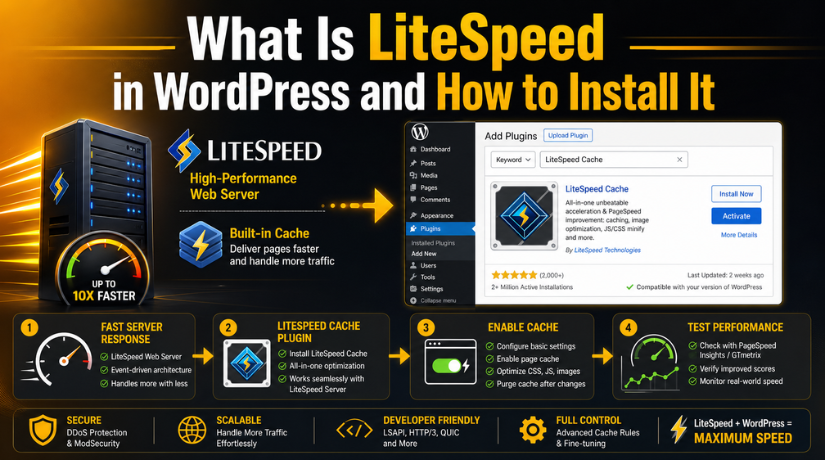
How to Install LiteSpeed in WordPress
The plugin installation process is simple for most users. You only need WordPress admin access.
Follow these steps:


- Log in to your WordPress dashboard.
- Go to Plugins > Add New.
- Search for LiteSpeed Cache.
- Click Install Now on the plugin.
- Click Activate after installation finishes.
- Open the new LiteSpeed Cache menu.
- Review basic settings and hosting compatibility.
This is the easiest method for how to install LiteSpeed in WordPress. After activation, avoid changing every setting at once. Start with basic cache options and test your website carefully.
Basic LiteSpeed Cache Setup in WordPress
After activation, start with a simple setup. Do not enable every option at once. Some advanced options may affect design or scripts.
Follow these steps for a safe LiteSpeed Cache setup WordPress process.
Step 1: Open LiteSpeed Cache Settings
- Log in to your WordPress dashboard first.
- Then go to LiteSpeed Cache > Cache from the menu.
- This section controls your main website cache settings.
Step 2: Enable Cache
- Find the Enable Cache option.
- Turn this setting ON and save your changes.
- This allows LiteSpeed to store ready page copies.
Step 3: Keep Default Settings First
- Keep most default settings during the first setup.
- Default options are safer for new WordPress users.
- They help you avoid sudden layout or function issues.
Step 4: Enable Cache for Normal Visitors
- Keep cache active for logged-out visitors.
- Most website visitors are not logged in users.
- Caching these pages helps improve loading speed safely.
Step 5: Clear Cache After Changes
- Clear cache after changing content, design, or settings.
- Go to LiteSpeed Cache > Toolbox > Purge.
- Then click Purge All to refresh cached pages.
Step 6: Test Your Website
- Open your website in a private browser window.
- Check important pages on desktop and mobile devices.
- Review menus, forms, images, buttons, and page layout.
How to Configure LiteSpeed Cache in WordPress
Once basic cache works, configure important speed areas carefully.
This helps you improve performance without breaking website features.
Step 1: Configure Cache Settings
- Go to LiteSpeed Cache > Cache.
- Review page cache, browser cache, and purge options.
- Enable only settings you understand and can test.
Step 2: Configure CSS and JavaScript
- Go to Page Optimization in LiteSpeed Cache.
- Enable CSS minify or JavaScript minify one by one.
- Test your website after every setting change.
Step 3: Configure Image Optimization
- Open the image optimization section.
- Enable image optimization and lazy load after testing.
- This can reduce image weight and improve page speed.
Step 4: Clean the Database Carefully
- Use database cleanup only when needed.
- Remove expired data, revisions, and unused temporary records.
- Take a backup before cleaning database items.
Best LiteSpeed Cache Settings for WordPress Beginners
The best LiteSpeed Cache settings for WordPress depend on your website type. A blog, business website, and WooCommerce store need different rules. So, start with safe settings and test each change.
Use these beginner-friendly settings first:
- Enable Cache: ON
- Cache Logged-in Users: OFF for most websites
- Cache Mobile: ON
- Browser Cache: ON
- HTML Minify: ON
- CSS Minify: ON after testing
- JS Minify: ON after testing
- Lazy Load Images: ON
- Object Cache: ON only if hosting supports it
These settings create a strong starting point for speed. They also reduce the risk of broken layouts. After each setting change, clear the cache and check your site.
Common Issues After Installing LiteSpeed Cache
LiteSpeed Cache is powerful, but settings need careful testing. Some options may affect themes, plugins, sliders, or forms. This usually happens after CSS or JavaScript optimization changes.
Common issues may include:
- Website layout appears broken after CSS optimization.
- Menu or slider stops working after JavaScript settings.
- New changes do not show because cache is old.
- Images load late or do not display correctly.
- WooCommerce cart or checkout behaves incorrectly.
If this happens, disable the last changed setting first. Then clear all cache and test the page again. For WooCommerce sites, never cache cart, checkout, or account pages incorrectly.
When Should You Get WordPress Support?
You should get expert help when caching affects website functions. This is important for business websites and online stores. A wrong setting can affect forms, checkout, or mobile layout.
WordPress support can help you review settings safely. Experts can also check speed issues, plugin conflicts, and server compatibility. This saves time and prevents avoidable website problems.
Conclusion
LiteSpeed is a helpful speed solution for WordPress websites. It works best with LiteSpeed hosting and correct plugin settings. The LiteSpeed WordPress setup can improve loading time and reduce server load.
Start with basic cache settings first. Then test every change on desktop and mobile. Avoid using multiple cache plugins at the same time.
If you need safe setup support, contact 24×7 WP Support. Our WordPress experts can install, configure, and test LiteSpeed Cache properly.
FAQs
1. What is LiteSpeed in WordPress?
LiteSpeed in WordPress means using LiteSpeed server technology with a WordPress website. It helps pages load faster by using server-level caching. Many users also install the LiteSpeed Cache plugin to manage cache settings from the WordPress dashboard.
2. Is LiteSpeed Cache plugin free?
Yes, the LiteSpeed Cache WordPress plugin is free to install. You can install it from the WordPress plugin directory. Some features work best when your hosting server supports LiteSpeed or OpenLiteSpeed.
3. How do I install LiteSpeed in WordPress?
You can install LiteSpeed Cache from your WordPress dashboard. Go to Plugins > Add New, search for LiteSpeed Cache, click Install Now, and then click Activate. After that, open the LiteSpeed Cache menu and start with basic settings.
4. Do I need LiteSpeed hosting for LiteSpeed Cache?
You can install the plugin on most WordPress websites. However, full server-level caching works best on LiteSpeed or OpenLiteSpeed hosting. Without LiteSpeed hosting, some advanced cache features may not work fully.
5. What are the best LiteSpeed Cache settings for WordPress?
The best settings depend on your website type. Beginners can start with cache enabled, browser cache on, mobile cache on, HTML minify on, and lazy load images on. Test CSS and JavaScript settings carefully before using them.
6. Can LiteSpeed Cache break my WordPress website?
Yes, some settings may affect your layout, menu, slider, images, or checkout pages. This usually happens after enabling CSS or JavaScript optimization. Disable the last changed setting, clear the cache, and test the website again.
Related posts:
Where Is Popup Maker in WordPress? Popup Builder Explained
WordPress Troubleshooting: When to DIY, When to Hire, and When to Rebuild
Gutenberg vs Page Builders in WordPress: Key Differences
WordPress.com vs WordPress.org: Free Plans, Official Site & Which to Choose in 2026
How to do Jotform WooCommerce integration?

Brian is a WordPress support specialist and content contributor at 24×7 WP Support. He writes practical, easy-to-follow guides on WordPress troubleshooting, WooCommerce issues, plugin and theme errors, website security, migrations, performance optimization, and integrations. With a focus on solving real website problems, Brian helps business owners, bloggers, and online store managers keep their WordPress sites running smoothly.
