
How to Learn WordPress Step by Step: Complete Beginner’s Guide
Introduction
If you’ve been putting off building a website because tech feels overwhelming, let this be the guide that changes your mind. WordPress powers more than 43% of all websites on the internet in 2026 — from personal blogs to Fortune 500 company sites — and it’s genuinely learnable by anyone with patience and the right roadmap. You don’t need to know how to code. You don’t need a computer science degree. What you do need is a clear, step-by-step plan.
This guide gives you exactly that. We’ll walk through everything from choosing your hosting to publishing your first post, written specifically for beginners who are starting from zero.
What Is WordPress and Why Learn It in 2026?
WordPress is a content management system (CMS) — a platform that lets you build and manage a website through a visual interface rather than writing raw code. It comes in two flavors: WordPress.com (a hosted service with limited customization) and WordPress.org (the self-hosted, open-source version that gives you full control). For anyone serious about building a real website, WordPress.org is the version to learn.
Why is it worth learning right now? Because the demand for WordPress skills is enormous and the barrier to entry keeps dropping. In 2026, the block editor (Gutenberg) has matured into a genuinely powerful visual builder, hosting has become cheaper and more beginner-friendly than ever, and the ecosystem of themes and plugins means you can build almost anything without touching a single line of code.
Whether you want to start a blog, sell products online, offer services, or build a portfolio, WordPress can handle it. And once you know how it works, you’ll have a skill that transfers across thousands of different websites and client projects.
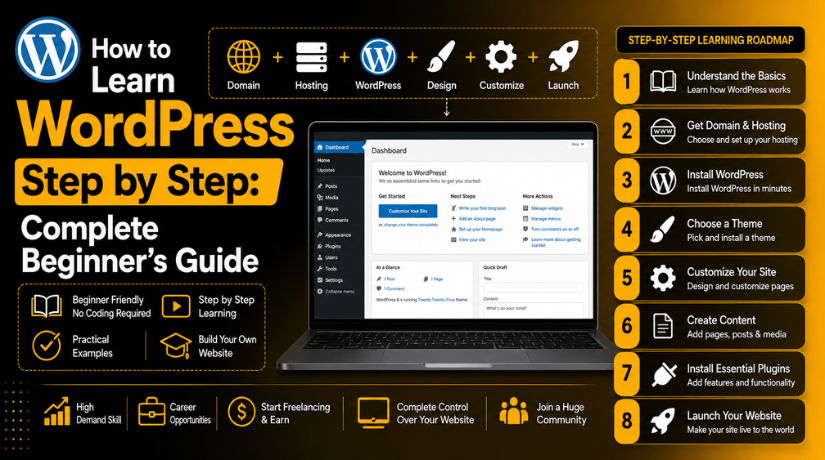
Step 1: Choose Your Hosting and Install WordPress
The first real decision you make is choosing a web host — the company that stores your website’s files and makes them accessible on the internet. For beginners, managed WordPress hosting or shared hosting plans from reputable providers make the most sense. Look for hosts that offer one-click WordPress installation, solid uptime, decent support, and reasonable pricing.
Popular beginner-friendly options include Bluehost, SiteGround, Hostinger, and DreamHost. Most of these offer starter plans under $5/month when paid annually. If budget is your primary concern, check out our breakdown of free WordPress hosting options — though be aware that free hosting comes with real limitations for a production site.
Once you’ve signed up for hosting, installing WordPress usually takes less than two minutes. Most hosts provide a one-click installer in their control panel (cPanel or a proprietary dashboard). Click install, enter your site name and admin credentials, and WordPress is live on your domain. That’s it — no FTP, no command line, no manual configuration required.
Step 2: Get Familiar with the WordPress Dashboard
After installation, navigate to yourwebsite.com/wp-admin and log in. What you see is the WordPress admin dashboard — the control center for your entire site. It can feel like a lot at first, but the structure is straightforward once you understand what each section does.
The left sidebar is your navigation menu. Here’s what the key items mean:
Posts — This is where you create blog articles and other regularly updated content. Posts are displayed in reverse chronological order and can be organized by categories and tags.
Pages — Static content that doesn’t change often lives here. Your Home, About, Contact, and Services pages will be created in this section.
Media — Your image, video, and file library. Every file you upload to WordPress ends up here.
Appearance — Theme management, menus, and widgets. This is where you control how your site looks.
Plugins — Add-ons that extend WordPress functionality. Think of them as apps for your website.
Settings — General configuration options including your site title, time zone, permalink structure, and more.
Spend thirty minutes just clicking through each menu item without changing anything. Get oriented before you start building. The dashboard is your home base — the more comfortable you are here, the faster everything else will go.
Step 3: Choose and Install a WordPress Theme
A theme controls the visual design of your site — layout, fonts, colors, and overall style. WordPress has thousands of free and premium themes available, and choosing the right one early saves you significant headaches down the road.
To install a theme, go to Appearance → Themes → Add New. You can browse the free theme directory directly from your dashboard or upload a premium theme you’ve purchased elsewhere. When evaluating themes, prioritize these factors: mobile responsiveness, loading speed, active development (recent updates), and clean, simple design that doesn’t try to do too much.
For most beginners, starting with a popular, well-supported theme is the smart move. Our guide to the most popular WordPress themes covers the top options across different use cases — from blogs to business sites to eCommerce.
Once you’ve activated a theme, you can customize it through Appearance → Customize (the WordPress Customizer) or, if your theme uses the full-site editing (FSE) approach, through Appearance → Editor. Most modern themes let you adjust colors, fonts, header and footer layouts, and more — all without code.
Step 4: Install Essential Plugins
Plugins are what make WordPress truly powerful. They’re add-ons that give your site new features — everything from contact forms and SEO optimization to image compression and security protection. The plugin directory has over 60,000 free options, and there are thousands more premium plugins available from third-party developers.
The key is not to go overboard. Too many plugins slow down your site and create security risks. Here are the core categories every beginner site needs:
SEO — Yoast SEO or Rank Math to optimize your content for search engines.


Security — Wordfence or Sucuri to protect your site from attacks and malware.
Backups — UpdraftPlus to automatically back up your site to cloud storage.
Caching/Speed — WP Super Cache or W3 Total Cache to improve loading times.
Contact Forms — WPForms or Contact Form 7 to add inquiry forms to your site.
To install a plugin, go to Plugins → Add New, search for the plugin name, click Install Now, then Activate. Most reputable plugins have setup wizards that walk you through initial configuration.
Step 5: Create Your First Pages and Posts
With your site’s foundation in place, it’s time to create content. Start with your essential static pages first:
Your Home page is the first impression visitors get — make it clear, focused, and visually strong. Your About page tells your story and builds trust. Your Contact page makes it easy for visitors to reach you. If you’re offering services or products, those pages come next.
To create a page, go to Pages → Add New. This opens the block editor (Gutenberg). The block editor works by adding individual blocks of content — paragraphs, headings, images, buttons, columns — and arranging them visually. It’s intuitive once you get a feel for the drag-and-drop flow. Press the + button to add a new block, or just start typing and hit Enter to create a new paragraph block.
For blog posts, the process is identical — just navigate to Posts → Add New instead. Posts should be assigned a category (create these under Posts → Categories) and given descriptive tags to help with organization and discoverability.
After you’ve created your pages, set your Home and Blog pages in Settings → Reading. This tells WordPress which page to display as your front page versus your blog index.
Step 6: Set Up Navigation Menus
A well-structured navigation menu helps visitors find what they’re looking for — and it matters for SEO too. WordPress makes menu management straightforward through Appearance → Menus.
Create a new menu, add your key pages to it (Home, About, Services, Blog, Contact), and assign it to a menu location (typically “Primary Menu” or “Header Menu”). You can also create dropdown submenus by dragging menu items slightly to the right under a parent item. For a deeper walkthrough of creating navigation structures, see our guide on how to add a drop-down menu in WordPress.
Step 7: Learn WordPress SEO Basics
Building a site is only half the battle — you also need people to find it. Search engine optimization (SEO) is the practice of making your content visible in Google and other search engines. The good news is that WordPress, especially with an SEO plugin installed, makes the basics very accessible.
The Yoast SEO plugin (one of the most widely used WordPress plugins in 2026) adds an SEO panel below each post and page in the editor. This panel lets you set a focus keyphrase, write a custom meta description, customize how your content appears in search results, and get real-time feedback on your content’s readability and SEO quality.
Key SEO fundamentals for WordPress beginners include: writing descriptive, keyword-rich page titles; setting clean permalink structures (go to Settings → Permalinks and choose “Post name”); adding alt text to all images; building internal links between related posts; and ensuring your site loads quickly on mobile devices. Our comprehensive Yoast SEO plugin tutorial walks through all the settings in detail.
Step 8: Launch Your Site and Keep Learning
Once your key pages are in place, your theme is configured, your essential plugins are running, and you’ve published at least a few posts, you’re ready to launch. Before you remove any “Coming Soon” page or share your URL, run through a quick pre-launch checklist: test all contact forms, check that your site looks correct on mobile, verify that Google Analytics or a similar tracking tool is set up, and make sure Wordfence or your security plugin is active.
After launch, the learning continues. WordPress is a platform with genuine depth — there’s always more to discover. Consider bookmarking resources like the official WordPress documentation at learn.wordpress.org, the WPBeginner YouTube channel for video walkthroughs, and the 24×7 WP Support blog for ongoing WordPress tips, troubleshooting guides, and plugin reviews.
How Long Does It Take to Learn WordPress?
This is one of the most common questions beginners ask, and the honest answer is: it depends on what “learning WordPress” means to you. If your goal is to have a functional, reasonably polished website up and running, most people get there in one to two weekends of focused effort. Following a structured guide like this one dramatically accelerates the process.
If you want to become genuinely proficient — able to troubleshoot problems, customize themes, evaluate plugins intelligently, and optimize for SEO — plan for two to three months of regular use. The best way to learn WordPress is by actually using it. Build a real site (even a personal one), publish real content, break things and fix them, and look things up as you go. That hands-on experience is worth more than any amount of passive reading.
For those who want to go deeper into development — building custom themes or plugins, for example — you’ll want to learn the basics of PHP, HTML, CSS, and JavaScript. But that’s an optional advanced path, not a prerequisite for building a great WordPress site.
Get Expert WordPress Help When You Need It
Learning WordPress on your own is absolutely doable, but there are times when having expert backup makes all the difference. Whether you’ve run into a plugin conflict that’s breaking your site, need help migrating to a new host, or just want someone to review your setup and catch any issues before they become problems, the team at 24×7 WP Support is here to help.
We offer round-the-clock WordPress support for website owners at every skill level — from absolute beginners to seasoned developers. Get in touch with our team today and let us take the technical stress off your plate so you can focus on building something great.
Related posts:
How to Enable GoDaddy Payments on Managed WordPress in 2026
Wondering How to Improve WordPress Accessibility? We Have Got Your Back
Does WordPress Support Email and SMTP? How to Send Emails From WordPress? Complete Guide
Best QR Code Plugins for WordPress
How to Start a Blog on WordPress: Complete Beginner's Guide

Brian is a WordPress support specialist and content contributor at 24×7 WP Support. He writes practical, easy-to-follow guides on WordPress troubleshooting, WooCommerce issues, plugin and theme errors, website security, migrations, performance optimization, and integrations. With a focus on solving real website problems, Brian helps business owners, bloggers, and online store managers keep their WordPress sites running smoothly.
