
How to Install & Use Cookiebot in WordPress (Step-by-Step Guide)
Introduction
Running a WordPress website is not only about design and content today. It is also about user trust, privacy, and clear data use. Many websites now load cookies from themes, plugins, analytics tools, chat widgets, videos, and marketing scripts. Most site owners do not even notice how many tools place cookies in the background. That is where a smart consent solution becomes useful. Cookiebot WordPress setup helps website owners manage visitor consent in a cleaner way.
It gives users more control over what they accept on your site. It also helps website owners present cookie information in a more organized format. This matters even more when your site collects visitor behavior data for marketing or tracking. A proper consent tool can support both user trust and website management. The Cookiebot plugin WordPress users install is made for this exact purpose. It helps connect your WordPress site with a consent system that can scan cookies, show a banner, and manage visitor choices. In this guide, you will learn what Cookiebot is, how it works in WordPress, and why many website owners now prefer it over a simple banner plugin.
What Is Cookiebot in WordPress and How It Works on Your Website
Cookiebot in WordPress is a consent management tool for websites. In simple words, it helps your site ask visitors for cookie permission. It also helps organize and control cookies based on user choices. Cookiebot CMP WordPress users rely on is more than a small popup. It works as a full consent system connected to your website. Once active, it can scan your site and detect cookies. It can then group them into categories for easier control. When a visitor lands on your site, the banner shows consent options. The visitor can accept, reject, or customize those options. This makes the process clearer and more user friendly.
The biggest job of Cookiebot is to manage cookie consent properly. A normal website may use necessary cookies, preference cookies, statistics cookies, and marketing cookies. Many site owners only think about a banner message. However, real consent management needs more than a simple notice. Cookiebot helps your website respond to visitor choices in a better way. That is why many people call it a smart Cookie consent WordPress plugin instead of a basic alert tool. It adds more control, more clarity, and better tracking of consent actions.
Why You May Need Cookiebot On a WordPress Website
Your Website May Already Use More Cookies Than You Think
Many WordPress websites load cookies without the owner noticing. Themes, plugins, analytics tools, chat boxes, videos, and ad scripts can all add cookies. Even a small website can collect more data than expected. Cookiebot helps you see and manage that activity better.
A Simple Cookie Notice Is Often Not Enough
A basic banner only tells users that cookies exist. It does not always explain what those cookies do. It may also fail to give clear consent choices. Cookiebot WordPress setup gives visitors better control over what they accept.
Visitors Now Expect Clear Privacy Choices
People want to know how websites use their data today. They do not want hidden tracking running in the background. They want simple and honest choices. Cookiebot CMP WordPress users trust helps make that process clearer and easier.
Your Site May Use Analytics And Marketing Tools
Many websites use Google Analytics, Meta Pixel, ads, and remarketing tools. These tools often depend on cookies to track user actions. That means consent becomes more important for everyday site use. Cookiebot plugin WordPress users install can help manage this in a better way.
It Helps Build More Trust With Visitors
Trust matters on every website, especially business and eCommerce sites. When users see a clean and clear consent banner, they feel safer. They can understand what is happening before they continue browsing. That makes your site look more professional and user friendly.
It Supports A Better GDPR Cookie Consent WordPress Setup
Many site owners want a stronger privacy setup for their website. They do not want to rely on a weak notice bar. They want a system that scans cookies and supports real consent choices. Cookiebot helps create a more complete GDPR cookie consent WordPress solution.
Your Website Changes Over Time
Most WordPress websites grow month by month. New plugins get added. Old tools get replaced. Marketing scripts and features also change. Cookiebot setup WordPress users follow helps keep consent management updated as the site grows.
It Makes Cookie Management Easier To Handle
Managing cookies manually can become confusing very fast. It is hard to track every script on every page. Cookiebot helps organize cookie categories and consent choices in one place. That saves time and makes ongoing website management easier.
It Is Useful For Many Types Of WordPress Websites
Cookiebot is not only for large company websites. It also helps blogs, business sites, WooCommerce stores, agency websites, and lead generation pages. Any site using tracking tools or third-party content can benefit from it. That makes it a practical Cookie consent WordPress plugin for many users.
Things You Should Prepare Before Installing Cookiebot in WordPress
Before you start the Cookiebot setup WordPress process, it is smart to prepare a few things first. This makes the installation smoother and helps you avoid setup errors later. The current WordPress flow connects your site to Cookiebot by using a Domain Group ID, and the plugin then uses that connection to load the banner and manage settings correctly.
Make Sure You Have Full Access to Your WordPress Admin Area
You need access to the WordPress dashboard before anything else. You must be able to install plugins, activate them, and open plugin settings. Since the Cookiebot plugin WordPress users install works from inside the admin area, limited access can stop the setup before it even starts.
Create a Cookiebot Account Before You Begin the Website Connection
You also need a Cookiebot account before the plugin can work fully. The current setup flow starts by creating an account or connecting an existing one, because the WordPress plugin is only the connector between your website and your Cookiebot CMP account. This is an important step if you want a proper Cookiebot CMP WordPress setup.
Add Your Website Domain in Cookiebot Before Connecting the Plugin
After creating your account, add your website domain inside Cookiebot. This step matters because Cookiebot uses the domain group to run scans and apply the right banner settings to your website. Cookiebot’s own setup guide says the site scan starts after you add and save the domain, and the first scan can take up to 24 hours to complete.
Keep Your Domain Group ID Ready Before Starting the WordPress Setup
One of the most important things to prepare is your Domain Group ID, which is also called the CBID in some Cookiebot documents. This ID connects your website to the correct Cookiebot domain group. Cookiebot support also explains that the CBID is not a secret key. It is only an identifier used to match the correct settings to your domain.
Review Your Existing Tracking and Marketing Tools Before Activation
Before installing the banner, check which tracking tools your website already uses. This includes tools like Google Analytics, Google Ads, Google Tag Manager, Meta Pixel, video embeds, chat tools, and third-party marketing scripts. This review is useful because Cookiebot can manage cookie blocking and consent signals, including Google Consent Mode, but you need to know what is already active on your site before turning everything on.
Prepare Your Privacy Policy and Cookie Information Pages in Advance
It is also a good idea to review your legal pages before setup. Your privacy policy and cookie-related information should match what your website actually uses. Once Cookiebot is connected, you can also add a cookie declaration to support better transparency, so having those pages ready early makes the whole GDPR cookie consent WordPress setup cleaner and more professional.
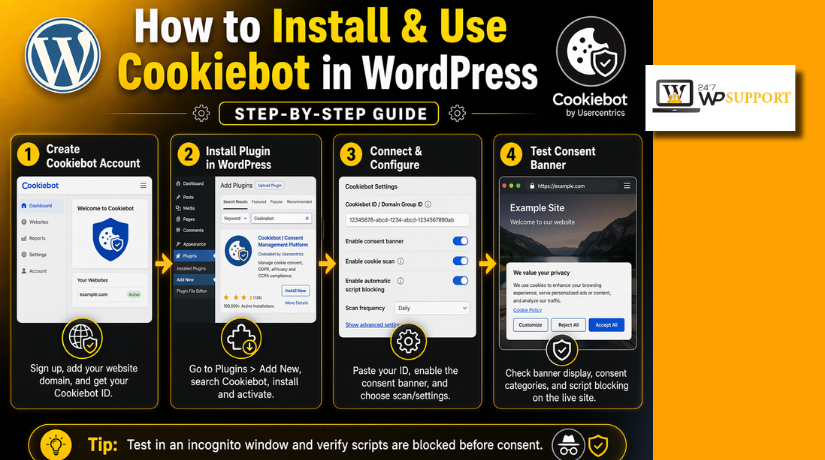
How to Install Cookiebot in WordPress the Right Way (Complete Guide)
Once your account, domain, and Domain Group ID are ready, you can begin the actual installation. The current setup is simple, but the order matters. First install the plugin, then connect your Cookiebot account data, and then test whether the banner appears correctly on the front end.
Step 1: Install and Activate the Cookiebot Plugin in WordPress
- Log in to your WordPress admin dashboard.
- Go to Plugins from the left menu.
- Click Add New Plugin at the top.
- Search for Cookiebot in the search box.
- Find the correct plugin in the results.
- Click Install Now.
- After installation, click Activate.
- Make sure the plugin is now active on your site.
Step 2: Create a New Cookiebot Account or Sign In to an Existing One
- Open the Cookiebot website in your browser.
- Create a new account if you do not have one.
- Use your existing login if you already have an account.
- Complete the basic account setup process.
- Make sure your account is ready before linking WordPress.
- Keep your login details safe for future use.
Step 3: Add Your Domain to Cookiebot and Let the First Scan Start
- Open your Cookiebot account dashboard.
- Add your website domain in the required field.
- Enter the full and correct website domain.
- Save the domain settings.
- Let Cookiebot start the first website scan.
- Wait for the scan to begin properly.
- Check later if scan results are not visible yet.
Step 4: Copy the Correct Domain Group ID From Your Cookiebot Account
- Stay inside your Cookiebot dashboard.
- Find the Domain Group ID for your website.
- Copy the ID carefully without missing any characters.
- Double-check the copied value before using it.
- Keep this ID ready for the WordPress plugin settings.
Step 5: Open Cookiebot Settings in WordPress and Paste the Domain Group ID
- Go back to your WordPress dashboard.
- Open the Cookiebot plugin settings.
- Go to the General Settings area.
- Find the field for the Domain Group ID.
- Paste the copied ID into that field.
- Check once to make sure it is correct.
- Click Save Changes.
Step 6: Save the Settings and Check Whether the Banner Appears on the Front End


- Open your website on the front end.
- Visit the homepage first.
- Check whether the cookie banner is showing.
- Test the banner on the desktop view.
- Test the banner on mobile view as well.
- Make sure the buttons are visible and working.
- Confirm that the banner looks clean and clear.
Step 7: Review the First Scan Results and Confirm the Setup Is Working Correctly
- Go back to your Cookiebot account dashboard.
- Open the scan or cookie results section.
- Review the cookies found on your website.
- Check whether the categories look correct.
- Confirm that the setup is linked properly.
- Make sure the banner and scan both are working.
- Review the settings again before moving to advanced setup.
How to Use Cookiebot in WordPress After the Installation Is Complete
Step 1: Open Your Cookiebot Settings and Check the Basic Connection
- Log in to your WordPress dashboard.
- Open the Cookiebot plugin settings.
- Make sure your Domain Group ID is connected properly.
- Confirm the plugin is active on the website.
- Check that there are no visible setup errors.
- Visit the front end once to confirm the banner loads.
Step 2: Review the Cookie Banner and Make Sure It Looks Clear
- Open your Cookiebot banner settings.
- Check the banner text carefully.
- Keep the message short, clear, and easy to understand.
- Make sure the buttons are visible and readable.
- Check that users can accept, reject, or customize consent.
- Test the banner on the desktop view.
- Test the banner on mobile view too.
Step 3: Adjust the Banner Design and Consent Options
- Choose a banner style that matches your website.
- Review the layout, colors, and button labels.
- Make sure the banner does not block important content badly.
- Set the consent options based on your site needs.
- Keep visitor choices simple and clear.
- Save the changes after every update.
Step 4: Review Your Cookie Scan Results
- Log in to your Cookiebot account dashboard.
- Open the scan results section.
- Check which cookies were found on your website.
- Review the cookie categories one by one.
- Make sure the results match your active tools.
- Recheck anything that looks missing or unclear.
Step 5: Monitor New Cookies When Your Website Changes
- Check Cookiebot after installing any new plugin.
- Review it again after adding tracking tools.
- Recheck it after adding chat tools or video embeds.
- Watch for changes after adding marketing scripts.
- Make sure new cookies are detected correctly.
- Keep scans updated as the site grows.
Step 6: Add a Cookie Declaration Page on Your Website
- Create a new page in WordPress.
- Name it something clear like Cookie Policy.
- Add the Cookie Declaration in the correct place.
- Publish the page after checking the layout.
- Link this page from your footer or legal pages.
- Make sure visitors can access it easily.
Step 7: Check That Visitors Can Manage Their Consent Properly
- Open the website as a normal visitor.
- Test the accept option on the banner.
- Test the reject option on the banner.
- Test the custom preferences option too.
- Make sure the banner responds correctly.
- Confirm users can update or withdraw consent later.
Step 8: Review Google Consent Mode If You Use Google Tools
- Open the Cookiebot settings for Google features.
- Check whether Google Consent Mode is enabled.
- Review this if you use Google Analytics.
- Review it if you use Google Ads too.
- Confirm the consent behavior matches your setup.
- Test tracking only after proper consent choices.
Step 9: Check Google Tag Manager If Your Site Uses It
- Review your Google Tag Manager setup carefully.
- Make sure tags do not fire too early.
- Check which tags depend on consent.
- Confirm Tag Manager works with Cookiebot correctly.
- Test important tags after banner interaction.
- Fix tag rules if behavior looks wrong.
Step 10: Keep Your Privacy and Cookie Information Updated
- Review your Privacy Policy page regularly.
- Update your Cookie Policy when needed.
- Make sure the policy matches real website behavior.
- Add new tools only after checking consent impact.
- Keep legal pages aligned with scan results.
Step 11: Test the Full Setup From Time to Time
- Visit the site in a private browser window.
- Check whether the banner appears correctly.
- Test all main consent options again.
- Review whether cookies load as expected.
- Check the declaration page once more.
- Repeat this test after major website changes.
Step 12: Keep Cookiebot Active as an Ongoing Website Tool
- Do not treat Cookiebot as a one-time setup.
- Review it whenever your website changes.
- Keep the plugin updated in WordPress.
- Recheck scans and banner settings often.
- Use it as part of regular website maintenance.
Common Problems You May Face When Installing Cookiebot in WordPress
Cookie Banner May Not Show on Your Website After Setup
One common problem is that the banner does not appear at all. In many cases, this happens when the Domain Group ID is wrong or the script is not loading correctly. Cookiebot support also says region distribution settings can affect banner delivery, so the banner may stay hidden if that setup is incomplete. The official plugin page also notes that the banner should go live after the Domain Group ID is added, so this is the first thing you should recheck in your Cookiebot WordPress setup.
Plugin Looks Connected but the Setup Still Feels Incomplete
Sometimes the plugin is active, but the setup still feels unfinished. This usually happens when the account, domain group, and plugin settings are not fully connected in the right order. Cookiebot’s WordPress guide still follows a clear flow: create the account, connect the domain group, then review optional settings like Google Consent Mode, GTM, IAB TCF, and georegion setup. If one part is skipped, the Cookiebot plugin WordPress connection may look active but still behave incorrectly.
Cookie Scan Results May Not Match What You Expected to See
Another common issue is incomplete or confusing scan results. This can happen because WordPress websites change often, and new plugins or embeds can add cookies later. Cookiebot’s plugin page explains that its scanning engine and cookie descriptions are refreshed over time to keep declarations accurate, which means you should review scans regularly instead of checking them only once. This is an important part of a reliable Cookiebot setup WordPress process.
Google Tracking May Behave Differently After Consent Setup
Many site owners get worried when Google Analytics or ads behave differently after setup. This is often normal because consent-based tracking changes how tags work before and after user action. Cookiebot says it integrates with Google Consent Mode v2 and can signal consent to Google Ads, GA4, gtag, and Tag Manager. Cookiebot support also explains that you may still need to ensure the correct default consent state is set, so testing is very important after installation.
Cookie Declaration Page May Not Show the Way You Want
Some users install Cookiebot correctly but place the Cookie Declaration in the wrong location. Cookiebot support says the declaration should be inserted only on the page and in the exact position where you want it to appear. If it is placed incorrectly, the output may look confusing or may appear where you did not plan. That is why declaration placement should be checked carefully during your Cookiebot CMP WordPress setup.
Google Tag Manager Setups Need Extra Attention After Installation
If your website uses Google Tag Manager, setup mistakes can cause tags to fire at the wrong time. Cookiebot’s WordPress guide shows GTM as an optional setup area, and Cookiebot’s GTM documentation explains that implementation details matter. Support guidance for consent mode checking also shows that testing should not rely on one simple dataLayer view in every setup. In short, GTM users should always test carefully after enabling GDPR cookie consent WordPress settings with Cookiebot.
Best Practices for Using Cookiebot in WordPress the Right Way
Review Your Banner Settings Carefully Instead of Leaving the Default Setup Alone
Do not stop after the first successful installation. The Cookiebot plugin page highlights that you can manage cookie blocking, Google Consent Mode, and IAB TCF settings from one place. It also says the banner can be customized and kept current with ongoing product updates. That means you should review the wording, layout, and consent options instead of leaving every default setting unchanged. This helps your Cookie consent WordPress plugin feel clearer and more professional.
Keep Checking Cookie Scans After Plugin, Script, or Design Changes
A WordPress website rarely stays the same for long. New plugins, ads, embeds, and tracking tools can all change cookie behavior. Cookiebot says its scanner helps detect cookies and tracking technologies, and its plugin page notes that scan rules and cookie descriptions are updated to keep declarations accurate. That is why regular scan review is one of the best habits for anyone using Cookiebot WordPress on a growing site.
Test Google Consent Mode and Google Tools After Every Important Change
If your site uses Google services, do not assume everything is correct just because the banner appears. Cookiebot provides Google Consent Mode integration and also offers a dedicated Consent Mode Checker for verifying setup. Their support docs also explain that correct consent behavior should be checked carefully, especially before consent and after user action. This makes testing a key best practice for every Cookiebot setup WordPress workflow.
Keep Your Cookie Declaration and Policy Information Updated Over Time
Cookiebot’s declaration is meant to support transparency and ongoing consent management. Since cookies can change as your website changes, your declaration and policy content should stay aligned with the real tools on your site. This matters for both trust and better privacy communication. A strong GDPR cookie consent WordPress setup should always reflect what your website actually loads today, not what it loaded months ago.
Treat Cookiebot as an Ongoing Website Management Tool
The official plugin listing highlights regular updates for stability, performance, accessibility, compatibility, privacy changes, and Google Consent Mode behavior. That means Cookiebot should not be treated as a one-time install-and-forget plugin. It works best when you review settings, test your banner, recheck scans, and keep the plugin current. This is the most practical way to use Cookiebot CMP WordPress on a live site.
Conclusion
Installing and using Cookiebot in WordPress is not only about showing a banner. It is about giving visitors clear choices, improving trust, and keeping your website’s cookie settings more organized. When Cookiebot is set up correctly, it can help you manage scans, control consent behavior, and keep your privacy information aligned with the tools running on your site. For WordPress owners, that means a cleaner setup and fewer problems later. A well-managed consent system also helps your website look more professional to visitors who care about privacy and transparency. If your site uses analytics, ads, chat tools, videos, or other third-party features, taking cookie consent seriously is a smart long-term move. Instead of depending on a basic notice, you can build a stronger process that supports both user experience and better website management.
If you do not want to handle the setup alone, 24x7WPSupport offers help for self-hosted WordPress websites and provides contact options through phone, email, and its contact page. The site lists support contact details including +1-888-818-9916 and info@24x7wpsupport.com. It also highlights WordPress support plans and ongoing assistance options for website owners who need technical help.
Let 24x7WPSupport help you install Cookiebot correctly, review your banner settings, check consent behavior, and fix WordPress issues before they affect your visitors. If you want your cookie consent setup to work smoothly without confusion, reach out to 24x7WPSupport and get expert help from a team focused on WordPress support.
Related posts:
How to Create Database Connection in WordPress (Step-by-Step)
How to Use the ActivityPub Plugin On WordPress: Complete Beginner's Guide
Facing Failed To Load Resource Issue in WordPress? Top Ways to Fix it Immediately!
WordPress Database Connection Error
How to Back Up Entire WordPress Site to Google Drive Easily

Brian is a WordPress support specialist and content contributor at 24×7 WP Support. He writes practical, easy-to-follow guides on WordPress troubleshooting, WooCommerce issues, plugin and theme errors, website security, migrations, performance optimization, and integrations. With a focus on solving real website problems, Brian helps business owners, bloggers, and online store managers keep their WordPress sites running smoothly.
