
How to Enable or Disable Maintenance Mode in WordPress (Step-by-Step Guide)
Introduction
Your website should look stable during updates and repair work. Visitors should not see broken pages or half-finished changes live. This is where WordPress maintenance mode becomes very useful. It helps you hide temporary work from public visitors. At the same time, you can keep working in the background safely. Many site owners use it during updates, redesign tasks, or error fixes. It is a simple way to protect trust and avoid confusion. If your site looks broken, people may leave very quickly. A proper maintenance page gives them a clear message instead.
In this guide, you will learn the easiest plugin-based method. You will also understand when to use it and why. Many users choose a WordPress maintenance plugin because setup is simple. It gives better control without touching code files manually. If you want to enable maintenance mode WordPress users can see, a plugin is often the best option. Later, you can also disable maintenance mode WordPress settings just as easily. This keeps your site clean, clear, and professional during updates.
What Is WordPress Maintenance Mode and How Does It Work?
WordPress maintenance mode is a temporary site state for public visitors. It hides your normal pages for a short period. Instead, users see a notice that explains the site is unavailable. This is helpful when you are making updates or fixes. It stops visitors from seeing broken layouts or loading problems. In simple words, it places your website behind a temporary message. That message can be plain or fully branded for your business. WordPress may briefly enter maintenance mode during some updates. This usually happens when plugins, themes, or core files update.
Site owners can also turn it on by choice. That is useful when work takes longer than a few minutes. A manual setup gives you better control over timing and design. It also helps when testing changes on important pages. If you are working on a launch message instead, that is different. A WordPress coming soon page is usually used before a site launch. Maintenance mode is more suitable for an existing live website. It is made for temporary repair, update, or design work.
When maintenance mode is active, visitors do not see the normal site. They see a message that explains the website is unavailable. Some websites show a very short and simple notice. Others display a branded page with logo and colors. You may also add contact details for support if needed. Some pages include an expected return time for visitors. This helps reduce confusion and builds trust during downtime. A good page should look clean, clear, and professional.
It should not feel broken or unfinished to users. That is why many people use a WordPress maintenance plugin today. These plugins help site owners create better-looking maintenance pages fast. They also let admins continue working in the dashboard. This means your team can fix issues without public interruptions. A weak or blank page often creates a poor user experience. A clear maintenance page gives visitors the right expectation instead.
Why You May Need to Enable WordPress Maintenance Mode During Website Updates
To Hide Broken Layout Changes from Visitors
When you update your website, some pages may not load correctly. Parts of the design may shift during the work. Visitors may see missing sections, broken images, or wrong spacing. This creates a poor first impression very quickly. WordPress maintenance mode helps hide these temporary display problems. It shows a clear message instead of unfinished page changes.
To Prevent Users from Seeing Update Errors
Plugin, theme, or core updates can sometimes create short-term errors. A page may stop loading during the update process. Some buttons may not work for a few minutes. Visitors may think the whole website is damaged. When you enable maintenance mode WordPress users see a proper notice. This makes the website look controlled and managed.
To Protect User Trust During Live Website Work
People expect a website to work properly every time. If they land on a broken page, trust can drop fast. This matters even more for business websites and service pages. A maintenance page tells visitors the issue is temporary. It shows that you are working on improvements. That message feels better than showing a broken website.
To Keep Important Pages Looking Professional
Your homepage, contact page, and service pages should always look clean. During updates, these pages may look incomplete for some time. Text may move, sections may disappear, or forms may stop working. A temporary maintenance page protects your brand image. It helps your website stay professional during changes.
To Avoid Problems During Plugin and Theme Changes
Some updates make only small changes. Others affect design, speed, or site functions. A new plugin setting may break a layout unexpectedly. A theme update may change how templates load. During these changes, maintenance mode gives you a safe work period. You can check the website before making it public again.
To Fix Bugs Without Public Interruption
Sometimes you need to fix plugin conflicts, form issues, or display bugs. These fixes may take time and testing. During that process, users may see strange behavior on the website. This can lead to confusion and support requests. WordPress maintenance mode helps you work quietly in the background. Visitors only see a simple status message.
To Protect Sales on WooCommerce Websites
For online stores, even a small error can hurt sales. If the cart page breaks, customers may leave quickly. If checkout fails, you can lose direct revenue. During store updates, maintenance mode becomes very useful. It protects shoppers from broken buying steps. A good WordPress maintenance plugin can help you manage this easily.
To Prevent Form and Lead Generation Issues
Many websites depend on contact forms and inquiry pages. If those forms stop working during updates, leads may be lost. Visitors may submit details and get no response. That creates frustration and reduces trust. Maintenance mode helps prevent this problem from happening in public. It gives you time to test forms before reopening the site.
To Manage Redesign Work More Safely
Website redesign work often happens on live pages. During that time, visitors may see mixed old and new sections. Some content may still be incomplete or unpolished. A maintenance page keeps the public view clean while you work. It gives you more control over how changes are released.
To Create a Better Visitor Experience During Short Downtime
A broken website feels confusing and careless to visitors. A proper maintenance page feels planned and clear. It tells users that the website will return soon. This improves the overall experience during downtime. Later, you can disable maintenance mode WordPress settings after testing everything carefully.
Important Things to Check Before Turning On Maintenance Mode in WordPress
Security work should happen carefully on a live website. If malware is found, quick action becomes very important. During cleanup, some files may be removed or replaced. This can affect how pages load for visitors. A broken page during cleanup can create more confusion. WordPress maintenance mode helps hide that temporary repair work. It gives you time to scan, clean, and test safely. This is also useful during server-side fixes and file recovery. If access needs tighter control for a short time, use it. A good WordPress maintenance plugin makes this process much easier. It keeps the public side clear while work continues behind it.
Taking a Full Website Backup Before Maintenance Work Is So Important
Before turning on maintenance mode, take a full backup first. This is one of the safest steps you can take. A backup protects your site if something goes wrong later. It helps you restore the website without starting from zero. You should back up both files and the database. Files include themes, plugins, uploads, and main site folders. The database holds posts, settings, users, and form entries. If an update fails, a backup can save time. It also reduces stress during plugin or design changes. Never skip this step before important website work begins.
You Should Decide the Downtime Window Before Enabling Maintenance Mode
You should know how long the work may take. This helps you plan the process more clearly. Short jobs may need only a few minutes. Bigger fixes or redesign work may take much longer. When you plan the time first, confusion stays lower. Your team can prepare the work in the right order. Visitors also get a better experience with clear timing. If possible, choose a low-traffic time for updates. This reduces the number of affected users during downtime. Planning first makes maintenance mode more useful and professional.
Preparing a Clear Visitor Message Before Maintenance Starts Helps a Lot
Visitors should know what is happening on your website. A short and clear message works best in most cases. Tell them the site is under temporary maintenance work. You can also mention support contact details if needed. Some websites add an expected return time for clarity. This helps reduce confusion and builds more trust. A good message should sound calm and professional. It should not feel vague, broken, or unfinished. Many users build this page with a WordPress maintenance plugin. That makes it easier to add text, logo, and colors. A strong message improves the whole WordPress coming soon page or maintenance page experience.
You Must Check Which Users Still Need Access During Maintenance Mode
Not every user should be blocked during maintenance work. Admins usually need normal access to the dashboard. Developers may also need access for testing and fixes. Editors or team members may need to review content updates. If everyone gets blocked, the work may slow down badly. That is why access planning matters before enabling maintenance mode. Many plugins let admin users stay logged in normally. Some also allow special bypass access for selected users. This keeps the work moving without public interruptions. It is a small step, but it matters a lot.
Reviewing Cache and CDN Settings Before Maintenance Mode Is Necessary
Caching can create problems during maintenance mode changes. A cache may keep showing old pages to visitors. In some cases, it may keep showing maintenance pages too long. This can happen even after the work is finished. You should check the browser, plugin, server, and CDN cache first. Know where you will clear each cache layer later. This saves time when the site goes live again. It also helps you avoid false error reports from users. If you do not plan this early, confusion can increase. A careful cache review makes maintenance mode much easier to manage.
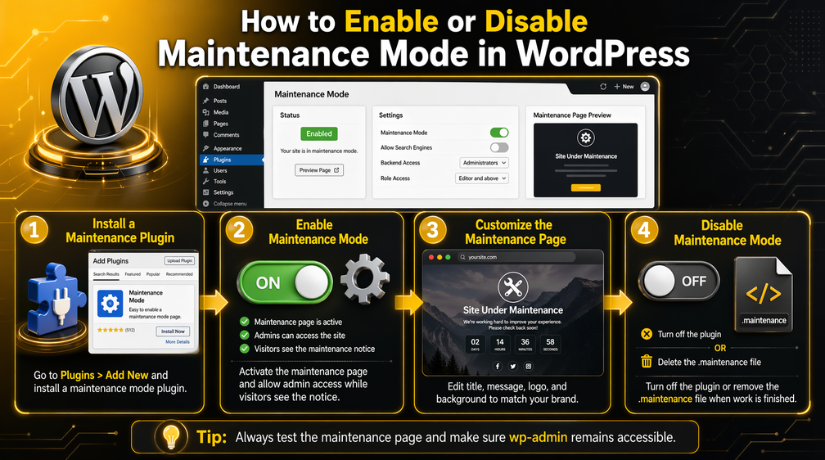
How to Enable Maintenance Mode in WordPress Using a Plugin
The plugin method is simple, fast, and easy to manage. You do not need coding skills for this setup. You also do not need to edit theme files manually. That reduces the chance of making technical mistakes live. Most website owners prefer the plugin-based method for this reason. It gives better control with less risk during updates. You can switch settings on and off quickly. You can also design the page without extra development work. If you want to enable maintenance mode WordPress users can see, this is usually the safest method. It works well for blogs, business sites, and online stores.
Step 1: Log In to Your WordPress Dashboard
- Open your WordPress admin login page.
- Enter your username and password.
- Log in with an administrator account.
- Make sure you can access plugin settings.
Step 2: Go to the Plugins Section in WordPress
- Look at the left-side dashboard menu.
- Click Plugins.
- Click Add New to open the plugin search page.
Step 3: Search for a WordPress Maintenance Plugin
- Use the search bar on the plugin page.
- Type terms like maintenance mode or coming soon.
- Review the plugin results carefully.
- Choose a trusted and updated WordPress maintenance plugin.
Step 4: Install the Maintenance Mode Plugin
- Click Install Now beside the plugin you want.
- Wait for WordPress to complete the installation.
- Make sure the install process finishes successfully.
Step 5: Activate the Plugin on Your Website
- Click the Activate button after installation.
- Wait for the plugin to become active.
- Confirm the plugin now appears in your dashboard.
Step 6: Open the Plugin Settings Page
- Find the plugin menu in the dashboard.
- Open its settings or setup page.
- Review the available options before making changes.
Step 7: Enable Maintenance Mode from the Plugin Settings


- Find the main maintenance mode option.
- Turn the setting to On or Enable.
- Click Save Changes.
- This will enable maintenance mode WordPress visitors can see.
Step 8: Add a Heading and Message for Visitors
- Enter a clear heading for the page.
- Write a short and simple maintenance message.
- Tell visitors the website is under temporary work.
- Keep the text professional and easy to understand.
Step 9: Add Your Logo and Branding Elements
- Upload your website logo if the plugin allows it.
- Add background color, image, or style settings.
- Match the page with your site branding.
- Make the page look clean and professional.
Step 10: Set Access Rules for Admin Users
- Check if admin users can still access the website.
- Allow developers or editors if needed.
- Use bypass or preview settings if available.
- Make sure your team can continue working safely.
Step 11: Preview and Test the Maintenance Page
- Open the website in an incognito window.
- Check what public visitors will see.
- Test the homepage and other important pages.
- Check the page on mobile devices too.
- Confirm your WordPress maintenance mode page works properly.
Step 12: Keep the Site in Maintenance Mode Until Work Is Complete
- Leave maintenance mode active during updates or fixes.
- Complete your website changes in the background.
- Keep visitors on the temporary notice page.
- When work is done, you can later disable maintenance mode WordPress settings.
How to Disable Maintenance Mode in WordPress from the Plugin Settings
Step 1: Log In to Your WordPress Dashboard
- Open your WordPress admin login page.
- Enter your username and password.
- Log in with an administrator account.
- Make sure you can access the plugin settings area.
Step 2: Go to the Maintenance Plugin Settings
- Look at the left-side dashboard menu.
- Find the maintenance mode plugin you used earlier.
- Click the plugin menu or settings page.
- Open the main settings panel.
Step 3: Find the Maintenance Mode Option
- Look for the main maintenance mode setting.
- It may show as Enable, Status, or Active.
- Check the current setting carefully.
- Make sure the maintenance mode is still turned on.
Step 4: Turn Off the Maintenance Mode Setting
- Change the setting from On to Off.
- Disable the maintenance mode option.
- Make sure the correct setting is selected.
- This will disable maintenance mode WordPress visitors were seeing.
Step 5: Save the Plugin Settings
- Click the Save Changes button.
- Wait for the settings to update.
- Confirm that the plugin saves the new status properly.
Step 6: Clear Your WordPress Cache
- Open your caching plugin settings if you use one.
- Clear or purge the website cache.
- Remove any stored cached version of the maintenance page.
- This helps your live site load correctly again.
Step 7: Clear Browser Cache and CDN Cache
- Clear your browser cache.
- Refresh the website in a new window.
- If you use a CDN, purge the CDN cache too.
- If your host uses server cache, clear that as well.
Step 8: Test the Website in an Incognito Window
- Open your website in an incognito browser window.
- Check what public visitors can now see.
- Make sure the maintenance page is gone.
- Confirm the live website is loading properly.
Step 9: Check Important Website Pages
- Test the homepage first.
- Open the contact page and blog page.
- If you run a store, test product, cart, and checkout pages.
- Make sure forms, buttons, and menus work correctly.
Step 10: Check Admin Access and Site Functionality
- Stay logged in and test the dashboard again.
- Make sure plugins and settings are working normally.
- Confirm your team can still access the backend if needed.
- Review the website carefully after reopening it.
Step 11: Recheck the Plugin Settings If the Page Still Shows
- Go back to the plugin settings again.
- Confirm the status is really turned off.
- Save the settings one more time if needed.
- Then test the website again.
Step 12: Check for a Stuck .maintenance File If Needed
- Open File Manager or FTP access.
- Go to the root folder of your WordPress site.
- Look for a file named .maintenance.
- Delete it if it is still there.
- Reload the website and test again.
Best Practices for WordPress Maintenance Mode in WordPress
Use a Clear and Helpful Message for Visitors
Your maintenance page should explain the situation in simple words. Visitors should know the website is under temporary work. The message should feel calm, clear, and professional. Avoid unclear text or messages that sound too technical. A good notice helps users trust your website more. It also makes the downtime feel planned and managed.
Keep the Design Clean and Professional
A clean design always works better during temporary downtime. Add your logo and use colors that match your brand. Keep the layout simple and easy to read. Avoid adding too many elements on the page. A messy page can confuse visitors and reduce trust. A polished page looks more professional and better managed. A good WordPress maintenance plugin makes this easier to build.
Let Admins Access the Website Normally
Maintenance mode should not block your whole team from working. Admins need access for testing, updates, and fixing issues. Developers may also need access during technical work periods. Good plugins allow these users to bypass the public page. This keeps work moving without public interruption. It also helps your team test the live site safely.
Keep Downtime as Short as Possible
Maintenance mode should stay active only for needed work. Do not leave the site hidden longer than required. Long downtime can affect trust, leads, and sales badly. Plan the work before turning the page on. Prepare files, tools, and updates in advance if possible. This helps finish the work faster and more smoothly.
Test Before and After Every Change
Testing should happen before, during, and after maintenance work. Check the website before turning the page on first. Then test while updates or fixes are happening. After that, test again before reopening the site publicly. This three-step process reduces mistakes and hidden problems. It helps you catch issues before visitors notice them.
Common Mistakes to Avoid When Using Maintenance Mode in WordPress
Forgetting to Turn Off Maintenance Mode After Finishing Work
This is one of the most common mistakes site owners make. They finish updates but forget to reopen the website publicly. As a result, traffic, leads, and sales can stop completely. Visitors may think the site is broken for good. Always double-check the plugin status after your work ends. This simple step can prevent major business loss.
Not Clearing Cache After Disabling the Maintenance Page
Many people turn the setting off and stop there. Then visitors still see the old maintenance notice page. This creates confusion and makes the site look unstable. Cache should always be cleared after disabling the page. That includes plugin, browser, CDN, and server cache. Skipping this step causes many avoidable problems.
Showing a Weak or Blank Message to Visitors
A poor page creates a poor impression very quickly. Visitors may not understand what is happening on the site. Some may think the website has been abandoned completely. A strong message helps visitors stay calm and informed. That is why your page should always look planned and useful. Even simple wording can make a big difference.
Locking Out Important Users During Live Work
Sometimes teams forget to allow admin or developer access. Then the people fixing the website face delays themselves. This slows the process and creates more frustration. Always check access rules before activating maintenance mode. Good setup should protect visitors without blocking your team.
Using Maintenance Mode for Long-Term Development Work
Maintenance mode is best for short updates and quick repair tasks. It is not the best choice for very long projects. If work will take days or weeks, use staging instead. A staging site gives better control for bigger changes. It also keeps the live website stable much longer.
Conclusion
Managing WordPress maintenance mode the right way helps protect your website during updates, fixes, and design work. It keeps visitors away from broken pages and gives your team time to work safely. This is very important for business websites, blogs, and online stores. A clean maintenance page looks much better than a site full of errors. It also helps protect trust while temporary work is in progress.
For most website owners, using a WordPress maintenance plugin is the easiest method. It gives simple controls, better design options, and easier access settings. You can quickly enable maintenance mode WordPress users will see during live work. After the job is done, you can also disable maintenance mode WordPress settings in a few simple steps. Just remember to clear all cache and test the full website again. These final checks help make sure everything is working properly.
It is also important to know the difference between maintenance mode and a WordPress coming soon page. Maintenance mode is best for live websites under temporary work. A coming soon page is better for new website launches.
If you want help with maintenance mode setup, plugin problems, update errors, design issues, speed problems, or stuck WordPress pages, 24x7wpsupport is here to help. Our team works on WordPress fixes, WooCommerce issues, plugin conflicts, error recovery, and website support services. We can help you manage changes safely without hurting the user experience. Visit 24x7wpsupport to get expert WordPress help for your website.

Brian is a WordPress support specialist and content contributor at 24×7 WP Support. He writes practical, easy-to-follow guides on WordPress troubleshooting, WooCommerce issues, plugin and theme errors, website security, migrations, performance optimization, and integrations. With a focus on solving real website problems, Brian helps business owners, bloggers, and online store managers keep their WordPress sites running smoothly.
