
How to Connect IDX in WordPress: Complete Step By Step Guide for Beginners
Introduction
A real estate website should do more than show contact details. It should help buyers search homes quickly and easily. Today, most buyers start their property search online first. They want fresh listings, clear photos, prices, maps, and useful filters. This is where IDX becomes very helpful for real estate websites.
IDX helps agents show live property listings on their websites. It connects MLS listing data with your WordPress website. This means visitors can search homes without leaving your site. A proper WordPress IDX integration can make your website more useful, trusted, and lead-focused.
When you connect IDX in WordPress, your website can display active property listings. These listings may include price, photos, address, beds, baths, and property type. Buyers can use search filters to find homes that match their needs. They can also request details or schedule a showing from listing pages.
Many real estate agents want to know how to add IDX to WordPress without complex coding. The good news is that WordPress makes this process easier. You can use a real estate IDX plugin to connect listings with your website. The plugin works as a bridge between MLS data and WordPress pages.
However, IDX setup should be done carefully. You need the right provider, plugin, and MLS approval. You also need a fast website with mobile-friendly pages. A clean IDX setup can improve buyer trust and website performance. It can also help your website become a stronger sales tool.
What Is IDX in WordPress and How Does It Help Real Estate Websites?
IDX stands for Internet Data Exchange. It is a system that allows approved MLS listings online. In simple words, IDX helps display property listings on websites. For WordPress users, IDX connects real estate data with website pages.
When you use MLS integration WordPress, your website can show listing data from MLS sources. MLS means Multiple Listing Service. It is the main database where real estate listings are stored. IDX takes approved MLS data and displays it on your website.
A proper IDX setup for WordPress helps agents show updated listings automatically. This means you do not need to add each property manually. The IDX provider sends property data through an approved feed. Then your WordPress plugin shows that data on your website.
IDX listings can include many useful property details. These details may include price, address, images, square footage, and status. They can also include beds, baths, property type, and listing agent details. Some IDX tools also support map search and saved searches.
The main goal of IDX is simple. It helps visitors search properties directly on your website. This makes your website more useful for serious buyers. It also helps agents collect leads from interested visitors.
Why Real Estate Agents Need IDX on WordPress for Better Results
A real estate website should help visitors find homes easily. It should also help agents collect quality buyer leads. This is why IDX is important for modern real estate websites. When agents connect IDX in WordPress, they can show live property listings directly on their website. This gives buyers a better search experience and saves agents valuable time. A proper WordPress IDX integration makes the website more active and useful. It also helps visitors trust the website because listings stay updated. Without IDX, agents may need to add property details manually.
Live Property Listings Help Buyers See Updated Home Details
Live property listings are one major benefit of IDX. Buyers want updated homes, prices, photos, and property details. They do not want to see old or unavailable listings. With MLS integration WordPress, your website can display current listing data. This helps visitors search active homes from your website. Agents also avoid the stress of manual listing updates. The IDX feed updates listings based on MLS rules. This keeps your website fresh and useful for visitors. A strong IDX setup for WordPress gives buyers better confidence. They can browse homes and contact the agent faster. This improves user trust and creates more lead opportunities.
Better Buyer Experience With Simple Search and Filters
Buyers want a quick and simple property search process. They want filters that match their real needs. IDX helps add these search tools to WordPress websites. Visitors can search by location, price, beds, baths, and property type. Some IDX tools also support map search and saved searches. This makes browsing easier for serious home buyers. A good real estate IDX plugin can improve this full experience. It helps visitors find matching homes without leaving your website. The search process should feel smooth on desktop and mobile. Buyers should not struggle with confusing layouts or slow pages. A clean WordPress IDX integration can reduce visitor frustration. It also helps users spend more time on your website.
More Real Estate Leads From Interested Website Visitors
IDX does not only show listings on your website. It also helps turn visitors into useful buyer leads. Property pages can include contact forms and showing request buttons. Visitors can ask questions about homes they like. They can also save searches and receive property alerts. These actions help agents understand buyer needs better. When you connect IDX in WordPress, you create more contact points. Each listing page becomes a chance to collect leads. Agents can follow up with people already interested in properties. This makes IDX very useful for lead generation. A strong IDX WordPress plugin may also connect with CRM tools.
Stronger Website Trust With Live MLS Listing Data
Trust is very important in real estate marketing. Buyers want accurate information before contacting an agent. IDX helps build that trust through live MLS listing data. When users see fresh listings, they feel more confident. They are more likely to browse and contact the agent. A WordPress real estate website with IDX looks more complete. It shows that the agent is serious about online service. It also gives buyers a useful reason to return again. Visitors can search new listings and save property alerts. This creates stronger engagement between buyers and your website. A proper IDX setup for WordPress also supports professional branding.
Local SEO Support Through City and Neighborhood Pages
IDX can also support local SEO when used correctly. Real estate agents often target specific cities and neighborhoods. IDX listings can support these location-based website pages. However, IDX alone is not enough for strong SEO. You also need unique content for each local page. Add helpful details about the area, market, schools, and lifestyle. This makes the page more useful for search engines and users. A smart WordPress IDX integration should include local content strategy. City pages can link to live property search results. Neighborhood pages can explain local benefits and available home types. This approach helps your WordPress real estate website become more helpful.
Things You Need Before Connecting IDX in WordPress
Before you connect IDX in WordPress, you need proper preparation. IDX setup depends on MLS access, provider support, and website readiness. If these items are not ready, setup may become difficult. A clear checklist can help avoid common setup issues. It also helps you choose the right IDX solution early. You need an active WordPress website, MLS approval, and IDX provider account. You also need a compatible theme, strong hosting, and SSL. These items help your IDX pages load and work correctly. A careful start can save time during setup.
Active WordPress Website With a Stable Theme
You need a working WordPress website before adding IDX. The website should have a clean and stable design. It should also work properly on mobile devices. Most property searches now happen from phones and tablets. So, mobile-friendly pages are very important for real estate users. Your theme should support full-width pages and custom layouts. This helps IDX search pages look clean and readable. A slow or broken theme can affect listing pages badly. Before installing an IDX WordPress plugin, update your theme and plugins. Also check that your website has no major layout issues. A strong base helps IDX tools work better. It also creates a better visitor experience from the start.
Real Estate License, Broker Approval, and MLS Membership
IDX usually needs approval before listings can appear online. Most MLS boards require agent or broker permission first. Some agents may need broker approval before using IDX. Rules can change based on the local MLS board. You should confirm these rules before choosing any provider. MLS membership is also important for listing data access. Without MLS access, you may not receive approved listing data. Your IDX provider can guide you through this process. They usually confirm if your MLS is supported. Some MLS boards may also charge data access fees. This is an important part of MLS integration WordPress. Approval delays can also affect your setup timeline. So, start this step before designing IDX pages.
IDX Provider Account With the Right MLS Coverage
You need an IDX provider that supports your MLS area. Not every provider supports every MLS board. So, always check coverage before buying any plan. Compare features, pricing, support, and setup options carefully. Popular options include IDX Broker, iHomefinder, Showcase IDX, Realtyna WPL, and MLSImport. Each provider may offer different tools and pricing plans. Some focus on simple search pages and lead forms. Others offer advanced maps, CRM features, and SEO options. Choose a provider that matches your website goals. A good real estate IDX plugin should be easy to manage. It should also provide useful support when issues appear.
Good Hosting and SSL for Faster IDX Performance
IDX pages can load many property records and images. This can make weak hosting slow or unstable. A fast hosting plan helps property search pages load better. Buyers may leave if search results take too long. So, hosting speed is important for IDX success. You should also use SSL on your website. SSL protects visitor data when they submit forms. It also helps build trust with buyers and sellers. Before you connect IDX in WordPress, test website speed and security. Remove unused plugins and optimize your website setup. A strong hosting base supports better IDX performance. It also helps your search pages work smoothly for visitors.
Basic Real Estate Pages Ready Before IDX Setup
Your website should include basic pages before IDX setup starts. These pages help visitors understand your services and contact you. Start with a clear home page and contact page. Then create property search and featured listing pages. You can also add buyer and seller service pages. City and neighborhood pages are also useful for local SEO. These pages give your IDX listings better structure. They also help visitors move through the website easily. A good WordPress real estate website should guide users clearly. Buyers should find listings, details, and contact options quickly.
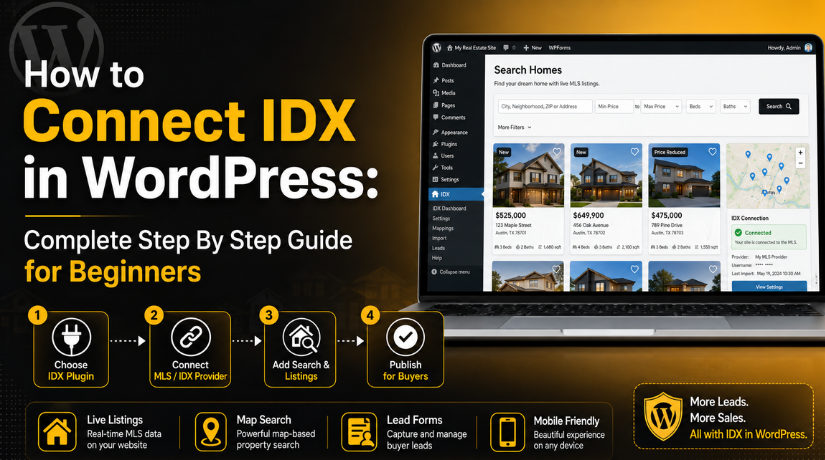
How to Connect IDX in WordPress Using a Plugin (Complete Guide)
A plugin is the easiest way to connect IDX in WordPress. It helps real estate agents show MLS listings without coding. Most agents prefer this method because it is simple. A good IDX WordPress plugin can handle listing display, search pages, maps, and lead forms.
Step 1: Choose the Right IDX WordPress Plugin for Your MLS
- Start by selecting the right IDX WordPress plugin.
- Check if the plugin supports your local MLS board.
- Not every plugin works with every MLS area.
- Review the plugin features before choosing any plan.
- Check if it offers property search and map search.
- Confirm if it supports lead forms and saved searches.
- Review pricing, setup fees, and monthly charges.
- Choose a real estate IDX plugin with good support.
- Make sure listing pages are mobile-friendly and clean.
- This step makes WordPress IDX integration easier and safer.
Step 2: Create an Account With the IDX Provider
- Create an account with your selected IDX provider.
- Add your real estate business details during signup.
- Enter your agent, broker, and MLS information correctly.
- Add your WordPress real estate website URL if required.
- Choose a plan that matches your website goals.
- Check if the plan includes search and lead forms.
- Confirm if it supports SEO-friendly listing pages.
- Save your login details for future plugin setup.
- This account connects MLS data with your WordPress website.
- Correct account details help avoid setup errors later.
Step 3: Get MLS Approval Before Adding IDX to WordPress
- Get MLS approval before you add IDX to WordPress.
- IDX data comes from your local Multiple Listing Service.
- MLS boards control how property data appears online.
- Your IDX provider usually sends the approval request.
- Your broker may also need to approve the request.
- Some MLS boards may charge data access fees.
- Approval time depends on your local MLS rules.
- Without approval, listings may not appear online.
- This step is important for MLS integration WordPress.
- Once approved, your IDX feed becomes active.
Step 4: Take a Backup of Your WordPress Website


- Take a full website backup before plugin installation.
- Backup your website files, database, and plugin settings.
- Use a backup plugin or hosting backup tool.
- This protects your site if anything goes wrong.
- IDX plugins may add scripts, pages, and settings.
- A backup helps you restore the site quickly.
- Never skip this step on a live website.
- It keeps your WordPress real estate website safe.
- Check that the backup file is complete.
- Store the backup in a safe location.
Step 5: Install the IDX Plugin From WordPress Dashboard
- Log in to your WordPress admin dashboard.
- Go to Plugins and click Add New.
- Search for your selected IDX WordPress plugin.
- Click Install Now and activate the plugin.
- Some providers may give a plugin ZIP file.
- Click Upload Plugin if you have a ZIP file.
- Upload the file and install it manually.
- Activate the plugin after the installation completes.
- Check the new IDX menu in WordPress.
- This starts the main IDX setup for WordPress process.
Step 6: Connect Your IDX Provider Account With WordPress
- Open the IDX plugin settings in WordPress.
- Add your license key, API key, or account ID.
- Copy these details from your IDX provider dashboard.
- Paste all details carefully into plugin settings.
- Select your MLS board, region, or approved feed.
- Save the settings after entering all details.
- Test the connection from the plugin dashboard.
- Recheck account details if the connection fails.
- One wrong character can break the connection.
- This step completes basic WordPress IDX integration.
Step 7: Set Up Your Main Property Search Page
- Go to Pages and click Add New.
- Add a clear title like “Search Homes.”
- You can also use “Property Search” as title.
- Add the IDX shortcode, block, or widget.
- Check your plugin guide for the correct shortcode.
- Add filters for city, price, beds, and baths.
- Add property type and listing status filters too.
- Enable map search if your plugin supports it.
- Keep the page clean and easy to use.
- This helps buyers search homes directly online.
Step 8: Add Featured Listings on Important Website Pages
- Add featured listings on your home page.
- You can also add them on area pages.
- Use plugin shortcodes for featured listing sections.
- Choose grid, list, or slider layout options.
- Keep the listing design clean and simple.
- Add buttons like View Details or Contact Agent.
- Use large and clear property images.
- Avoid adding too many listing widgets together.
- Too many widgets can slow the website.
- Featured listings improve the buyer browsing experience.
Step 9: Create City and Neighborhood IDX Listing Pages
- Create pages for your main service areas.
- Add city-based IDX listings on each page.
- Create neighborhood pages for better local targeting.
- Add unique content about each local area.
- Write about schools, parks, lifestyle, and market trends.
- Do not rely only on automatic listing data.
- Search engines prefer helpful and unique page content.
- Link city pages with related neighborhood pages.
- This improves your WordPress real estate website structure.
- It also supports better local search visibility.
Step 10: Add Lead Capture Forms on IDX Listing Pages
- Add contact forms on listing detail pages.
- Add showing request forms near property details.
- Enable saved searches for serious home buyers.
- Add email alerts for new matching properties.
- These tools help buyers return to your website.
- They also help agents understand buyer interest.
- Connect forms with your CRM if supported.
- Test every form after adding it to pages.
- Confirm inquiry emails reach the correct inbox.
- A good real estate IDX plugin supports lead capture.
Step 11: Customize the IDX Page Design and Layout
- Match IDX pages with your website branding.
- Open design settings inside the IDX plugin.
- Adjust colors, buttons, fonts, and listing cards.
- Keep the layout clean and easy to read.
- Make property photos clear and large enough.
- Place search filters where users can find them.
- Avoid heavy design elements on IDX pages.
- Heavy elements can slow property search pages.
- Check the mobile layout after every change.
- A clean design improves trust and user experience.
Step 12: Configure SEO Settings for IDX Pages
- Add SEO titles to important IDX pages.
- Write unique meta descriptions for search pages.
- Use keywords naturally without keyword stuffing.
- Add helpful content above or below listing sections.
- Link search pages with buyer service pages.
- Link city pages with related neighborhood pages.
- Avoid thin pages with only automatic listing data.
- Add useful local details for better page value.
- Submit important IDX pages in Google Search Console.
- A smart IDX setup for WordPress includes SEO.
Step 13: Test IDX Search, Filters, Forms, and Maps
- Open your property search page in a browser.
- Test city, price, beds, and bath filters.
- Check if listings appear after each search.
- Open listing detail pages and review property information.
- Test map search and confirm it loads properly.
- Submit test inquiries from every lead form.
- Confirm emails reach the correct inbox successfully.
- Test pages on mobile, tablet, and desktop.
- Check page speed and loading behavior carefully.
- Testing helps prevent common IDX issues later.
Step 14: Publish and Monitor Your IDX WordPress Setup
- Publish your IDX pages after complete testing.
- Add the property search page to your menu.
- Link featured listings from your home page.
- Add city pages inside your website navigation.
- Monitor leads, speed, and search behavior regularly.
- Check if listings update properly from MLS.
- Keep WordPress, themes, and IDX plugins updated.
- Review form notifications and email delivery often.
- Check MLS disclaimers and required attribution text.
- Proper monitoring keeps your IDX website working correctly.
Using a plugin is a practical way to connect IDX in WordPress. It helps agents show MLS listings with less technical work. A good plugin can add search pages, maps, listings, and forms. It can also support lead capture and local SEO pages.
Common IDX Connection Problems in WordPress and Easy Fixes
After you connect IDX in WordPress, some setup issues may appear. These problems can affect listings, forms, maps, and page speed. Most issues happen because of wrong settings, pending MLS approval, plugin conflicts, or cache problems. A proper WordPress IDX integration needs careful testing after setup. You should check search pages, listing pages, forms, and mobile layouts. This helps you find problems before visitors face them. A good IDX WordPress plugin usually provides support and setup guides. Still, you should know the common problems and their fixes. This makes your IDX setup for WordPress safer and easier to manage.
IDX Listings Are Not Showing on Your Website
Sometimes listings do not appear after plugin setup. This is a common issue during MLS integration WordPress setup. It may happen because MLS approval is still pending. It can also happen due to wrong API details. Your IDX account may not be active yet. The plugin settings may also be incomplete or incorrect. First, check your IDX provider dashboard for feed status. Then confirm whether your MLS board has approved access. Recheck your license key, API key, and account ID. Save settings again and clear your website cache. If listings still do not appear, contact your IDX provider. They can confirm whether your MLS feed is active.
IDX Search Filters Are Not Working Properly
Search filters are important for every WordPress real estate website. Buyers use filters to find homes by price, city, beds, and baths. If filters stop working, users may leave quickly. This problem may happen due to wrong plugin settings. It may also happen because MLS fields are not mapped correctly. Cache plugins can also block updated IDX search scripts. JavaScript conflicts may create filter problems too. Start by clearing your website and browser cache. Then review the filter settings inside your IDX plugin. Disable other plugins one by one for testing. If filters work after disabling a plugin, there is a conflict. Ask your IDX provider to check MLS field mapping.
IDX Map Search Is Not Loading Correctly
Map search helps buyers understand property locations quickly. But sometimes maps do not load on IDX pages. This may happen because the Google Maps API key is missing. It may also happen if billing is not active. Some themes or plugins can block map scripts. Browser console errors can also explain this issue. First, check if your IDX WordPress plugin needs a map API key. Add a valid key inside plugin settings. Make sure Google Maps billing is active if required. Clear your website cache after saving changes. Then test the map page in a private browser. If the map still fails, test with a default theme. This helps find theme-related conflicts quickly.
IDX Pages Look Different From Your Website Design
Many IDX pages use their own layout or templates. This can make them look different from your website. The issue may appear after you add IDX to WordPress. Your theme CSS may not apply to IDX pages. The IDX wrapper page may also be missing. Some plugin layout settings may not match your brand. First, check if your provider supports wrapper pages. A wrapper page helps IDX content match your theme. Then adjust colors, buttons, fonts, and spacing. Use custom CSS only when needed. Keep property cards clean and easy to read. Also check the design on mobile devices. A matching design builds trust and improves user experience.
IDX Lead Forms Are Not Sending Emails
Lead forms are very important for real estate websites. They help buyers contact agents from listing pages. Sometimes forms submit, but emails do not arrive. This problem often happens because WordPress email is unreliable. SMTP may not be configured on your website. Form notification settings may also be incorrect. Emails may also land in spam folders. First, install and configure an SMTP plugin. Use a verified sender email for better delivery. Then check all form notification settings carefully. Submit a test inquiry from each listing form. Confirm that emails reach the correct inbox. Also check spam and email logs. A proper email setup protects valuable buyer leads.
IDX Pages Are Loading Slowly on WordPress
IDX pages can become slow because they load many records. Property photos, map scripts, filters, and widgets can add weight. Weak hosting can make this problem worse. Too many listing widgets on one page can also slow loading. A slow WordPress real estate website can lose visitors quickly. Start by testing page speed on important IDX pages. Remove extra widgets that are not needed. Use only helpful listing sections on each page. Enable caching carefully, based on plugin guidance. Optimize images and remove unused plugins. A CDN can also improve loading for some websites. If speed remains poor, upgrade your hosting plan. Faster pages create a better buyer experience.
MLS Disclaimer or Broker Attribution Is Missing
MLS rules are very important in IDX setup. Many MLS boards require disclaimers and broker attribution. If these details are missing, compliance issues may appear. This problem may happen because template settings are disabled. It may also happen due to custom design changes. Some users hide disclaimer text by mistake. You should never remove required MLS information. First, check the compliance settings inside your real estate IDX plugin. Enable MLS disclaimers and required attribution text. Review listing detail pages and search result pages. Make sure required text appears clearly on all pages. If unsure, contact your IDX provider or MLS board. Compliance protects your website and real estate business.
IDX Plugin Conflicts With Theme or Other Plugins
Plugin conflicts can affect IDX search, forms, layouts, and maps. This issue is common on websites with many plugins. Cache, security, optimization, and page builder plugins may cause conflicts. A theme script can also block IDX features. First, update WordPress, themes, and plugins safely. Then clear all caches and test IDX pages again. If the problem remains, disable plugins one by one. Test IDX search after each disabled plugin. This helps find the conflicting tool. You can also switch to a default theme temporarily. If IDX works there, your theme may need changes. Always take a backup before testing plugin conflicts.
IDX Listings Are Not Updating Automatically
IDX listings should update based on MLS feed rules. Sometimes listings may show old prices or status details. This can create trust issues for buyers. The issue may come from delayed feed updates. It may also happen due to cache or sync settings. First, check the update schedule from your IDX provider. Some feeds update faster than others. Then clear website cache and plugin cache. Check if your plugin has a manual sync option. Run sync if your provider allows it. Also confirm that your IDX account is active. If listings remain outdated, contact provider support. They can check your feed connection and update timing.
IDX Pages Are Not Helping With SEO
Some IDX pages may not rank well by themselves. This happens when pages have thin or duplicate content. Many listing pages use similar MLS data across websites. Search engines may not treat them as unique pages. You should add useful local content around IDX sections. Create city and neighborhood pages with original information. Add buyer tips, local details, and market guidance. Use natural keywords like connect IDX in WordPress and WordPress IDX integration where useful. Add internal links to buyer and seller service pages. Write unique meta titles and descriptions for important pages. SEO needs more than listing data alone. Helpful content makes IDX pages more valuable for users.
Conclusion
IDX can make a real estate website more useful and powerful. It helps buyers search live property listings from your website. It also helps agents capture leads from serious visitors. A proper IDX setup for WordPress needs the right plugin, MLS approval, clean design, and careful testing. You should also check search filters, maps, forms, speed, and MLS disclaimers. These steps help avoid common IDX problems after launch. A strong MLS integration WordPress setup can improve trust and user experience. It can also support local SEO when combined with useful content. If you want a better property search experience, IDX is a smart choice.
If you want to connect IDX in WordPress without technical stress,24x7wpsupport can help. Our WordPress experts can install your IDX WordPress plugin, connect your MLS feed, create property search pages, fix IDX errors, and improve website speed. We can also help with design, SEO, forms, plugin conflicts, and ongoing support. Whether you are an agent, broker, or real estate agency, we can make your WordPress real estate website easier to manage. Visit 24x7wpsupport today and get expert WordPress support for your IDX website setup.

Brian is a WordPress support specialist and content contributor at 24×7 WP Support. He writes practical, easy-to-follow guides on WordPress troubleshooting, WooCommerce issues, plugin and theme errors, website security, migrations, performance optimization, and integrations. With a focus on solving real website problems, Brian helps business owners, bloggers, and online store managers keep their WordPress sites running smoothly.
