
Why and How to Use Facebook Debugger to Fix Image Issues in Shared Posts?
Last updated on September 29th, 2021 at 11:09 am
We won’t be surprised if you say that a Facebook error, not a proper display of shared images, is causing troubles as it happens all the time. WordPress posts, when shared on Facebook, will have different images. While some might suggest removing the wrongly displayed image and uploading the right image directly on Facebook to resolve this solution, we differ.
It’s because this solution doesn’t work all the time and will lead to multiple other issues. For instance, you will experience less traffic on the website as the image will lead the traffic to your Facebook page, not on your website.
To make things worse, this solution will fail to resolve the problem for others. Anyone using the URL of the shared post will still see the wrong image. This is why we don’t advocate this solution.
So, does it mean one should continue with the wrong image?
Of course not! There is a better solution for this issue and we’re going to tell you all about it in this post. In an emergency, it is even better to take WordPress support services for this purpose.
Images in Link or Shared Post
When one wants to share the images on Facebook from the website directly, using Open Graph meta tag or og: image tag is the only way out. Invented by Facebook itself, this is a standard data-sharing protocol for proper optimization of the page content.
It is used to specify the URL of the targeted image. The key requirements of this tag are as stated below:
- The image should have a dimension of 200 x 200 pixels.
- The image file size shouldn’t be more than 8 MB.
- For best display resolution, 1200 x 630 pixels is the ideal image size.
If any of the above criteria are not met, you’re surely going to face trouble with the images on the shared posts.
Facebook Debugger- The Real Savior
The permanent and ideal solution is to use Facebook Debugger to fix image issues in shared posts. Facebook Debugger is a professionally designed tool helping users to have a preview of page content of the shared post or link. Additionally, this tool is a great way to analyze the usability of the links and the process by which tags are interpreted by Facebook.
Any unseen errors in images of shared posts will be users’ notice before they share and grant them the ability to fix them beforehand. Missing tags in the shared pages can also be easily analyzed. In a nutshell, Facebook Debugger is a great way to increase the viability of the shared posts and make sure they suffice their purpose well.
All these things must have made me curious about this tool. So, here are we, telling you its modus operandi bit by bit.
Step #1 – Get the tool
Facebook Debugger is free to use for everyone. You can get it directly from Sharing Debugger page or Facebook for Developers > More > Tools > Sharing Debugger.
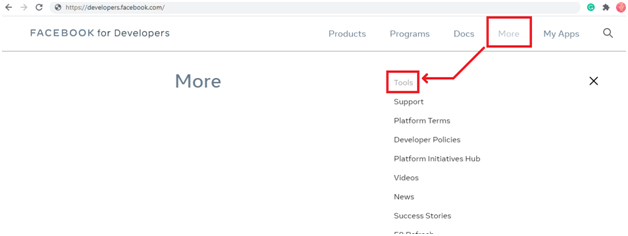
In the second option, you need to log in with a valid Facebook credential to access the tool. First-timers need to double-check whether or not the “Sharing Debugger” tab is highlighted. The tool is all set to serve you.
Step # 2- Bring it into action
Enter the address of the page you want to check or have a preview of the targeted page.
Using this tool, one can check the blog or website page.
Once the address is uploaded, click on the ‘Debug’ option and wait for a while to fetch the results.
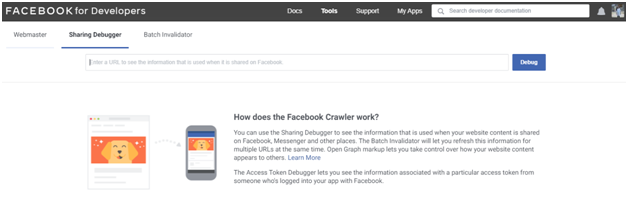
Step #3- Interpret the Facebook Debugger results
The debugger is fast at its job and will bring accurate results in front of you. Carefully, examine the results. We will help you understand it a bit. The section titled ‘warnings’ will display the issues that one needs to fix on priority.
Up next in the report is the information about when the page was scraped lastly and will provide the list of the fetched and canonical URLs.
There will be a detailed preview of the blog or the post that you’re trying to share on Facebook.
Step #4: Clear up the caches
If the preview is not the way you wanted, your next resort is to clean up the caches. For users of WordPress websites, clearing the WordPress cache will work. Also, clean up the Facebook cache by clicking on ‘Scrape Again’.
Step #5: Make adjustments in the open graph settings as per the need of the hour
If clearing the cache doesn’t work and fixing the issue with the images of shared posts then it’s time to make adjustments in the open graph.
Just go to the end of the Facebook Debugger reports and fetch more details. The lower half of the report will have all the needed information for your back-end team to fix issues.
Step #6: Re-run Facebook Debugger
Once the team has resolved the issue, just re-run the Facebook Debugger and check whether or not the previous image sharing issue is present yet. Make sure you clean the WordPress and Facebook cache before re-checking. If all the steps were followed as guided, the issue must have been taken care of.
Using Yoast SEO and Cache Cleaning For Fixing Facebook Image Share Issue
Sometimes Facebook doesn’t display the right image in the preview. The key cause for this issue is either a low-quality image or a WordPress website cache. Both these issues should be resolved for effortless and impressive post-sharing. We will discuss this next.
Fixing the Shared Post Image Issue The Yoast SEO Way
Yoast SEO is a very well-known plugin in the digital world. It assists people in creating the right kind of digital content and attracting audiences. The low image quality in the shared posts can also be handled with full diligence with Yoast SEO. Here is how.
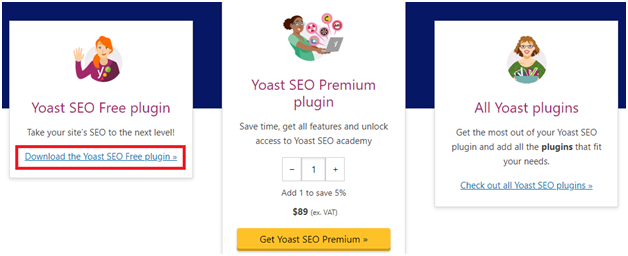
Step #1- Download the Yoast SEO plugin and complete the setup for your WordPress dashboard.
Step #2- Once the installation is done, go to Post>All Posts and pick the post you want to make changes in.
Step #3- In the ‘Post Editor’ section, look for Yoast SEO and select it. Now, go to ‘Social Tab’ and then select the image button. Choose the feature image as per your wisdom and use that as og: image.
Step #4- Click Publish/Update to apply the recent changes.
See, it was as simple as clapping. Wasn’t it?
But, we’re not done yet. Next thing is to guide or direct Facebook to use the image that you have just added in the shared post. To make this happen, go to the Facebook debugger tool and enter the copied link of the post that you have just modified in the text tab.
Click the ‘Debug’ section and then on the ‘Scrape Again’ section to upload the image. This should resolve the issue. If the wrong image is still there, keep on clicking ‘Scrape Again’ till the time Facebook updates your tags. It may sound tedious but this is the only way out.

Fixing The Shared Post Image Issue By Cleaning The WordPress Website Cache
If low image quality is the reason for the wrong image display in the shared post, the majority of times the WordPress website cache is to blame. So, you must know the art and science to fix this as well.
To begin with, get a useful caching plugin like WP Fastest Cache and install it on your WordPress website. WP Fastest Cache is a great choice to make. Once configured successfully, it can clean all the caches while you’re posting or updating any page/post on your website.
All you need to do is,
- Login to your WordPress dashboard.
- Click on the plugin link and go to the ‘Setting’ tab.
- Click ‘Update Post’ and then, choose to clear cache for Post/Page.
- Now, click ‘Ok’ and then on ‘Submit’ to apply the changes.
- This process will automatically clear all cached data for updated posts and pages. If you want to do it manually for a specific page, select “Delete Cache”>” Delete All Cache”. Once it’s done, you’ll be notified.
- Now, your next step is to tell Facebook to scan the recently updated page or post.
- To make this happen, once again you have to use the Facebook Debugger tool. Simply log in to it and enter the link you want to debug. Select ‘Scrape Again’ and keep on doing it until Facebook pulls the right image for your post.
Perks To Enjoy With Facebook Debugger
Now that all the fundamental knowledge about Facebook Debugger is clear, it’s time to learn about the benefits of using this tool.
- While not the best of the things are free, Facebook Debugger is. Yes, you don’t have to spend a single penny to use it.
- It provides detailed information in one go. The preview will provide details on the caption, image, and page introduction. So, you don’t have to look around for any other help.
- As the preview is saved on the server, quick access is granted.
Final Words
The right image speaks thousands of words. While you’re sharing your WordPress post on Facebook, it’s crucial to feature the impressive image. This seems easy but it’s not as if a wrong image can be uploaded or you can have a tough time uploading the image in the right resolution. In either case, you will lose CTR for your post.
To fix all the shared post image issues, Facebook Debugger is the best help that one can ever ask for. It’s easy to use and helps at various fronts. In this guide, we have explained a lot about this tool. So, just grab it and fix image issues in the blink of an eye.


