
How To Install WordPress In A Subdomain
Last updated on April 17th, 2025 at 06:17 am
Introduction
WordPress is one of the most popular content management systems (CMS) in the world. It powers millions of websites, from blogs and business sites to online stores. One of its many strengths is flexibility, which includes the ability to install WordPress in a subdomain.
A subdomain is a subsection of your main domain. For example, if your main website is yourdomain.com, a subdomain could be blog.yourdomain.com or shop.yourdomain.com. Installing WordPress on a subdomain allows you to run a separate site under the same domain—ideal for running a blog, a store, or a client portal.
There are many benefits to this setup:
- Keeps different parts of your site organized.
- Improves SEO by targeting different keywords.
- Allows for different design and functionality without affecting the main site.
Let’s walk through the step-by-step process to install WordPress in a subdomain.
Why do you need to install WordPress in a subdomain?
A subdomain, as the name suggests, is considered a part of the website’s main domain. Essentially, a subdomain retains the core of the original domain while allowing you to customize it for a specific purpose.
For example, suppose your website is named wordbeg.com. Later, you decide to add an eCommerce store. To keep things organized, you might want a separate WordPress installation for the store. In this case, the new address could be shop.wordbeg.com—this is your subdomain, and you’ll need to install WordPress on it.
Whenever you want different sections of your site to maintain the same branding but function independently, a subdomain is a great solution. It’s also useful when you want to personalize your domain for a specific feature or audience.
Whatever the reason—whether to segment your site or customize its structure—you’ll need to install WordPress on the subdomain. And that’s exactly what this guide will help you do.
So, without further delay, let’s learn how to install WordPress in a subdomain.
How to Install WordPress in a subdomain?
1: Prerequisites for Installing WordPress in a Subdomain
1.1. Hosting Requirements
To install WordPress in a subdomain, make sure your hosting provider supports:
-
- Subdomain creation.
- FTP or cPanel access to manage files and databases.
Most modern hosting services offer these features by default.
1.2. Subdomain Setup
To create a subdomain:
-
- Log in to cPanel or your hosting dashboard.
- Look for the Subdomains option.
- Enter a name (e.g., blog) and choose the main domain (e.g., yourdomain.com).
- The system will create a folder (e.g., public_html/blog).

1.3. Domain and DNS Configuration
Ensure your DNS settings point the subdomain to the correct directory:
-
- If your DNS is managed externally, add an A record or CNAME pointing to your server IP or main domain.
- Changes may take time to propagate.
2: Downloading and Preparing WordPress
2.1. Download WordPress
Go to the official WordPress.org website and download the latest version in ZIP format. Extract the contents to a folder on your computer.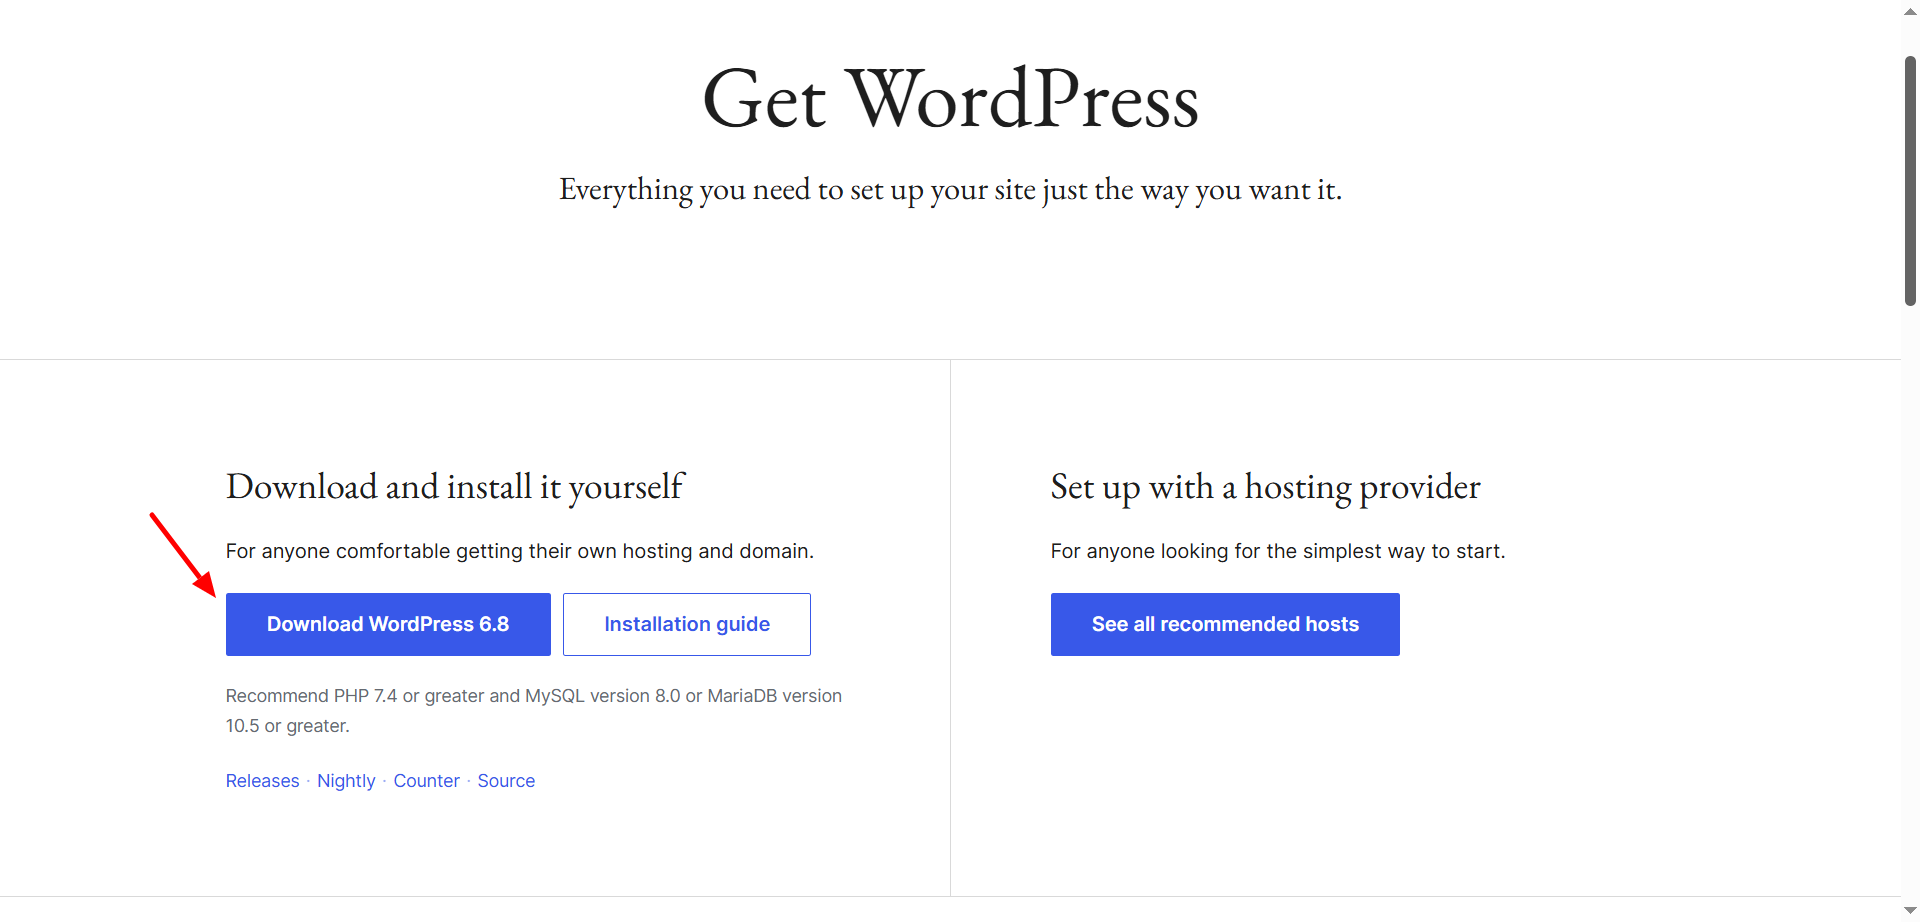
2.2. Extract and Upload WordPress Files
You can now upload the extracted files:
-
- Use FTP (like FileZilla) or cPanel File Manager.
- Navigate to the subdomain folder (e.g., public_html/blog).
- Upload all WordPress files into this directory.
3: Creating a Database for WordPress
3.1. Accessing cPanel MySQL Database
To set up your database:
-
- Go to MySQL® Databases in cPanel.
- Create a new database (e.g., blog_db).
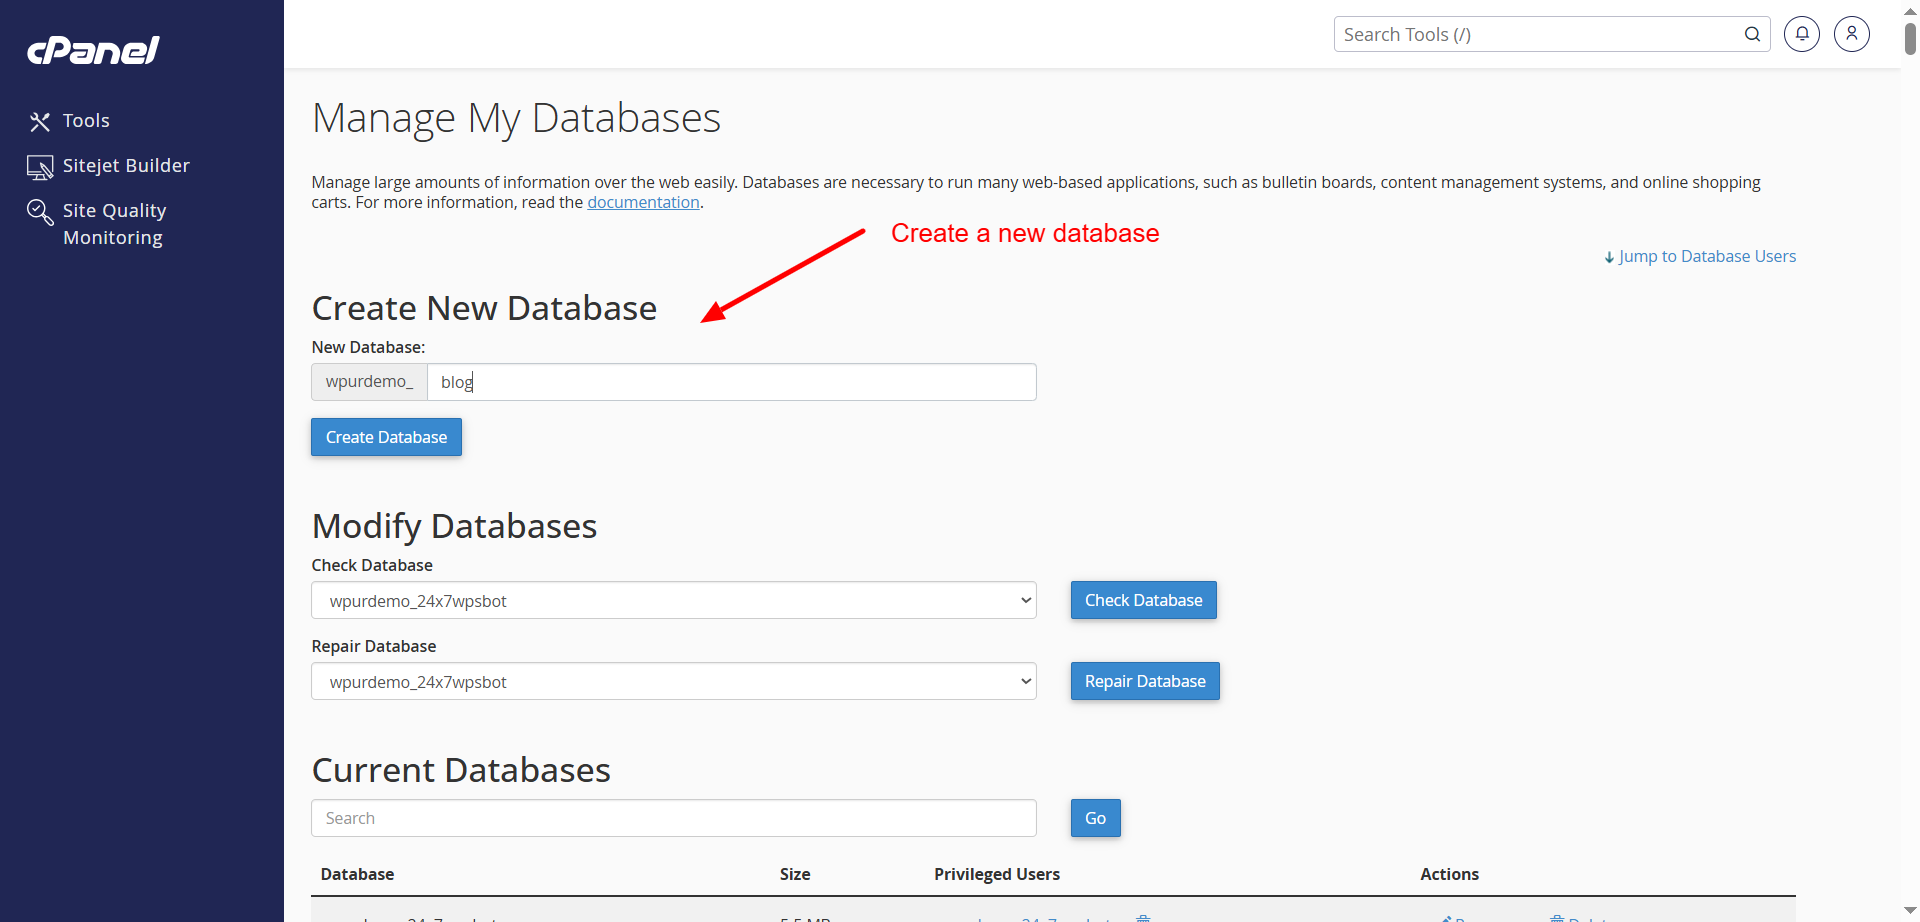
- Create a user and assign it to the database.
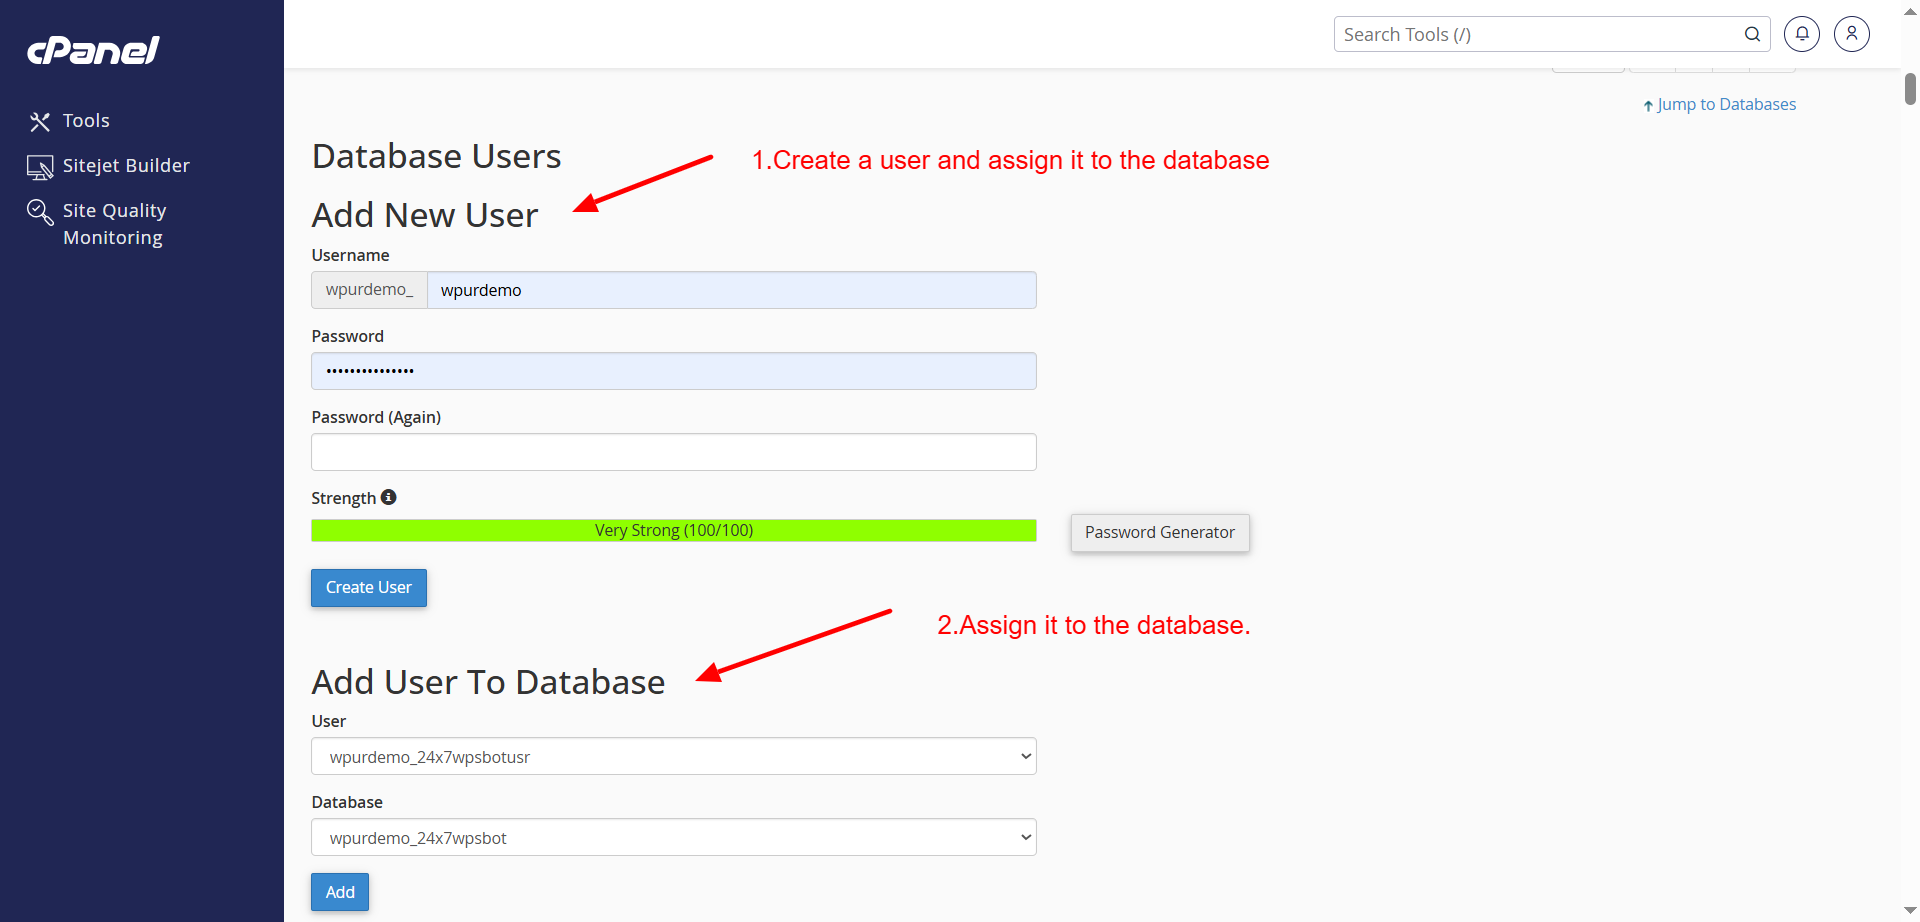
- Give the user All Privileges.
3.2. Storing Database Information
Note down:
-
- Database name
- Database username
- Password
You’ll need these details for the configuration step.


4: Configuring wp-config.php
4.1. Editing wp-config.php
Inside your WordPress files:
-
- Find wp-config-sample.php and rename it to wp-config.php.
- Open the file and enter your database details:
define(‘DB_NAME’, ‘your_db_name’);
define(‘DB_USER’, ‘your_db_user’);
define(‘DB_PASSWORD’, ‘your_db_password’);
-
- Visit WordPress secret key generator to generate security keys and paste them into the config.
4.2. File Permissions
Ensure wp-config.php has restricted permissions:
-
- Use chmod 640 to protect sensitive data.
5: Installing WordPress via Browser
5.1. Accessing the Subdomain URL
Open your browser and visit blog.yourdomain.com. This will launch the WordPress installation wizard.
5.2. WordPress Installation Wizard
The setup wizard will ask:
-
- Your preferred language.
- Site title, admin username, password, and email.
Fill out the form and proceed.
5.3. Completing the Installation
Click Install WordPress. After a few seconds, you’ll see a success message. Click the link to log in to your new WordPress dashboard.
6: Post-Installation Configuration
6.1. Choosing a Theme
-
- Go to Appearance > Themes.
- Choose a free theme or upload a premium one that fits your subdomain’s purpose.
6.2. Installing Plugins
Essential plugins to consider:
-
- Wordfence for security.
- Yoast SEO or Rank Math for SEO.
- W3 Total Cache for performance.
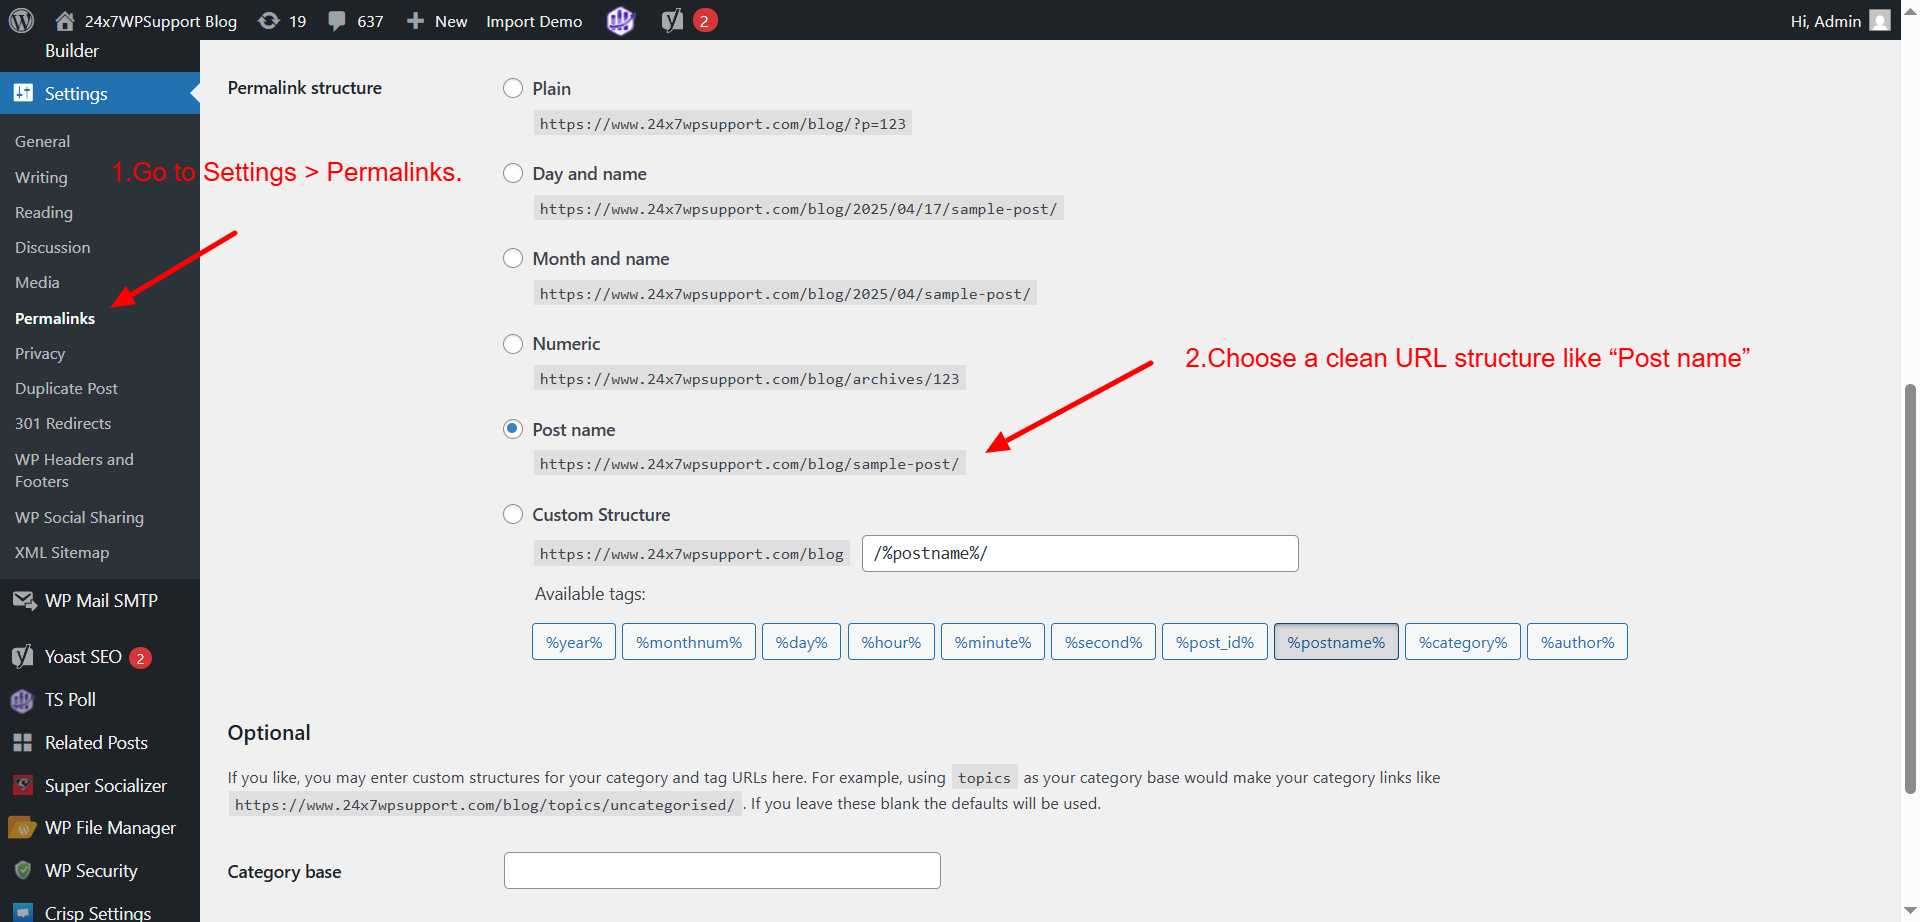
6.3. Setting Up Permalinks
-
- Go to Settings > Permalinks.
- Choose a clean URL structure like “Post name” for SEO.
6.4. Customizing Settings
Update key settings under Settings > General:
-
- Site Title and Tagline
- Timezone
- Language

7: Common Troubleshooting Tips
7.1. Subdomain Not Working
-
- Check if the subdomain folder exists.
- Review DNS settings and A records.
- Wait for DNS propagation if newly created.
7.2. WordPress Not Loading After Installation
-
- Clear browser cache.
- Check PHP version (recommended: PHP 7.4 or above).
- Ensure files were uploaded to the correct directory.
7.3. Database Connection Errors
-
- Double-check database name, username, and password in wp-config.php.
- Make sure the user has proper privileges.
Conclusion
Installing WordPress in a subdomain is a smart way to separate sections of your site. Whether you’re starting a blog, a store, or a learning hub—it keeps your content organized and scalable.
Follow each step carefully—from subdomain setup to WordPress installation—and you’ll be running your new site in no time.
Need more help? Explore our other tutorials or reach out for expert assistance.
Call to Action
Ready to level up your WordPress site?
👉 Check out our WordPress tutorials for more help.
📞 Need support? Call our 24×7 WordPress experts at +1 8888189916, UK: 800-069-8778, AU: 1800-990-217
💬 Have questions? Drop them in the comments—we’re here to help!
Related posts:
How to Permanently Delete a WordPress Site
How to Fix WordPress Allowed Memory Size Exhausted Error in Websites
How to Enable or Disable Maintenance Mode in WordPress (Step-by-Step Guide)
How To Create A Custom Form In WordPress
Guide to Editing Source Code of your WordPress Website PHP, MySQL, HTML, JavaScript & CSS

Brian is a WordPress support specialist and content contributor at 24×7 WP Support. He writes practical, easy-to-follow guides on WordPress troubleshooting, WooCommerce issues, plugin and theme errors, website security, migrations, performance optimization, and integrations. With a focus on solving real website problems, Brian helps business owners, bloggers, and online store managers keep their WordPress sites running smoothly.
