
How to Install Thrive Themes on WordPress (Step-by-Step Guide)
Last updated on April 23rd, 2026 at 01:08 pm
Introduction
If you want a website that looks good and sells better, Thrive Themes can help. It is a popular toolkit made for WordPress users who want more control. Many people use it to build pages, collect leads, and improve conversions. That is why many site owners search for how to install Thrive Theme Builder today. This guide is made for beginners, bloggers, marketers, and business owners. It explains each step in a simple and clear way. You will learn what Thrive Themes means in WordPress. You will also learn the benefits and limits before setup.
This Thrive Themes installation guide is written to make the process easy. It also helps readers understand the modern Thrive Suite setup WordPress users follow today. If you want a practical WordPress Thrive Themes tutorial, this article will help. It is also useful if you want to install Thrive Themes on WordPress without confusion.
What Are Thrive Themes?
Thrive Themes is not only one simple WordPress theme. It is a full set of tools built for growth-focused websites. These tools help users design pages and improve visitor actions. That may include clicks, signups, sales, and lead form submissions. Thrive Themes is known for visual editing and marketing-focused features. It gives users more control without writing much code. This is one reason many people want to install Thrive Themes on WordPress. The company offers both theme tools and feature-based plugins. So, when users talk about Thrive Themes, they often mean the full platform. This includes page building, theme design, forms, testing, and more. That is why understanding the product set matters before setup.
Thrive Themes includes several tools for different website needs. The most common one is Thrive Theme Builder. This tool controls your website’s main design structure. Another major product is Thrive Architect. It helps users build pages with drag-and-drop editing. Thrive Leads is used for email forms and lead capture. Thrive Apprentice helps create online course content and lessons. Thrive Quiz Builder creates quizzes for engagement and lead generation. Thrive Ovation helps collect and display testimonials on pages. Thrive Ultimatum is used for campaigns and timed offers. Thrive Optimize helps run page tests and compare results. These tools work together inside one Thrive system. That is why many users search for install Thrive plugins WordPress steps together. A clear Thrive Suite setup WordPress guide helps users choose the right tools first.
What Are the Pros and Cons of Using Thrive Themes?
Pros of Using Thrive Themes
- Built for conversions, not only for design: Thrive Themes is made for users who want results from their website. It is not only focused on making pages look nice. It also helps improve signups, clicks, leads, and sales. This makes it useful for business websites and marketing pages.
- Easy visual editing for beginners: Thrive tools offer drag-and-drop editing. You can build pages by clicking and moving elements visually. This reduces the need for coding. Beginners can understand the layout faster and make changes with less stress.
- Strong all-in-one toolkit: Thrive Themes gives many tools in one system. You can use page building, lead forms, quizzes, testimonials, and A/B testing together. This saves time because you do not need many unrelated plugins from different companies.
- Good connection between Thrive tools: One big advantage is product integration. Thrive Architect, Thrive Leads, Thrive Quiz Builder, and other tools work well together. This creates a smoother workflow. You do not need to fix many compatibility issues between separate tools.
- Thrive Theme Builder gives better site control: Thrive Theme Builder lets you control headers, footers, blog layouts, page templates, and other global parts. This gives users more full-site control than many normal themes. You can shape the whole website style from one system.
- Useful for marketing-focused websites: Thrive is a strong option for marketers, coaches, agencies, bloggers, and service providers. If your website needs landing pages, lead generation, and conversion elements, Thrive can be very useful. It is made with this goal in mind.
- Helpful ready-made templates: Thrive includes templates that help users start faster. This is useful for people who do not want to build everything from zero. Templates can save time and help users create pages with a clean and modern layout.
- Good for landing pages and sales pages: If you create offer pages, webinar pages, service pages, or opt-in pages, Thrive can help a lot. The page builder includes many conversion-focused blocks. These elements are helpful when your website is built to generate action.
- Central product management: Thrive Product Manager makes installation and updates easier. You can install the products you need from one place. This feels more organized than downloading and uploading many separate plugin files one by one.
- Better choice for growth-focused businesses: Many website tools focus only on design freedom. Thrive focuses more on business growth. That is why it is useful for websites that want more leads, more subscribers, or more customer actions from traffic.
- Saves time for non-technical users: A non-technical user can still do many tasks with Thrive. You can edit pages, update templates, add forms, and change content without always needing a developer. This can reduce support needs for everyday work.
- Good learning value for serious WordPress users: Once users understand the system, it becomes easier to manage future work. People who want to improve their WordPress skills can learn a lot from using Thrive tools regularly. It builds confidence in page design and marketing setup.
Cons of Using Thrive Themes
- It can feel confusing at first: New users often get confused between Thrive Suite, Thrive Theme Builder, and Thrive plugins. They may not understand what each product does. This can make the first setup slower, especially for users who are new to WordPress.
- There is a learning curve: Although Thrive is beginner-friendly in many ways, it still takes time to learn. Users need to understand templates, global design settings, page editing, and product roles. It is easier than coding, but it still needs practice.
- Thrive Theme Builder changes your theme structure: This is one of the biggest points to understand. Thrive Theme Builder becomes the active theme of the website. That means your old theme structure is replaced. If you activate it on a live site, the layout can change quickly.
- Not always the best fit for very simple websites: If you only need a basic blog or a small simple website, Thrive may feel too large. Some users do not need quizzes, lead forms, A/B testing, or advanced design control. In such cases, a simpler setup may be better.
- Too many tools can feel heavy to manage: Thrive offers many products, which is useful, but it can also become too much. If users install everything without planning, the dashboard may feel crowded. This can confuse beginners and make daily management harder.
- Existing site redesign may take extra work: If the website already uses another theme, switching to Thrive Theme Builder may need careful setup. Menus, widgets, templates, and design parts may need to be adjusted again. This can take time on an active business website.
- Users may install tools they do not really need: Because the Thrive Suite includes many useful products, users may feel tempted to install all of them. That is not always a smart move. Installing only the needed tools is usually better for easier management and cleaner setup.
- Better for business goals than for casual users: Thrive is very good for growth and conversion work. But casual website owners may not use its full power. If someone just wants a personal site with simple pages, they may not get full value from the system.
- Setup mistakes can affect the live website: If users skip backups or activate the wrong tools without planning, the live website can change in unwanted ways. This is especially true when switching themes. That is why Thrive setup should be done carefully.
- Requires planning before installation: Thrive works best when users know their goal first. They should decide whether they need only Thrive Architect, only Theme Builder, or multiple tools. Without this planning, users may waste time or create extra setup issues.
- Can be harder for users who dislike structured systems: Some users prefer very simple theme settings. Thrive has its own workflow and structure. Users who want a quick traditional theme upload may find the process a little different from what they expect.
- Full value comes only when used properly: Thrive is powerful, but only when users actually use its features well. If someone installs it but does not use the page builder, templates, or lead tools properly, they may not get enough benefit from the platform.
What You Need Before Installing Thrive Themes on Your WordPress Website
Before you install Thrive Themes on WordPress, prepare your website first. This step helps you avoid setup errors and design problems later. Many users rush into installation and then face avoidable issues. A little planning makes the whole process smoother and safer. This Thrive Themes installation guide starts with the basic things you need. These checks are important for a clean Thrive Suite setup WordPress users can trust. They also help beginners follow this WordPress Thrive Themes tutorial without confusion.
Need a Self-Hosted WordPress Website Before Starting the Setup
You need a self-hosted WordPress website before using Thrive products. Thrive Themes works on WordPress.org websites with full admin control. It does not work like a simple tool on limited platforms. You need access to your WordPress dashboard to install plugins. You also need permission to activate themes and manage settings. This is important if you want to install Thrive plugins WordPress websites use correctly. Without full dashboard access, the setup process may stop midway. So, always confirm your website is self-hosted before you begin.
Active Thrive Themes Account Is Required for Installation
You also need an active Thrive account before the setup starts. This account gives you access to your Thrive product downloads. It also connects your website with the Thrive system properly. Users do not usually install everything with a normal theme ZIP. Thrive uses its own setup method through Product Manager. That is why your account access matters from the first step. If your account is inactive, downloads and activation may fail. So, always keep your login details ready before installation begins. This makes the Thrive Themes installation guide easier to follow from start to finish.
Current WordPress and Hosting Requirements Matter Before Installation
Your website should meet basic technical requirements before setup begins. This is a very important step that many beginners ignore. An outdated website can create problems during installation or activation. Your WordPress version should be updated and running properly. Your PHP version should also be current and supported. Good hosting is also important for smooth installation and performance. Slow or weak hosting can interrupt the product setup process. This is especially important when using multiple Thrive products together. A good Thrive Suite setup WordPress process always starts with a healthy website environment. If the base setup is strong, the install process becomes much safer.
Taking a Full Website Backup Before Installation Is Always a Smart Step
A full website backup is one of the safest steps before setup. You should never skip this part before changing themes or tools. If something goes wrong, a backup helps restore the website quickly. This is very useful on live business websites with existing pages. Thrive Theme Builder can change the site design structure after activation. That means old layouts may not stay exactly the same. A backup gives you peace of mind during the full process. It also protects your content, settings, and important site files. Before you install Thrive Themes on WordPress, always create a full backup first.
Admin Permission to Upload Plugins and Activate Themes Is Necessary
You need the right user role to complete the Thrive installation. In most cases, admin access is required for these tasks. You must be able to upload plugins into the dashboard. You must also be able to activate themes and edit settings. If you do not have these permissions, setup may stop early. This often happens on client sites or team-managed websites. So, confirm your permissions before starting the installation work. This small check saves time and avoids access-related delays later.
You Should Decide Your Thrive Setup Goal Before Installing Anything
Before installation, decide what you really want to use. This is one of the most important planning steps. Some users only need Thrive Architect for page building. Some want Thrive Theme Builder for full website control. Others want to install Thrive plugins WordPress sites need for leads, quizzes, or course content. Some users want the full Thrive Suite setup WordPress offers. But not every website needs every Thrive product. If you install too many tools without a clear plan, the dashboard can feel crowded. It is better to start with only the products you need. This makes the setup cleaner, faster, and easier to manage later.
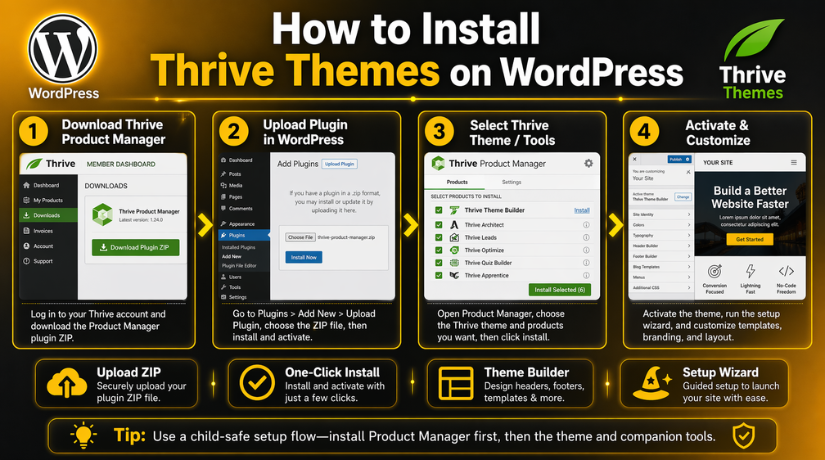
How to Install Thrive Themes on WordPress (Complete Guide)
Step 1: Check Your Website Before Starting
- Make sure your site is a self-hosted WordPress website.
- Confirm that you have full admin access.
- Check that you can upload plugins.
- Check that you can activate themes.
- Make sure WordPress is updated.
- Check that your PHP version is supported.
- Review your hosting setup for smooth performance.
Step 2: Back Up Your Website
- Create a full website backup before installation.
- Back up your files and database.
- Save the backup in a safe location.
- Do not skip this step on a live website.
- Use the backup if something goes wrong later.
Step 3: Log In to Your Thrive Themes Account
- Open your Thrive Themes member account.
- Go to your member dashboard.
- Find the Thrive Product Manager plugin.
- Download the ZIP file to your computer.
- Keep the file ready for upload.
Step 4: Open Your WordPress Dashboard
- Log in to your WordPress admin area.
- Go to the left sidebar menu.
- Click Plugins.
- Click Add New.
- Click Upload Plugin at the top.
Step 5: Upload the Thrive Product Manager Plugin
- Click Choose File.
- Select the Thrive Product Manager ZIP file.
- Click Install Now.
- Wait for the upload to finish.
- Click Activate Plugin after installation.
Step 6: Open Thrive Product Manager
- Look for Thrive Product Manager in the dashboard menu.
- Click to open it.
- Sign in with your Thrive account if asked.
- Connect your website to your Thrive account.
- Wait for your available products to load.
Step 7: Choose the Thrive Products You Want
- Review the list of available Thrive products.
- Select the tools you want to install.
- Choose Thrive Theme Builder for full site design control.
- Choose Thrive Architect for page building.
- Choose other tools only if needed.
- Do not install everything without a clear plan.
Step 8: Install the Selected Products
- Click Install Selected Products.
- Let the Product Manager start the installation.
- Wait for the install process to complete.
- Do not close the page during installation.
- Check that all selected products finish properly.
Step 9: Activate Thrive Theme Builder
- Find Thrive Theme Builder after installation.
- Activate it if you want to use it.
- Remember that it will become your active site theme.
- Expect possible layout changes after activation.
- Review the site carefully after this step.
Step 10: Make Sure Thrive Architect Is Installed Too
- Check whether Thrive Architect is installed.
- Install it if it is missing.
- Keep it updated with the latest version.
- Use it with Theme Builder for editing pages.
- Confirm that both tools are active.
Step 11: Run the Thrive Theme Builder Setup
- Start the setup wizard after activation.
- Upload your website logo.
- Set your brand colors.
- Choose your header design.
- Choose your footer design.
- Set your homepage layout.
- Set your blog template.
- Review menu and template settings.
Step 12: Check Your Website on the Front End
- Open your website in a browser.
- Review the homepage design.
- Check inner pages.
- Check blog pages.
- Review header and footer sections.
- Check menus and links.
- Test the site on mobile devices too.
Step 13: Clear Cache if the Design Looks Wrong
- Clear your browser cache.
- Clear your WordPress cache plugin cache.
- Clear server cache if available.
- Clear CDN cache if you use one.
- Refresh the site again.
- Check whether the design updates properly.
Step 14: Update Thrive Products Regularly
- Keep Thrive products updated.
- Check for updates from the dashboard.
- Update plugins one by one when needed.
- Back up the site before major updates.
- Review the website after every update.
What You Should Do First After Thrive Themes Installation Is Complete
Once installation is done, do not stop the work there. You should review the setup carefully before using the site fully. This is the stage where you confirm everything works as expected. Many users install the products but skip the review step. That can cause small issues to stay hidden longer. A careful review helps you catch problems early and fix them fast. It also makes your Thrive Suite setup WordPress process more stable. After you install Thrive Themes on WordPress, testing becomes very important. This protects your design, pages, and user experience.
Check That All Selected Thrive Products Installed Correctly
Start by opening the Thrive dashboard and checking the installed tools. Review the products you selected during the installation step earlier. Make sure each one appears properly in the dashboard area. Check that the activation status looks correct for every tool. If one product is missing, review the Product Manager again. Sometimes users think a product was installed, but it did not finish. A quick dashboard check can confirm this in minutes. This step is small, but it is very important. It helps keep the whole WordPress Thrive Themes tutorial process on track.
Complete the Basic Website Setup After Thrive Installation
After confirming the products, complete the main website setup tasks. Upload your logo if you did not finish earlier. Review your brand colors and visual style settings again. Check the selected header and footer templates carefully. Make sure your homepage is set correctly in WordPress. Also check the blog page and site menu assignments. These settings affect how the full website looks to visitors. This is why they should be reviewed before you move forward. A clean setup makes your site look more finished and professional. It also helps your Thrive Themes installation guide steps end successfully.


Reviewing Templates and Menus Matters After Thrive Setup
Templates control many important parts of your website structure. If a template is missing, some pages may look incomplete. Menus also matter because visitors use them for navigation. If menus are not assigned correctly, your site may feel broken. These are common issues after any major theme change. So, check all global template areas one by one. Review headers, footers, blog layouts, and page templates carefully. This step helps your new Thrive setup feel complete and polished.
Test the Front End of Your Website After Installation
Now open the front end of your website and review it well. This is where you check how visitors will see the site. Start with the homepage and then move to inner pages. Open blog posts, service pages, and contact pages too. Check whether the design looks clean and aligned properly. Review buttons, forms, menus, and links for any visible issue. This is one of the most important checks after installation. Even a successful setup can still need a few small fixes. Testing helps you find those issues before real visitors do.
Which Website Areas You Should Test First After Thrive Installation
Begin by checking your homepage because it gets the most attention. Then review blog pages and standard content pages carefully. Open your header and footer on different pages too. Make sure your menu links work as expected. If you use forms, test those forms as well. Check whether pages load properly on mobile devices too. A design that looks good on desktop may shift on mobile. So, always test more than one screen size. This step makes your Thrive Suite setup WordPress result much safer.
Fix Missing Design Parts and Incomplete Layout Areas After Setup
Sometimes a website may still show missing parts after installation. This can happen after a theme switch or template update. The good news is that these issues are often easy to fix. Start by checking menu assignments and global templates again. Some old theme settings may not carry over automatically. Widgets and special layout sections may also need review. That is normal when changing to a new theme framework. If a page looks incomplete, compare its template settings first. Then update the missing design part inside the Thrive setup area. A calm review usually solves most of these layout problems.
Common Design Elements You May Need to Review After Installation
The most common parts to review are headers and footers first. Then check homepage sections and blog listing templates carefully. Review sidebars if your site uses them anywhere. Also check widget areas from the old theme setup. Sometimes page sections may need a new template assignment. These small adjustments help finish the design properly. That is why this Thrive Themes installation guide includes this review step.
Common Problems That Users Face During Thrive Themes Installation on WordPress
Even a careful setup can still create a few problems. This does not always mean the installation was done incorrectly. In many cases, the issue comes from hosting, access, or old settings. That is why users should stay calm and check each area properly. A good Thrive Themes installation guide should explain these problems clearly. This helps users fix issues without creating more confusion. If you want to install Thrive Themes on WordPress smoothly, problem checking matters. It also helps beginners follow this WordPress Thrive Themes tutorial with more confidence.
Thrive Product Manager Sometimes Does Not Upload in WordPress Properly
One common problem happens during the first upload step. The Thrive Product Manager file may not upload correctly. This usually happens because the wrong file was selected first. In some cases, the hosting upload limit is also too small. Some websites also block plugin uploads due to permission settings. If the file does not upload, check the ZIP carefully. Then review your upload limit and admin access settings. This is a simple issue, but it stops progress quickly. That is why this Thrive Themes installation guide includes it clearly.
Thrive Product Installation Sometimes Gets Stuck in the Middle of the Process
Another common issue happens during product installation. The selected Thrive products may stop loading midway. This can happen on slow hosting or weak server setups. Sometimes the website times out before installation finishes fully. In other cases, a firewall rule may interrupt the process. Users may think the product is broken, but that is not always true. The issue may only be temporary or server-related. If you install Thrive plugins WordPress sites use on weak hosting, delays can happen. That is why server quality matters in a stable setup process.
Thrive Theme Builder May Not Work Properly After Installation and Activation
Sometimes users install Theme Builder, but the site looks incomplete. This can happen even when the plugin is installed successfully. The issue may come from an outdated WordPress version first. It may also come from an older PHP version on hosting. In some cases, the Site Wizard was not completed fully. Theme or plugin conflicts can also affect the setup result. That is why activation is not the final step alone. You must also review the full setup after activation. This is very important in how to install Thrive Theme builder correctly. A working install still needs proper setup and testing.
License and Account Activation Problems Can Interrupt the Thrive Setup Process
Some users face activation issues after installing the products. The products may appear installed, but not fully connected. This often happens when the wrong Thrive account is used. It can also happen when account access has expired already. Sometimes the site cannot connect to the Thrive server correctly. That may happen due to hosting restrictions or connection issues. This problem can slow the whole installation process quickly. It also prevents users from using products with full access. So, account connection is an important part of the setup.
Thrive Setup Can Feel More Confusing on WordPress Multisite Installations
Multisite websites can add extra setup confusion for some users. That is because network rules can affect plugin handling. Installation steps may look similar, but control settings can differ. Users may need network-level access in some setups. Without the right access, some products may not work correctly. This is why multisite setups need extra care and planning. The process is still possible, but the checks matter more.
Best Practices That Help Keep Your Thrive Themes Setup Safe Stable and Easy to Manage
Once Thrive Themes is installed, the next goal is stability. A good setup should not stop at installation alone. You should also follow a few habits after the process ends. These habits help avoid future issues and reduce support work later. They also make your website easier to manage over time. If you want a better Thrive Suite setup WordPress result, best practices matter. They help your site stay clean, updated, and easier to fix.
Keeping Thrive Products Updated Is Important After the Initial Installation
Updates help fix bugs and improve product performance over time. They also help maintain better compatibility with WordPress updates. If products stay outdated, the site may face avoidable issues later. That is why regular updates are always a good habit. Check your dashboard for Thrive updates from time to time. But do not rush major updates without preparation first. A careful update process is always safer for live websites. This is a simple but important long-term website habit.
You Should Always Back Up the Website Before Major Thrive Changes
A backup is not only important before the first installation. It also matters before future updates and major design changes. If something goes wrong, recovery becomes much easier with backup. This is especially true for business websites with active traffic. So, create backups before theme changes or big edits. This one habit can save many hours later. It also makes design testing much less stressful. That is why backups remain a best practice always.
Using Only the Thrive Products You Really Need Makes Management Easier
A smaller setup is usually easier to manage well. Too many tools can make the dashboard feel more complex. They can also make problem checking harder for beginners. Start with core tools and expand only when needed. This approach keeps the website more focused and practical. It also helps users learn the platform more clearly. If you install Thrive plugins WordPress sites truly need, management becomes easier. A clean setup is often the smartest setup.
Testing the Website on Desktop Tablet and Mobile Should Never Be Skipped
A page can look fine on desktop but break on mobile. That is why screen testing is always an important step. Check the homepage, blog pages, and contact forms carefully. Also review buttons, menus, and layout spacing on smaller screens. Mobile users are a major part of website traffic today. So, this check should never be ignored after setup. It helps protect both design quality and user experience. This is a basic but very useful final review step.
You Should Avoid Activating Thrive Theme Builder on a Busy Live Website Without Planning
Theme changes can affect the full design structure quickly. That is why live websites need extra care before activation. If possible, test the setup on staging first. This gives you a safer place to review all changes. You can check templates, menus, and layouts before going live. That makes the final switch much less risky. This is one of the smartest best practices for serious websites. Careful planning always gives better setup results.
Understanding Theme Level Changes and Plugin Level Changes Matters Later
Many users confuse global design changes with plugin feature changes. Thrive Theme Builder controls the site-wide design structure. Plugins handle features like forms, pages, quizzes, or lessons. When users understand this difference, troubleshooting becomes easier later. It also helps avoid mistakes during future updates or edits. This small concept makes the whole platform easier to manage. That is why every WordPress Thrive Themes tutorial should explain it clearly.
Reviewing Templates After Every Important Update Helps Prevent Future Layout Issues
Templates can shift after major updates or design changes. So, review headers, footers, and page templates after updates. Also check blog layouts and landing pages if you use them. This small review helps catch design issues early. It protects the website from hidden layout problems later. Regular checking is better than fixing big issues later. This is a simple habit, but it gives strong results. A well-managed site always benefits from
Conclusion
Installing Thrive Themes on WordPress becomes easier with the right process. Users should prepare the website before starting the setup. They should choose only the products they truly need. They should also complete the setup and test carefully after activation. Small checks help prevent bigger problems later. This is why a good Thrive Themes installation guide matters so much. It gives users a safer and clearer path from start to finish. With the right steps, the process feels much more manageable.
If you need help with Thrive setup, expert support can save time. 24x7WPSupport can help install Thrive Themes on WordPress correctly. The team can also fix activation errors and design issues. They can review layout problems after Theme Builder activation. They can also help with performance and setup clean-up. If you want a smooth Thrive Suite setup WordPress experience, expert help matters. Visit 24x7wpsupport and get reliable WordPress support today.

Brian is a WordPress support specialist and content contributor at 24×7 WP Support. He writes practical, easy-to-follow guides on WordPress troubleshooting, WooCommerce issues, plugin and theme errors, website security, migrations, performance optimization, and integrations. With a focus on solving real website problems, Brian helps business owners, bloggers, and online store managers keep their WordPress sites running smoothly.
