
How to Install Bitnami for WordPress: Step-by-Step Beginner Guide
Introduction
Setting up WordPress can feel confusing for many new users. A normal WordPress setup needs a web server, PHP, and a database. Users must install these tools and connect them correctly. This process can create errors when settings are missed. Bitnami makes this task easier with a ready setup package. It helps users create a working WordPress website faster. A Bitnami WordPress installation is useful for learning, testing, and development. Users can test plugins, themes, and settings without using live hosting. This guide explains the basic idea behind Bitnami. It also explains how users can use it for WordPress projects. If you want an easier setup, Bitnami is a helpful option.
What Is Bitnami for WordPress and How Does It Work?
Bitnami for WordPress is a ready-made WordPress package. It includes WordPress and all required server tools. These tools usually include Apache, PHP, and MariaDB. Together, they create a complete WordPress Bitnami stack. This stack lets WordPress run without separate manual setup. Users do not need to install each part one by one. This saves time and reduces common setup mistakes. A Bitnami WordPress setup can work on a local computer. It can also work on a cloud server when needed. Many beginners use it to understand WordPress safely. Developers also use it to test websites before launch. A WordPress installation using Bitnami gives users a faster start.
What Are the Main Uses of Bitnami for WordPress?
Bitnami Helps Users Test WordPress Locally Before Going Live
Bitnami helps users create a local WordPress website. This means the website runs on their own computer. Users do not need live hosting for testing. A Bitnami WordPress localhost setup is very useful here. It allows safe testing without affecting the real website. Users can test pages, plugins, themes, and settings easily. This makes the Bitnami WordPress installation helpful for beginners.
Bitnami Helps Beginners Learn WordPress Without Hosting
Many beginners want to learn WordPress before buying hosting. Bitnami makes this possible with a local setup. Users can install WordPress and practice inside the dashboard. They can create posts, pages, menus, and forms safely. This is a simple way to understand WordPress basics. A Bitnami WordPress tutorial can guide users through each step.
Bitnami Helps Developers Build WordPress Themes and Plugins
Developers often need a safe place for development work. Bitnami provides a complete WordPress Bitnami stack for this purpose. They can build custom themes and test plugin functions. They can also check PHP errors and database changes. This helps them fix issues before website launch. It keeps the live website safe from development mistakes.
Bitnami Helps Agencies Create Client Demo Websites
Agencies can use Bitnami to create WordPress demo websites. These demos help clients review designs before approval. Teams can prepare layouts, pages, and features locally first. After approval, they can move the site to live hosting. This makes the Bitnami WordPress setup useful for client work. It saves time and avoids direct changes on live websites.
Bitnami Helps Users Test WordPress Plugins and Themes Safely
Plugins and themes can sometimes create website errors. Bitnami lets users test them in a safe environment. Users can install, activate, and review plugins locally. They can also test theme layouts before using them live. This helps prevent broken pages and plugin conflicts. It is a smart use of WordPress installation using Bitnami.
Bitnami Helps Users Create a Development Copy of a Website
Users can create a copy of their website for testing. This copy can run locally using Bitnami. It helps users test updates before changing the live site. They can check WordPress core, plugin, and theme updates safely. This process reduces the risk of downtime or errors. It is useful for regular WordPress maintenance work.
Bitnami Helps Users Understand Basic Server Tools
Bitnami also helps users learn basic server tools. WordPress needs Apache, PHP, and MariaDB to run. Bitnami includes these tools in one simple package. Users can understand how these parts work together. This gives beginners better control over WordPress setup. It also makes future hosting tasks easier to understand.
Requirements Before Installing Bitnami WordPress on Your System
Before starting the Bitnami WordPress installation, you should prepare your system first. Bitnami makes WordPress setup easier, but basic requirements still matter. A proper setup helps avoid errors during installation. It also helps WordPress run smoothly after installation. You should check your operating system, storage, internet, permissions, and ports. These checks are important for beginners and developers. They also help when you want to Install Bitnami WordPress locally. A small preparation step can save much troubleshooting later. This section explains each requirement in a simple way. Follow these points before starting your Bitnami WordPress setup.
Use a Supported Operating System for Bitnami WordPress
You should first check your operating system compatibility. Bitnami WordPress can work on Windows, macOS, and Linux. You should download the correct installer for your system. A wrong installer may not run properly. It may also create installation errors during setup. Always choose the package from the official Bitnami source. This keeps your download safe and updated. If you use a cloud server, check its supported system too. Some users also run Bitnami inside a virtual machine. This is useful for isolated WordPress testing. A supported system makes the WordPress Bitnami stack more stable. It also helps your local website run without service errors.
Check Basic System Resources Before Installation
Your computer should have enough resources for WordPress. Bitnami includes WordPress, Apache, PHP, and MariaDB together. These tools need memory, storage, and processing power. You should keep enough free disk space before installation. Low storage can stop files from installing correctly. You also need a stable internet connection for downloads. A working browser is needed to open WordPress locally. Your operating system should also be updated. Old system files may create permission or service problems. Close heavy apps before installing Bitnami. This can help the installer run smoothly. Good system resources improve your Bitnami WordPress localhost experience.
Keep Required Login and Access Details Ready
You need proper access before starting the setup. For local installation, use an admin account. Some systems ask permission before installing server tools. Without admin permission, services may not start correctly. If you install on cloud hosting, keep cloud login ready. You may also need server access details. For advanced changes, SSH access can be useful. If you plan to connect a domain, keep DNS access ready. You should also decide your WordPress admin username. Choose a strong password during installation. Save these details in a safe place. Correct access helps complete the WordPress installation using Bitnami without delays.
Check Port Availability Before Running the Installer
Ports are important for Bitnami services. Apache usually uses port 80 for normal website access. SSL websites often use port 443. MariaDB also uses a database port. If another app uses the same port, Bitnami may fail. Tools like XAMPP, WAMP, MAMP, or IIS can cause conflicts. You should stop these tools before installation. This helps Apache and MariaDB start correctly. If a port is already busy, Bitnami may ask changes. You can choose another port during setup. Remember the changed port for opening your local website. Port checking is important for a smooth Bitnami WordPress setup.
Backup Existing Website Data Before Any Migration Work
If you are replacing or moving a website, take backups first. Never install over important live data without a backup. Backup your WordPress files before making any changes. Also export the website database safely. Download media files, themes, and plugin settings when possible. A backup protects you from accidental data loss. It also helps restore the website if setup fails. This step matters more during migration work. Local testing is safer, but backups still help. If you create a development copy, keep original files untouched. A clean backup makes Install WordPress locally Bitnami work safer. It also gives you confidence before testing major changes.
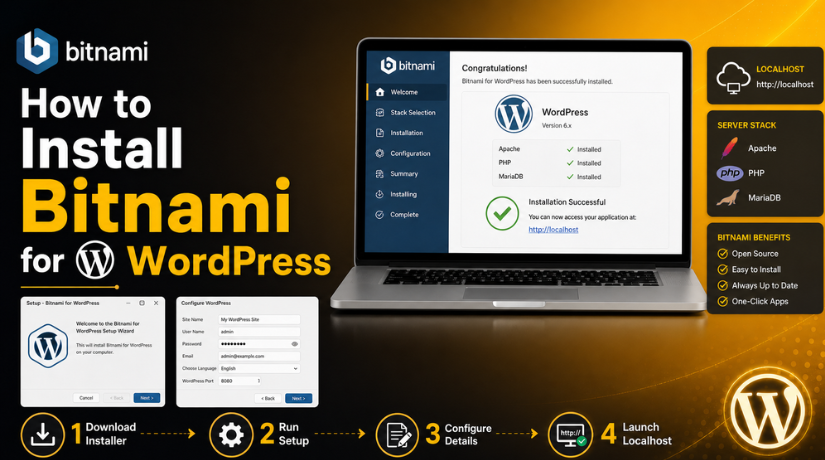
How to Install Bitnami for WordPress (Step By Step Guide)
A Bitnami WordPress installation becomes easier when you follow each step correctly. Bitnami gives you a ready server package for WordPress. It includes Apache, PHP, MariaDB, and WordPress together. This makes the setup easier for beginners and developers. You can use this method for local testing and learning. You can also use it before moving website changes live. Follow the steps below to Install Bitnami WordPress on your system correctly.
Step 1: Download the Bitnami WordPress Installer from the Official Source
- Open the official Bitnami WordPress download page in your browser.
- Choose the correct installer for your operating system.
- Select Windows, macOS, or Linux based on your device.
- Avoid downloading the installer from unknown third-party websites.
- Unknown sources may include outdated or unsafe installation files.
- Downloading from the official source keeps your setup safer.
- This step starts your Bitnami WordPress setup correctly.
- Save the installer in an easy-to-find folder.
- You can use the Downloads folder or desktop location.
- Wait until the download finishes before opening the installer.
Step 2: Start the Bitnami WordPress Installer on Your Computer


- Open the downloaded installer file on your computer.
- Your system may ask for permission before continuing.
- Click allow or run as administrator when required.
- This helps Bitnami install server services correctly.
- Some systems may ask you to choose a language.
- Select your preferred language and continue the setup.
- Read each installer screen before clicking the next button.
- Do not skip screens without checking the selected options.
- This helps you avoid wrong settings during installation.
- Starting correctly keeps the WordPress Bitnami stack stable.
Step 3: Choose a Simple Installation Folder for Bitnami WordPress
- The installer will ask for an installation folder.
- Choose a simple folder path for better file access.
- Avoid folder names with special characters or symbols.
- Do not use very long or confusing folder paths.
- Make sure your system has enough free storage space.
- Bitnami stores WordPress files, database files, and server tools.
- Keep the folder location easy to find later.
- This helps when checking logs or configuration files.
- A clean folder path supports Bitnami WordPress localhost setup.
- It also makes troubleshooting easier after installation.
Step 4: Enter WordPress Site Details and Admin Login Information
- Enter your WordPress website details during the setup process.
- Add your website name in the site name field.
- Create a WordPress admin username for dashboard access.
- Do not use “admin” as your username.
- This username is common and less secure.
- Create a strong password with letters, numbers, and symbols.
- Add your correct email address for admin notifications.
- Some versions may also ask for your full name.
- Save your login details in a password manager.
- These details are required after WordPress installation using Bitnami.
Step 5: Configure Apache and Database Ports If Bitnami Asks
- Bitnami may ask you to confirm Apache and database ports.
- Apache usually uses port 80 for normal website access.
- SSL websites commonly use port 443 for secure access.
- The database service also uses a separate port.
- Keep default ports if they are available.
- Change ports if another application already uses them.
- XAMPP, WAMP, MAMP, or IIS may create conflicts.
- Stop those services before continuing when possible.
- If you change any port, write it down safely.
- Correct port settings help Install Bitnami WordPress without errors.
Step 6: Complete the Bitnami WordPress Installation Process
- Review all setup details before starting installation.
- Click the install button when everything looks correct.
- The installer will copy WordPress and server files.
- It will configure Apache, PHP, and MariaDB automatically.
- Wait until the full installation process finishes.
- Do not close the installer while setup is running.
- Closing it early may damage installation files.
- Once completed, Bitnami may show a launch option.
- Select the launch option to open your WordPress website.
- This completes the main Bitnami WordPress installation process.
Step 7: Open Your WordPress Website on Localhost
- Open your browser after the installation finishes.
- Bitnami usually provides a local website URL.
- This local setup is called Bitnami WordPress localhost access.
- Open the provided URL in your browser.
- Check the homepage and confirm it loads properly.
- Then open the WordPress admin login page.
- Enter the username and password created during setup.
- If login works, your setup is ready.
- You can now manage posts, pages, themes, and plugins.
- This is the main goal of a Bitnami WordPress tutorial.
Step 8: Update WordPress Core, Themes, and Plugins After Setup
- Log in to your WordPress dashboard after installation.
- Check if WordPress core updates are available.
- Update WordPress core to the latest stable version.
- Update all themes shown in the dashboard.
- Update all installed plugins before testing your site.
- Remove unused plugins and themes from WordPress.
- This keeps your local website cleaner and safer.
- Updates also fix bugs and compatibility problems.
- Test your dashboard after completing all updates.
- An updated WordPress Bitnami stack works more reliably.
Step 9: Configure Basic WordPress Settings Before Testing Work
- Open the WordPress settings area from the dashboard.
- Set the correct site title and tagline.
- Choose a clean permalink structure for better URLs.
- Set the correct time zone for your location.
- Check the admin email under general settings.
- Review discussion settings if comments are not needed.
- For test websites, block search engines from indexing.
- This matters when the site later moves online.
- Save all settings after making required changes.
- These small steps improve your Bitnami WordPress setup.
Common Bitnami WordPress Installation Issues and Simple Fixes
A Bitnami WordPress installation usually works smoothly when settings are correct. Still, some users may face setup or access issues. Most problems happen because of ports, services, permissions, or wrong URLs. These issues are common during any Bitnami WordPress setup. The good part is that most errors are easy to fix. You only need to check the correct service, setting, or path. This section explains common problems in simple steps. It will help you fix your WordPress Bitnami stack without confusion.
Apache Server Does Not Start After Bitnami Installation
Apache is the web server used by Bitnami WordPress. It helps your website open in the browser. Sometimes, Apache does not start after installation. This usually happens when another app already uses port 80. Tools like XAMPP, WAMP, MAMP, or IIS can create this issue. Some security tools may also block Apache services. You may also face this issue without admin permission. This can stop your Bitnami WordPress localhost site from loading. To fix this issue, close other local server tools first. Then restart the Bitnami services from the manager tool. If the issue continues, change the Apache port. You can also run Bitnami as an administrator. These steps usually fix Apache startup problems quickly.
Database Service Does Not Start in Bitnami WordPress
Bitnami uses MariaDB to store WordPress data. Your posts, pages, users, and settings need the database. If the database service fails, WordPress cannot load correctly. This issue may happen because of a port conflict. It can also happen after an incorrect system shutdown. Sometimes, missing permissions can stop the database service. This issue can affect the full WordPress installation using Bitnami. To fix it, restart the database service first. You can do this from the Bitnami manager tool. If it still fails, restart your computer. Then check if another database service is already running. You should also review Bitnami error logs when needed. Avoid force-closing services during future shutdowns.
WordPress Login Page Is Not Opening Properly
Sometimes, users cannot open the WordPress login page. This can happen after a new Bitnami WordPress setup. The most common reason is the wrong local URL. Apache may also be stopped in the Bitnami manager. Browser cache can also load an old broken page. Firewall or security software may block local access too. If you changed ports, the URL may need that port. First, check that all Bitnami services are running. Then open the correct local WordPress URL. Try clearing your browser cache and cookies. You can also test the site in another browser. If you changed the port, add it to the URL. This should help open the login page correctly.
Forgotten WordPress Admin Password After Installation
Users sometimes forget the password created during setup. This is common during a fresh Install Bitnami WordPress process. Without the password, you cannot access the dashboard. First, check the saved installation notes or password manager. If your email works, use the “Lost your password?” option. WordPress can send a reset link to your admin email. If email does not work, reset the password from the database. This should be done carefully by an experienced user. You can also take expert help for database changes. Always save your future login details securely. A password manager can prevent this issue again.
Plugin or Theme Upload Fails in Bitnami WordPress
Plugin or theme upload errors can happen after installation. This issue may appear during local testing work. Sometimes, the file upload limit is too low. Sometimes, PHP memory is not enough for larger files. Wrong file permissions can also block uploads. A wrong ZIP file can also cause installation failure. This issue may affect your Bitnami WordPress tutorial testing process. First, confirm the theme or plugin ZIP file is correct. Then check if the upload size limit is enough. You may need to increase PHP upload settings. Also review file permissions if uploads still fail. Restart Bitnami services after changing configuration files. This helps the new settings apply correctly.
Website Shows Too Many Redirects Error
A redirect error can stop your WordPress site from opening. This usually happens because of wrong URL settings. It may also happen due to HTTP and HTTPS mismatch. Incorrect SSL setup can create repeated redirects. Browser cache can also keep old redirect rules. This issue can affect both local and cloud setups. First, check the WordPress Address and Site Address settings. Both URLs should match your current setup. Clear your browser cache after changing URL settings. Disable forced HTTPS if SSL is not configured yet. Also review the .htaccess file for redirect rules. Correct URL settings usually fix this issue quickly.
Bitnami WordPress Localhost Website Runs Slowly
A Bitnami WordPress localhost site may sometimes load slowly. This can happen when your system has low memory. Too many active plugins can also slow WordPress. A heavy theme can increase local loading time too. Antivirus software may scan local WordPress files repeatedly. This can make the site feel very slow. First, disable plugins that are not needed. Then switch to a light theme for testing. Close heavy apps running in the background. Increase PHP memory only if required. You can also exclude the local project folder from antivirus scanning. Do this only when you trust the folder fully. These steps can improve local WordPress speed.
Conclusion
Bitnami is a helpful tool for WordPress users. It makes WordPress setup faster and easier. Users can avoid many manual server setup steps. A proper Bitnami WordPress installation gives you a ready testing space. You can test plugins, themes, updates, and custom changes safely. It is also useful for developers and agencies. However, users should still manage updates, backups, and security. Most Bitnami issues are easy to fix with basic checks. You should check services, ports, permissions, and URLs first. A clean WordPress Bitnami stack can save time and reduce errors. It also helps you learn WordPress in a safe environment.
If you need help installing Bitnami or fixing WordPress setup errors, contact 24x7wpsupport. Our WordPress experts can help with installation, troubleshooting, migration, security, and performance issues. We can also help move your local WordPress test site to a live server. Get expert WordPress support today at 24x7wpsupport.

Brian is a WordPress support specialist and content contributor at 24×7 WP Support. He writes practical, easy-to-follow guides on WordPress troubleshooting, WooCommerce issues, plugin and theme errors, website security, migrations, performance optimization, and integrations. With a focus on solving real website problems, Brian helps business owners, bloggers, and online store managers keep their WordPress sites running smoothly.
