
How to Create a Custom Login URL in WordPress Without Plugins (Complete Guide)
Last updated on April 23rd, 2026 at 01:10 pm
Introduction
Most WordPress websites use the same default login address. That address is usually /wp-login.php or /wp-admin on the site. Many website owners want to change this default login path. They want a cleaner and more private admin entry point. A custom login URL WordPress setup can help with that goal. It gives your website a less obvious login location. This can reduce random visits to the default login page. It can also make admin access feel more controlled. Many users also prefer a setup with fewer extra plugins. That is why they look for a WordPress login URL change without plugin methods. This approach is useful when you want more control. It is also useful when you want a lightweight website setup.
Still, this change should always be done with care. Your WordPress login page is a very sensitive area. A small mistake can block admin access very fast. That is why planning matters before making any change. You should understand the process before editing login behavior. You should also know that this is not magic security. It is only one part of better website protection. A strong WordPress security login URL setup should always work with other safety steps. Good passwords, login limits, and updates still matter a lot.
Even then, many site owners still want to change WordPress login URL paths. They do this to reduce direct hits on default login areas. They also do this to keep admin access more private. When done correctly, the setup can be clean and useful. This guide focuses on that exact need in simple terms. It explains the basic idea before moving into setup steps. That helps you understand the topic the right way.
What Is a Custom Login URL in WordPress?
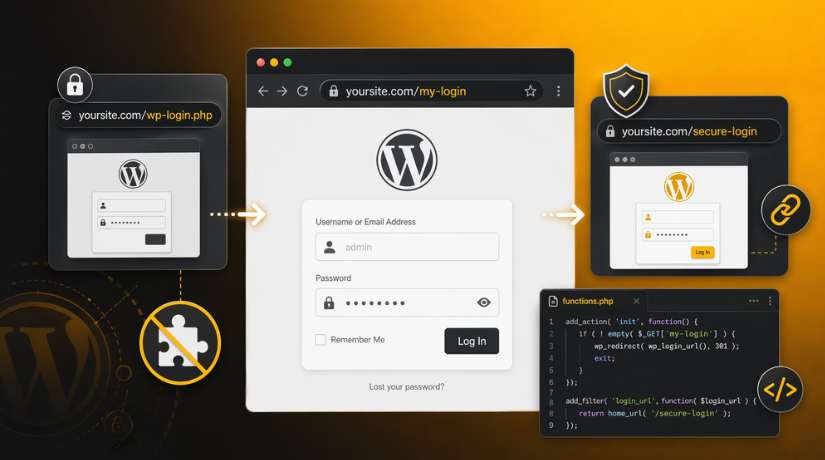
A custom login URL is a new login path for admins. It replaces the common default path used by WordPress. Instead of using /wp-login.php, you use another login slug. That new slug becomes your main admin login entry point. This is what many users mean by WordPress custom login page URL. The goal is to make login access less obvious. It also helps create a more organized admin route. This setup can look cleaner for agencies and business teams. It can also feel more private than the default login path.
For example, a website may use /secure-login or /team-access. Another website may use /client-login or /admin-entry instead. These are simple examples of a custom login path. They are easier to remember for the website owner. At the same time, they are less common than defaults. That is why many people want a custom login URL WordPress setup. They feel it gives their website a smarter login structure. It also supports a more custom admin workflow.
It is important to understand one key difference here. A custom login URL is not always the same thing. It is different from a custom login page design. A custom login URL changes how users reach the page. A custom login page changes how the page looks visually. A branded login page may include your logo and colors. But it may still use the default WordPress login path. In that case, the design changes, but the path stays the same. So, the two ideas are related, but not identical. When people say change WordPress login URL, they usually mean the path itself. When they say custom login page, they may mean layout or design.
A custom login URL can also support better admin privacy. It does not fully stop attacks on its own. Still, it can reduce random traffic on standard login paths. Many bots try common WordPress login addresses first. Because of that, site owners often try to hide wp-admin login WordPress access. They also try to change wp-login.php URL behavior carefully. This creates a less direct path to the admin area. That makes the login process feel more controlled and private. It also supports a stronger first layer of login protection.
Can You Really Change the WordPress Login URL Without Plugins?
Yes, you can do it without plugins, but carefully. WordPress does not include a built-in setting for this. You cannot safely rename core login files and move on. That method creates update problems and breaks future maintenance. So, do not edit core files for this task. If you want to change WordPress login URL settings, use a safer method. Most developers create a new login path with custom code. They also control redirects and access rules very carefully. This is why WordPress login URL changes without plugin methods need testing first. You are not truly renaming the core system file. Instead, you are changing how users reach the login area. This is a smarter and safer way to work. It also keeps future WordPress updates easier to manage.
Many website owners want to change wp-login.php URL access points. They also want to hide wp-admin login WordPress routes from direct visitors. That goal is possible, but only with proper planning. A common method is creating a WordPress custom login page URL first. After that, the default login route is redirected or limited. This creates a cleaner path for admin access. It also helps reduce random traffic to default login pages. Still, the job must be done with care. A wrong redirect can lock you out very fast. A small code error can also break login access. That is why backups and testing are always important. The safe method is not about speed. It is about control, stability, and clean setup.
When You Should Create a Custom Login URL on Your WordPress Website
When Only a Few People Manage the Website
A custom login URL works best when only a few people access the site. This setup is easier to manage with a small admin team. You can share the new login path only with trusted users. That keeps the login process more private and controlled. It also reduces the chance of random users reaching admin pages. For small business websites, this method often works very well. It creates a cleaner admin access system without extra plugin use.
When You Want a More Private Admin Login Path
Many website owners do not like using the default login URL. The common paths are easy to guess by anyone online. A custom login URL gives your website a less obvious entry point. This does not make the site fully secure alone. Still, it helps create a more private login experience. Many users choose this option for better admin control. It also supports a cleaner WordPress security login URL setup.
When Your Website Gets Too Many Login Bot Visits
Many bots try to access default WordPress login pages daily. They often target /wp-login.php and /wp-admin again and again. This is one reason people change WordPress login URL paths. A custom login path can reduce direct bot visits. It makes the default login route less open to random traffic. This does not stop all attacks by itself. But it can reduce unwanted hits on default login pages. That makes it a useful step for login control.
When You Want Fewer Plugins on Your Website
Some website owners prefer a lighter WordPress setup. They do not want to install another plugin for every task. In that case, a WordPress login URL change without plugin method feels useful. It helps reduce plugin load on the website. It also gives developers more direct control over the setup. This option is helpful when the site already uses custom code. It works best when changes are planned and tested properly. For many custom projects, this is a smart choice.
When You Manage Client Websites as an Agency or Developer
Agencies and developers often manage many WordPress websites together. In these cases, a custom login path can improve control. It gives each website a cleaner admin access point. It also helps create a more custom experience for clients. A WordPress custom login page URL can look more professional too. It feels less generic than the default WordPress login path. This is useful for branded or client-focused WordPress projects. It also helps agencies keep admin access better organized.
When You Are Building a Custom WordPress Website
Custom websites often need more control over user access. These websites may already use child themes and custom functions. That makes it easier to change wp-login.php URL behavior safely. Developers can create a new login path that matches the project. They can also manage redirects and access rules carefully. This setup fits custom WordPress builds better than basic sites. It gives more freedom while keeping the login process structured. That is why custom projects often use this method.
When You Have Backup, Staging, and File Access Ready
You should only make login changes when recovery options exist. A backup gives you safety if something goes wrong. A staging site lets you test the setup first. File access through FTP or hosting also matters a lot. These tools help if login access breaks after changes. Without them, even a small mistake becomes risky. So, this method is best when you are prepared. Safe testing is a big part of successful login changes.
When You Want Better Control Over Admin Access
Some website owners want tighter control over how admins sign in. They want one clean path for admin login access. They also want to avoid open use of default login routes. A custom login URL supports that goal very well. It creates a more controlled way to reach the dashboard. This setup is useful for teams, businesses, and managed sites. It also helps when admin access should stay more private. That is why many users choose this method today.
Important Precautions You Should Follow Before Changing the WordPress Login URL
Changing the login path needs careful planning from the start. This is not a small design change on your website. It affects how you enter the WordPress admin area daily. A small mistake can block your login access very fast. That is why safety steps must come before any code. If you want to change WordPress login URL settings safely, prepare first. Good planning helps you avoid stress, lockouts, and broken redirects. It also makes the full setup smoother and easier later.
Take a Full Website Backup Before Making Any Changes
Always create a full backup before editing login behavior. Save your files, database, and current site settings together. This gives you a safe restore point if needed. If anything breaks, you can roll back quickly. That is very important for login-related website changes. A backup protects you from code errors and redirect issues. It also gives peace of mind during testing. Never skip this step before changing login access.
Use a Staging Website Before Editing the Live Site
A staging site is the safest place for testing. It lets you try changes without affecting real visitors. You can test every login step in a safe environment. This includes login, logout, password reset, and redirects. If the setup fails, your live site stays safe. That is why staging is strongly recommended here. A WordPress login URL change without plugin methods needs careful testing. A staging site helps you do that properly.
Keep cPanel, FTP, or File Manager Access Ready
You should always keep server access ready before starting. This helps if the new login path stops working. You may need to remove code or restore files manually. In that case, hosting access becomes very important. Without it, fixing a lockout gets much harder. FTP, cPanel, or file manager access can save time. They also help you recover your website safely. Always check this access before editing login files.
Save the Original WordPress Login URL Before Testing
Do not forget the default login path before making changes. Save /wp-login.php and /wp-admin in a safe place. You may need them during setup or testing. This is useful while your custom route is still incomplete. It also helps if redirects do not work correctly. Keeping the original path saved is a simple safety step. Small steps like this can prevent big login problems later.
Never Edit WordPress Core Files for This Setup
Do not rename or edit core WordPress login files directly. That method is unsafe and hard to maintain later. WordPress updates can remove your changes very quickly. Core edits also create future compatibility problems. If you want to change wp-login.php URL behavior, use safe custom methods. Work with templates, functions, or server rules instead. That keeps your website stable after future updates. It is the right way to handle login changes.
Make Sure Your Child Theme Is Active First
A child theme is the safest place for custom login code. It protects your edits during future theme updates. If you add code to the main theme, updates can erase it. That can break your custom login setup later. A child theme keeps your changes separate and safer. This is important for any WordPress custom login page URL method. It also supports better long-term website maintenance. Always confirm your child theme is active before editing.
Test Changes in an Incognito Browser Window


An incognito window helps you test like a real logged-out user. Normal browser sessions may keep you logged in already. That can hide login problems during your checks. Incognito mode shows the actual visitor experience more clearly. It helps you test redirects, login forms, and admin access. Use it after each important setup step. This makes your testing more accurate and helpful. It is a small step with big value.
Keep a Recovery Plan Ready Before Going Live
You should know how to recover access before changes begin. Decide what you will do if login breaks suddenly. This may include restoring backup or removing custom code. It may also include disabling redirects from server files. A recovery plan keeps you calm during errors. It also helps fix problems much faster. Every WordPress security login URL setup should include this step. Good recovery planning is part of safe development.
How to Create a Custom Login URL in WordPress Without Plugins (Step By Step Guide)
Once your precautions are ready, you can begin setup. The goal is to create a cleaner login path safely. You are not replacing the WordPress login system completely. You are only changing how users reach that system. The safest method is to create a custom login page. Then you control redirects and access around it carefully. This approach is cleaner than editing core files directly. It also works better for long-term site maintenance.
Step 1: Understand What You Are Really Changing
- First, understand the goal before making any login changes.
- You are not replacing the full WordPress login system.
- You are only creating a new path to reach it.
- This is the safest way to change WordPress login URL access.
- It avoids risky edits inside important core WordPress files.
- It also keeps future updates easier to manage later.
- This method works better than trying to change wp-login.php URL directly.
- That is why most safe custom methods follow this approach.
Step 2: Create a New Login Page in WordPress
- Now create a new page from your WordPress dashboard.
- This page will become your new login entry point.
- Choose a page title that clearly matches its purpose.
- Then set a clean and unique slug for it.
- Avoid simple slugs like login or admin if possible.
- A more custom slug makes the page less obvious.
- This new page is the base of your custom login URL WordPress setup.
- It also helps create a cleaner WordPress custom login page URL.
Step 3: Add a Custom Login Form to That Page
- After creating the page, add a login form to it.
- This form should connect with normal WordPress user authentication.
- It should include username, password, and login button fields.
- You can also add a remember me option.
- This step creates a working front-end login page.
- It gives users a new way to access the site.
- This is how many developers change WordPress login URL behavior safely.
- The login process stays normal behind the custom page.
Step 4: Use a Custom Template or Theme Functions
- To make the page work correctly, use custom code.
- Most website owners add this code in a child theme.
- That is the safer place for custom login changes.
- You can use a page template or theme functions.
- Both methods help connect the page with WordPress login.
- Do not edit WordPress core files for this task.
- Core edits are risky and break after future updates.
- A child theme keeps the setup safer and easier to manage.
Step 5: Set the Redirect After Successful Login
- Once the login form works, plan the next destination.
- Most admins should go straight to the dashboard after login.
- Some websites may need role-based redirects for different users.
- The redirect should match your website workflow clearly.
- A wrong redirect can create confusion or login loops.
- So, check this step very carefully during setup.
- Good redirect behavior makes the custom login feel natural.
- It also improves the full user login experience.
Step 6: Add the Lost Password and Logout Links
- A complete login page needs more than basic fields.
- Users may forget passwords and need reset access.
- They may also need a clean logout option later.
- So, add lost password and logout links properly.
- These links should still work with your custom setup.
- This step is very important for real-world login use.
- Many manual login pages fail because these links are missed.
- A proper setup should support all basic account actions.
Step 7: Test the New Login Page Before Restricting Anything
- Before hiding old login paths, test the new page first.
- Open the custom login page in an incognito browser window.
- Try logging in with correct and wrong details.
- Test the password reset link and logout action too.
- Also test the page on desktop and mobile devices.
- This helps you confirm the new page works fully.
- Never restrict old login access before this testing step.
- Good testing helps prevent lockouts and broken login flows.
Step 8: Redirect the Default Login URL Carefully
- After full testing, handle the default WordPress login path.
- Many users want to hide wp-admin login WordPress pages.
- Others want a WordPress login URL change without plugin tools.
- You can redirect visits from /wp-login.php to your new page.
- You can also handle /wp-admin access for logged-out users.
- But do this step with extra care and patience.
- A bad redirect can block both login paths quickly.
- That is why this step should come after testing.
Step 9: Check wp-admin Access After the Change
- Now test the admin area after adding your redirects.
- Try opening /wp-admin while logged out of the site.
- Then try opening it again after logging in.
- This helps you confirm the new login path works correctly.
- It also shows whether admin redirects are behaving properly.
- Many users forget to test this important area.
- That creates confusion after the custom setup goes live.
- So, always check admin behavior before finishing the process.
Step 10: Clear Cache and Review Security Rules
- If your website uses cache, clear it after the changes.
- Cached pages can show old login behavior by mistake.
- Also review firewall, CDN, and security tool settings.
- These systems can affect redirects and login page loading.
- If something looks wrong, check these layers carefully.
- This is important for a smooth WordPress security login URL setup.
- Sometimes the code is correct, but cache blocks change.
- So, this step helps confirm the final setup properly.
Step 11: Keep the Original Login Access as Backup
- Do not remove every old access point too quickly.
- Keep a recovery option ready during the first tests.
- Save the original login paths in a secure place.
- Also keep FTP or file manager access available.
- If something breaks, you can restore access faster.
- This step protects you from sudden lockout problems.
- It also gives you more confidence during live testing.
- Safe backup access is always important during login changes.
Step 12: Document the Setup for Future Use
- Once everything works, note all changes clearly somewhere safe.
- Save the page slug, code edits, and redirect rules used.
- This helps during future theme or server updates.
- It also helps other admins understand the custom setup.
- A documented setup is easier to maintain long term.
- This is very useful for client websites and agency projects.
- It keeps your custom login URL WordPress structure organized.
- Good documentation supports safer website maintenance later.
Common Problems and How to Fix Them When Using a Custom Login URL in WordPress
Changing the login path can work very well when done carefully. Still, some problems can appear during testing or after launch. Most issues happen because of redirects, code mistakes, or missed login steps. That is why this part is very important for readers. It helps them fix common errors without more confusion. It also makes the full setup easier to manage later.
Login Redirect Loop After Creating the New Login Path
A redirect loop is one of the most common login problems. This happens when one login page keeps sending users back again. In most cases, the redirect rules are not set correctly. The website may treat every visit as a blocked request. It may also redirect logged-in and logged-out users the same way. That creates a loop instead of normal login access. To fix this, review the redirect conditions very carefully. Check whether the custom page is excluded from redirect rules. Also confirm that logged-in users are handled properly. A small redirect fix often solves this issue fast.
Locked Out of the WordPress Admin Area
This is the problem most users want to avoid. It usually happens when the default login path gets blocked too early. It can also happen if the new custom page stops working. In that case, users cannot reach either login path correctly. That is why backup access is always very important. To fix this, use FTP, file manager, or hosting access. Remove the last custom code or redirect rule you added. You can also restore the backup if needed. This is why a recovery plan matters before setup begins. Safe recovery steps make admin lockouts easier to fix.
Custom Login Page Opens but the Login Form Does Not Work
Sometimes the new login page loads correctly, but login fails. The form may show on screen, but users cannot sign in. This usually means the login form is not set properly. The form may be missing correct WordPress authentication handling. It may also have template issues inside the custom page. To fix this, check the login form function carefully. Make sure username, password, and submit fields work correctly. Also review the action and redirect behavior in the code. A working page design alone is not enough here. The login process must connect properly behind the page.
Wp-admin Still Opens the Default WordPress Login Screen
Many users change the main login page but forget /wp-admin. After that, the old login screen still appears from admin access. This can confuse users and weaken the custom setup. It means the default admin route is still active. To fix this, add proper handling for logged-out admin visits. The website should redirect those users to the new login page. At the same time, logged-in users should still reach the dashboard. This balance is very important for a clean setup. If /wp-admin is ignored, the custom login path feels incomplete.
Password Reset Link Stops Working After the Change
A custom login page must still support password recovery. If that flow breaks, users may lose easy account access. This often happens when the lost password link is forgotten. It can also happen if the reset path redirects incorrectly. To fix this, check the full password recovery process carefully. Test the lost password form from your custom login page. Then test the reset email and new password flow too. Make sure users can complete the full process smoothly. A login setup is not complete without proper reset support.
Theme Update Removes the Custom Login Setup
This problem appears when edits are placed in the main theme. After the theme updates, custom login code may disappear. That can remove the custom path or break redirects. In some cases, it sends users back to old login pages. To fix this, always use a child theme for changes. A child theme protects your custom work during updates. It also makes future editing much safer and easier. If the setup already broke, restore the code in the child theme. This is one of the best long-term fixes for stability.
White Screen or Error After Adding Custom Code
A small code mistake can break the login setup quickly. One missing bracket or wrong function can cause errors. In some cases, the page may show a white screen. In other cases, the login page may stop loading fully. To fix this, remove the last code change first. Use FTP or file manager if dashboard access is blocked. Then review the code line by line carefully. Testing small changes one by one helps avoid this problem. Clean code and slow testing reduce these errors a lot.
Cache, CDN, or Firewall Is Breaking the Login Behavior
Sometimes the setup looks correct, but login still fails. In many cases, cache or security layers cause that issue. A cached page may still show the old login behavior. A firewall rule may also block new redirects or page access. CDN settings can create similar problems on live sites. To fix this, clear all cache after every major change. Also check firewall, CDN, and security tool settings carefully. Make sure the custom login page is not blocked there. Many login issues disappear after cache and rule review. This step is often missed, but it matters a lot.
Conclusion
Creating a custom login URL without plugins is possible in WordPress. But the setup should always be done with care. The safest method is using a custom page and smart redirects. You should never rename or edit WordPress core files directly. That creates future update and maintenance problems. A better method is to build a clean custom path. Then test each login step before blocking old access. This gives you more control without adding plugin weight.
A custom login URL WordPress setup can make admin access cleaner. It can also make the default login path less obvious. That helps reduce random visits to common login pages. Still, this is not a complete security solution alone. Good passwords, login protection, updates, and backups still matter. A strong WordPress security login URL setup should always include those steps. When planned well, the custom login path becomes useful and stable. When rushed, it can create lockouts and confusion instead. That is why careful setup always matters more than fast setup.
If you want to change WordPress login URL settings safely, follow each step in order. Test the custom page first before changing old login access. Keep recovery access ready during the whole process. Also document your setup for future updates and fixes. These small habits make a big difference later. They help keep your WordPress custom login page URL stable over time. They also reduce future support problems for your website.
If you want expert help with this setup, 24×7 WP Support can help. Our team can help you change WordPress login URL settings safely. We can also help with redirects, login errors, and custom development. If you want to hide wp-admin login WordPress access properly, we can guide you. We also help fix issues caused by bad login redirects. Visit 24x7wpsupport to get professional WordPress support for your website.

Brian is a WordPress support specialist and content contributor at 24×7 WP Support. He writes practical, easy-to-follow guides on WordPress troubleshooting, WooCommerce issues, plugin and theme errors, website security, migrations, performance optimization, and integrations. With a focus on solving real website problems, Brian helps business owners, bloggers, and online store managers keep their WordPress sites running smoothly.
