
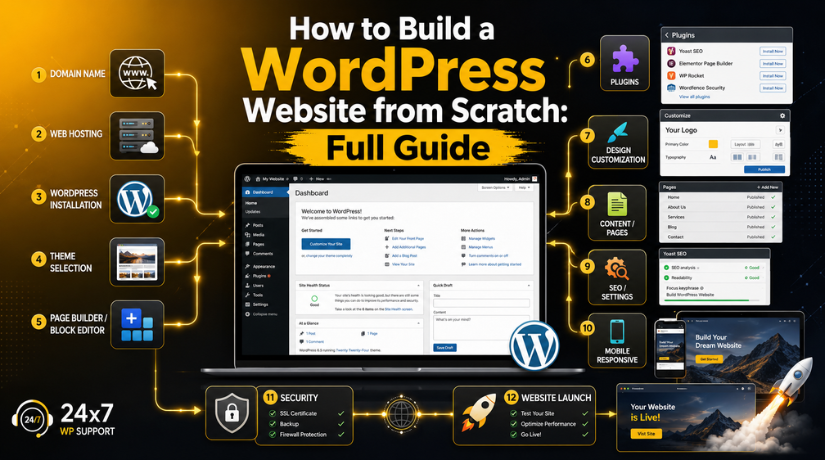
How to Build a WordPress Website from Scratch: Full Guide
Introduction
Building a WordPress website from scratch might sound intimidating — but in 2026, it’s one of the most beginner-friendly things you can do online. Millions of people with zero coding experience have launched fully functional websites using WordPress, and you can too. Whether you want a personal blog, a business site, a portfolio, or an online store, this guide walks you through every step from selecting hosting to publishing your first page.
WordPress powers over 43% of all websites on the internet. That’s not an accident — it’s because the platform strikes the perfect balance between flexibility and ease of use. Let’s get you up and running.
What You Need Before You Start
Before touching WordPress, you need two foundational things in place: a domain name and web hosting. Think of your domain as your website’s street address, and hosting as the land it sits on. Without both, your site has nowhere to live on the internet.
Here’s a quick overview of what to expect cost-wise in 2026:
- Domain name: $10–$20/year (often free with hosting plans)
- Shared hosting: $3–$15/month (great for beginners)
- Managed WordPress hosting: $15–$50/month (faster, more hands-off)
- Premium theme (optional): $30–$100 one-time
- Essential plugins: Mostly free, with premium options available
If you’re on a tight budget, you can absolutely get started for under $50/year. If you want performance and premium tools, budget closer to $200–$300/year. For a full cost breakdown, check out our guide on how much it costs to build a WordPress website in 2026.
Step 1: Choose and Purchase Web Hosting
Your hosting provider is one of the most important decisions you’ll make. Speed, reliability, and customer support all depend on it. For beginners, shared hosting is usually the best starting point — it’s affordable, easy to manage, and more than capable of handling a new website.
Popular Hosting Options for WordPress in 2026
Some of the most widely used WordPress hosting providers include SiteGround, Bluehost, Hostinger, and DreamHost. Most of them offer one-click WordPress installation, a free domain for the first year, free SSL certificates, and 24/7 support.
When choosing a host, look for:
- WordPress-specific performance optimizations
- Automatic backups
- Free SSL (HTTPS)
- A money-back guarantee so you can switch if needed
If you’re planning to grow quickly, consider managed WordPress hosting from the start. It costs more but eliminates a lot of technical headaches. For a cost comparison on WordPress hosting, read our dedicated post on how much WordPress hosting costs in 2026.
Step 2: Register Your Domain Name
Your domain name is your brand’s first impression online. Choose something short, memorable, and relevant to your content or business. Avoid hyphens, numbers, and overly long names — they’re harder to remember and type.
Tips for Picking a Great Domain
Stick to a .com extension if possible — it’s still the most trusted and recognized. If your ideal .com is taken, consider .co, .net, or a country-specific extension. Use your brand name, your name (for personal sites), or a phrase that clearly describes what you do.
Most hosting providers let you register your domain directly through them, which makes DNS configuration easier. Once you’ve registered, you’re ready to install WordPress.
Step 3: Install WordPress
Installing WordPress used to require technical know-how. In 2026, most reputable hosting providers handle this automatically. When you sign up, you’ll often be prompted to install WordPress with a single click through tools like Softaculous, Installatron, or a custom one-click installer built into the hosting dashboard.
The One-Click Install Process
Log into your hosting control panel (cPanel or a custom dashboard), find the WordPress installer, enter your site name, admin username, and password, then click Install. Within minutes, WordPress is live and ready. You’ll receive a URL to your WordPress admin dashboard — typically yourdomain.com/wp-admin.
What If You Want to Install Manually?
Manual installation is rarely necessary, but it’s an option if you need more control. It involves downloading the WordPress files from WordPress.org, uploading them to your hosting server via FTP, creating a MySQL database, and running the WordPress setup wizard. Unless you have a specific reason, skip this and use the one-click installer.
Step 4: Choose and Install a Theme
Once inside your WordPress dashboard, the first thing you’ll want to do is choose a theme. Your theme controls the visual appearance of your site — layout, fonts, colors, and overall design style.
Free vs. Premium Themes
WordPress.org’s official theme directory has over 14,000 free themes. Popular choices for beginners include Neve, Astra, GeneratePress, and OceanWP — all of which are fast, SEO-friendly, and highly customizable. If you want a more polished, feature-rich look from day one, premium themes from marketplaces like ThemeForest offer professional designs.
To install a theme, go to Appearance → Themes → Add New in your dashboard. Search for a theme, preview it, and click Install, then Activate. For more options and recommendations, browse our roundup of the best free WordPress themes.
Customizing Your Theme
After activating a theme, head to Appearance → Customize to open the WordPress Customizer. Here you can upload your logo, set your site colors and typography, configure your header and footer, and preview changes in real time before publishing. Many modern themes also include their own customization panels with even more options.
If you want drag-and-drop control over page layouts, you can use a page builder plugin like Elementor or Beaver Builder. These tools make it easy to design individual pages without writing any code.
Step 5: Install Essential Plugins
Plugins are what make WordPress truly powerful. They add functionality to your site — everything from contact forms and SEO tools to performance optimizations and security features. The WordPress plugin repository has over 60,000 free plugins available.
Must-Have Plugins for Every WordPress Site
Here’s a core set of plugins to install right away:
- Yoast SEO or Rank Math — for on-page SEO optimization
- WP Rocket or W3 Total Cache — for site speed and caching
- Wordfence or Solid Security — for security monitoring and firewall protection
- UpdraftPlus — for automated backups
- WPForms or Contact Form 7 — for contact and lead forms
- Smush or ShortPixel — for image compression and optimization
To install a plugin, go to Plugins → Add New, search by name, click Install Now, then Activate. For a full breakdown of essential plugins for beginners, see our guide on the best WordPress plugins for beginners.


Step 6: Create Your Core Pages
With your theme and plugins in place, it’s time to add content. Every WordPress site needs a handful of essential pages to feel complete and professional.
Pages Every Website Needs
Homepage — Your most important page. It should communicate who you are, what you offer, and guide visitors toward your key goal (contact, purchase, subscribe, etc.).
About Page — Tell your story. People buy from people they trust, and a well-written About page builds credibility quickly.
Contact Page — Make it easy for visitors to reach you. Use your contact form plugin to embed a form, and include your email, phone number, or business address if relevant.
Blog Page — Even if you’re not a blogger, a blog section helps with SEO and keeps your site fresh with new content.
Privacy Policy & Terms of Service — These are legally important, especially if you collect any user data. Many themes include placeholder templates for these pages.
To create a page, go to Pages → Add New. Use the WordPress block editor (Gutenberg) to add text, images, buttons, and other content blocks. When finished, click Publish.
Step 7: Configure Your Settings and Navigation
After your pages are created, set your homepage and blog page correctly. Go to Settings → Reading and choose “A static page” under “Your homepage displays.” Select your Homepage and Blog page from the dropdowns.
Setting Up Your Navigation Menu
Go to Appearance → Menus to create your main navigation menu. Add your key pages, drag them into the desired order, and assign the menu to your Primary Menu location. A clean, logical menu makes it easy for visitors to explore your site.
Permalink Settings
Go to Settings → Permalinks and choose “Post name” as your URL structure. This produces clean, readable URLs like yoursite.com/contact instead of yoursite.com/?p=123 — much better for SEO.
Step 8: Set Up Basic SEO
A beautiful website won’t help if nobody can find it. Basic SEO configuration ensures search engines can crawl and understand your site from day one.
Using Yoast SEO or Rank Math, configure your site’s:
- Site title and tagline — Go to Settings → General to update these
- XML sitemap — Both Yoast and Rank Math generate these automatically
- Meta descriptions — Add these to each page for better click-through rates in search results
- Google Search Console — Submit your sitemap here so Google starts indexing your pages
SEO is a long game, but setting things up correctly from the start puts you in a much stronger position as your site grows.
Step 9: Secure Your Site and Set Up Backups
Security is non-negotiable. WordPress sites are targeted by bots and hackers constantly, but a few simple measures dramatically reduce your risk.
Install a security plugin like Wordfence, enable two-factor authentication for your admin login, change the default admin username (“admin” is the most commonly targeted), and keep WordPress core, themes, and plugins updated at all times.
For backups, use UpdraftPlus to schedule automatic daily or weekly backups to a remote location like Google Drive or Dropbox. If anything ever goes wrong, you can restore your site with a few clicks. Want to go deeper on keeping your site safe? Our guide on the best WordPress security plugins covers everything you need.
Step 10: Test Before You Launch
Before announcing your site to the world, run through a final checklist:
- Does your site load on mobile? (Check on multiple devices)
- Do all navigation links work?
- Does your contact form send submissions correctly?
- Is your SSL certificate active (padlock icon in the browser)?
- Does your site load quickly? (Use Google PageSpeed Insights to test)
- Are your meta titles and descriptions set on all key pages?
Fix any issues you find, then do a final review of your content for spelling, grammar, and formatting consistency. Once you’re satisfied, your site is ready to go live.
You’re Ready to Launch
Building a WordPress website from scratch in 2026 is genuinely achievable for anyone — no technical background required. With the right hosting, a clean theme, essential plugins, and well-crafted content, you can have a professional website running in a single weekend. The key is to start simple, get the basics right, and then add complexity as your needs grow.
If you’d rather have a team of WordPress experts handle the setup, optimization, and ongoing maintenance for you, 24×7 WP Support is here to help. We offer professional WordPress development, speed optimization, security hardening, and unlimited support — so you can focus on your business while we handle the tech. Get in touch with our team today and let’s build something great together.
Related posts:

Brian is a WordPress support specialist and content contributor at 24×7 WP Support. He writes practical, easy-to-follow guides on WordPress troubleshooting, WooCommerce issues, plugin and theme errors, website security, migrations, performance optimization, and integrations. With a focus on solving real website problems, Brian helps business owners, bloggers, and online store managers keep their WordPress sites running smoothly.
