How to Add Custom Links to Gallery Images in WordPress?
Last updated on July 23rd, 2021 at 09:20 am
The gallery is the most common and useful feature of WordPress which is going obtuse by the many WordPress User in nowadays. We know that Gallery Play an important role in creating and storing images, video,s or any format content in it. The gallery is also known for representing visual content and providing a space to store it. There are lots of types of galleries present in WordPress. These galleries may contain various types of special code or having various formats of the display to represent the WordPress image. The image which is present in WordPress is represented in an attractive manner and placed in a category wise format. In this article, we are going to go through in detail about adding a custom link to the gallery image in WordPress. So let’s get started.
What are WordPress gallery custom links?
Gallery custom links are to be known as the user may add any type of media such as Image, video, GIF, and many more in any WordPress website. After that, a custom link is to be generated so that the user can use that link in their WordPress content. These links are very beneficial at the point of visitors because they can redirect to another URL after clicking. These URLs are going to help in attaching the specific image in that. It is a type of functionality where users can build in any part of the wordpress website.
How to add Custom Links to gallery Image?
We are going to add Custom links to the gallery image with the help of the wordPress plugin. Now let’s understand all the things in detail. We are going to cover all things such as how to install How to Add Custom Links plugin in wordpress? How to Setup Gallery Custom Links plugin in detail? All these topics we are going to discuss in detail so read this article carefully.
How to Install and Activate Gallery Custom Links plugin in WordPress?
- First of all, a user needs to login to the wordpress dashboard by using a login ID or username and password after that click on the submit option.
- Now user successfully logged in to the wordpress dashboard area. Users can see on the left top of the screen a dashboard context menu appear on the screen.
- Now the user must click on the plugin option which is present in the context menu. After that is a context menu appears on the screen. The user must click the add new plugin option in the sub context menu.
- After clicking on the Add New Plugin option a new screen appears in front of the user. The user can see a search box on the screen. Now the user must enter a keyword i.e. “Gallery Custom Links”. After entering the user must hit enter and the user can see the plugin appears on the screen.
- Now users click on the install button and after some time plugin will be installed in wordpress.
- After successfully installation user can see the “Activate” button. Now the user must click on the Activate button. Now The Gallery Custom Links plugin has been activated in wordpress.
Now user can see that the wordpress plugin has been successfully installed and activated in the desired wordpress.
How to setup and add links to Gallery Custom Links plugin WordPress?
As we know that it is a free wordpress plugin for all users. There will be no pro version available to any user. This wordpress plugin is setup out of the box. That’s why there is no such special or custom setting for it. Users can simply use this. So follow all the steps which are given below.
- First of all, a user needs to login to the wordpress dashboard by using a login ID or username and password after that click on the submit option.
- Now user successfully logged in to the wordpress dashboard area. Users can see on the left top of the screen a dashboard context menu appear on the screen.
- Now the user must click on the “Add New” Post option. A sub-context menu appears. After clicking on that option user will see the “Add New Post” option. Now the user must click on “Add a new post”.
- Then a New Post section appears on the screen. In this section, the user can create or design a custom post it.
- Now user can see a tool sidebar that is present on the screen on the right side. Now user can see a custom meta field that is on the toolbar.
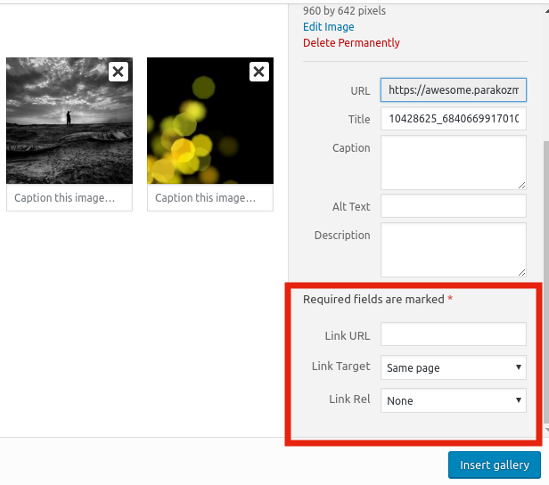
- Now the user must scroll down and see custom link meta fields. As you can see in the image given below

- Where the user can see few options are present in a custom link meta tag such as Link URL, Link Target, Link rel. Whereas the user can add any link from any post, gallery, and some external links in the “Link URL field”.
- After that users can choose all the fields according to their requirements. Such as user wants to open That URL in the same field or a new window.
This plugin contains lots of features. With the help of this plugin, the user can show or display the image in the lightbox and carousel popup. This plugin also contains some highly enhanced features in it such as disable individual image which is present in the gallery.
How to add custom links to a Single Image?
Now we are going to follow the process of a single image with a custom link. So, read and follow all the steps which are given below.
- First of all, a user needs to login into the wordpress dashboard by using a login ID or username and password after that click on the submit option.
- Now user successfully logged in to the wordpress dashboard area. Users can see on the left top of the screen a dashboard context menu appear on the screen.
- Now the user must click on the “Add New” Post option. A sub-context menu appears. After clicking on that option user will see the “Add New Post” option. Now the user must click on “Add a new post”.
- Then a New post section appears on the screen. In this section, the user can create or design a custom post it.
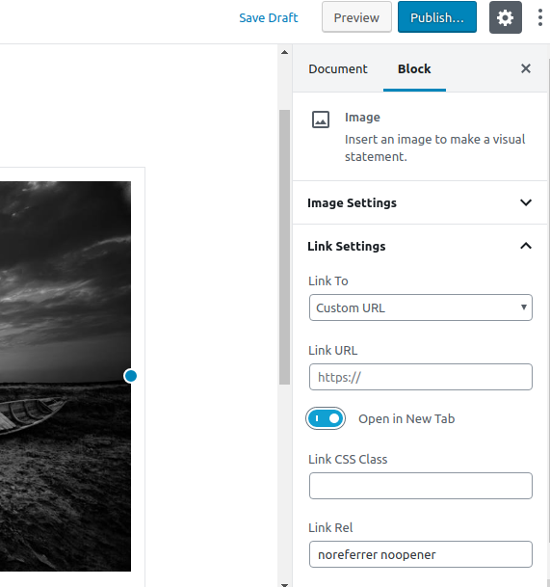
- Now user can see a tool sidebar that is present on the screen on the right side. In that sidebar, users can see two options that are “Documents” and “Block”. Now the user must click on the “Block” option.
- Now users can see Link Setting in that link setting user can see a lot of options are present., as you can see in the image below.


