
How to Activate Akismet in WordPress: Complete Step-by-Step Guide
Last updated on April 23rd, 2026 at 01:12 pm
Introduction
Spam is a common problem on many WordPress websites today. It can fill your comment area with junk messages fast. It can also affect contact forms and user submissions badly. This creates more work for website owners and admins daily. It also makes your website look less trusted to visitors. That is why many users choose Akismet for spam control. It is one of the most trusted tools in WordPress today.
If you want better spam control, this guide will help. It explains how to Activate Akismet in WordPress correctly. It also explains the basic Akismet plugin setup process clearly. Many site owners ask how to enable Akismet WordPress properly. Some also want to know which steps come after activation. That is important because activation alone does not finish setup. You must also connect the plugin before it starts working. Once connected, it helps block spam in the background. This makes daily website management much easier and faster.
In this guide, you will learn the first important basics. You will understand what Akismet is and why it matters. You will also see why so many website owners trust it. If you want a reliable WordPress spam protection plugin, Akismet is a strong choice.
What Is Akismet in WordPress and What Does It Actually Do?
Akismet is a spam filtering plugin made for WordPress websites. It checks incoming content and looks for spam signs automatically. It works quietly in the background after proper setup finishes. This makes it useful for beginners and experienced users alike. Akismet is known as an Akismet anti-spam WordPress solution. It helps site owners avoid wasting time on junk content. Instead of checking every message by hand, Akismet helps first. It scans data and decides what looks safe or suspicious. This helps keep your website cleaner and more professional. It is one of the most well-known spam tools available.
Many WordPress users install it on new websites early. That is because spam can start even on small sites. If your site accepts public content, spam may appear soon. Akismet helps reduce that problem before it grows bigger. It is simple to use once the connection is complete. Many users search how to enable Akismet WordPress for this reason. They want a quick and smart way to control spam. Akismet gives that support through an easy plugin system.
Akismet is popular because it is easy to start using. Many WordPress websites already know its name and purpose. It has been trusted by website owners for many years. Users like tools that save time and reduce daily stress. Akismet does both in a simple and direct way. It helps reduce manual moderation work in the dashboard. That means admins spend less time cleaning spam manually. They can focus more on content and real visitors instead. Another reason is its easy Akismet plugin setup process.
Users can install, activate, and connect it without much confusion. Many people also search for the Akismet plugin step by step online. They want a simple process that works without trouble. Akismet fits that need very well for most users. It is also helpful for blogs, business sites, and stores. Small websites and large websites both use it regularly. It works well for users who want easy spam control. That is why Akismet remains a trusted WordPress choice today.
Why You Should Activate Akismet on Your WordPress Site
Activating Akismet Saves Time for WordPress Website Owners
Spam takes time to check, remove, and manage every week. This becomes harder as your website gets more traffic. A busy site may receive many junk messages each day. Cleaning them by hand can waste valuable working hours. That is one reason to Activate Akismet in WordPress early. Akismet helps reduce the number of spam items you review. It checks content in the background without extra daily effort. This makes moderation faster and simpler for site admins. A good WordPress spam protection plugin should save real time. Akismet does that well for many WordPress website owners. It is a smart choice for users who want a better workflow. Instead of sorting every comment manually, the plugin helps first. This makes daily dashboard tasks more manageable and less stressful.
Akismet Helps Keep Your WordPress Website Clean
A website looks better when spam stays under control always. Visitors trust pages that look clean and professionally managed. Spam comments can make even good websites look weak. Fake messages also lower the quality of public discussion areas. That is why Akismet anti-spam WordPress protection matters so much. Akismet helps filter junk before it fills your website sections. This keeps comment areas cleaner and easier to manage daily. It also helps reduce harmful links in public submissions. A clean website gives visitors a better overall first impression. That matters for blogs, company sites, and online stores. If you want a strong website presentation, spam control matters too. When you Activate Akismet in WordPress, you take that step early. It helps your site stay neat, useful, and more trusted.
Akismet Supports a Better Experience for Website Visitors
Visitors enjoy websites that feel safe and well managed. They do not want to read fake comments or spam links. They also do not trust pages filled with low-quality messages. Good filtering helps create a better user experience overall. That is another reason many users choose Akismet quickly. It protects public areas and improves content quality at once. This helps real visitors focus on useful content and discussion. A cleaner comment area also supports better website trust. When users search how to enable Akismet WordPress, this is why. They want easier management and better visitor experience together. Akismet helps meet both goals with one trusted plugin. It works quietly, but the results are easy to notice.
Akismet Works Well for Many Types of WordPress Websites
Not every WordPress website works the same way daily. Some are blogs and some are business websites. Some are portfolios and some are WooCommerce stores. Many also use contact forms for customer communication online. All these websites can face spam in different forms. That is why Akismet works well for many website types. It is not only useful for blog comment moderation tasks. It also helps websites that collect form entries regularly. This wider use makes Akismet more useful to more users. A flexible WordPress spam protection plugin brings more value long term. If you want a tool for different spam risks, Akismet helps. It is a practical solution for many website owners today.
Akismet Works Quietly in the Background After Setup
One major benefit of Akismet is its silent workflow. After proper Akismet plugin setup, it works in the background. You do not need to watch every item constantly. The plugin checks content as it comes into the website. This automatic process helps reduce manual work each day. It also makes site management feel lighter and more organized. Many users want this kind of easy support system. That is why they search to activate the Akismet plugin step by step. They want a simple setup with long-term spam control benefits. Akismet offers that balance in a user-friendly way. Later, you may also need to learn how to use the Akismet API key during connection. That step helps complete the setup properly.
What You Need Before Activating Akismet in WordPress on Your Website
You Need WordPress Admin Access
Before starting, you need access to your WordPress dashboard. In most cases, only an administrator can install or activate plugins. If you do not have admin rights, you may not see the plugin options. This is the first thing to check before starting the Akismet plugin setup.
You Need to Check Whether Akismet Is Already Installed
Some WordPress websites already have Akismet installed by default. That is why you should first open the Plugins page and check the installed plugin list. If Akismet is already there, you can move to the next step quickly. This makes it easier to activate Akismet in WordPress without extra work.
You Need to Install the Correct Akismet Plugin
If the plugin is not already installed, you need to add it manually. Go to the Add New Plugin page and search for Akismet. You should make sure the plugin name is Akismet Anti-Spam. You should also check that the author is Automattic. This helps you avoid installing the wrong plugin by mistake.
You Need an Akismet Account or API Key
Plugin activation alone does not complete the full setup. After activation, Akismet must connect with its service before spam filtering starts. For that, you need an Akismet account or a valid API key. This is why many users search how to use the Akismet API key during setup. Without this connection, the plugin cannot protect your website properly.
You Need a Stable Internet Connection
A stable internet connection is also important during setup. Akismet needs to connect with its online service when you link the plugin. If the connection is weak, the process may stop or fail. This can create confusion for beginners. A smooth connection helps the setup finish without problems.
You Need to Know That Jetpack May Change the Settings Path
On some websites, Akismet settings may appear inside Jetpack. This does not happen on every WordPress website, but it is still important to know. If Jetpack is installed, the path to Akismet settings may look different. This can confuse users during setup. So it is good to mention this before the activation process begins.
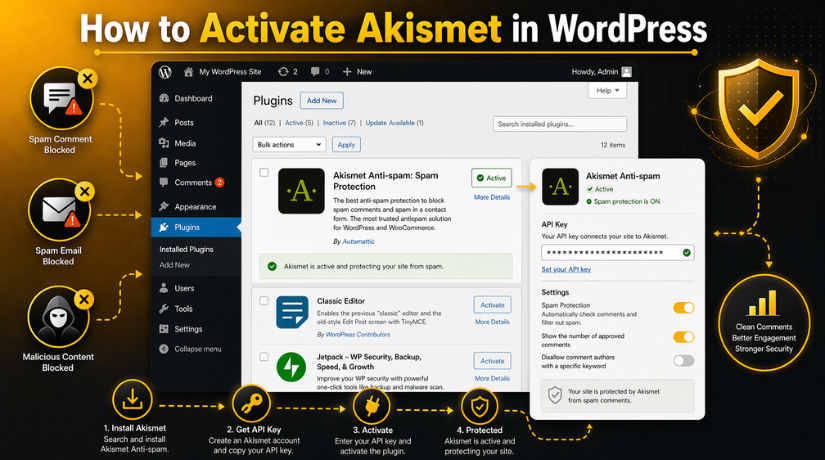
How to Activate Akismet in WordPress Easily (Complete Guide)
Step 1: Log in to your WordPress dashboard
- Open your WordPress admin login page.
- Enter your username and password.
- Log in with an administrator account.
- Make sure you have permission to install plugins.
- This is required before you start the setup.
Step 2: Go to Plugins → Add New
- Look at the left menu in your dashboard.
- Click on Plugins.
- Then click Add New.
- This will open the WordPress plugin search page.
- Now you are ready to search for Akismet.
Step 3: Search for Akismet
- Type Akismet in the search box.
- Wait for the results to load.
- Find Akismet Anti-Spam in the results.
- Check that the author is Automattic.
- Make sure you choose the correct plugin.
Step 4: Install the plugin
- Click the Install Now button.
- Wait a few seconds for installation to finish.
- Do not close the page during installation.
- WordPress will install the plugin automatically.
- After that, the activate option will appear.
Step 5: Click Activate
- Click the Activate button after installation.
- WordPress will enable the plugin on your website.
- This starts the Akismet plugin setup process.
- The plugin is now active in your dashboard.
- But the full setup is not finished yet.
Step 6: Open Akismet settings
- After activation, go to the left menu.
- Click Settings.
- Then open Akismet Anti-Spam.
- On some sites, it may appear under Jetpack.
- Open the settings page to continue setup.
Step 7: Connect Akismet


- On the settings page, look for the setup option.
- Click the button to connect Akismet.
- You may see account setup or API key options.
- Choose the option that matches your need.
- This step is required for spam protection to work.
Step 8: Enter your API key if needed
- If you already have an API key, use it here.
- Click the manual API key option.
- Paste your Akismet API key into the field.
- Click the connect or save button.
- This completes the connection part of the setup.
Step 9: Adjust Akismet settings
- Review the available Akismet settings carefully.
- Choose how spam should be handled on your site.
- Enable automatic spam filtering if needed.
- Check privacy notice settings for comment forms.
- Save your changes after reviewing the options.
Step 10: Make sure it is working
- Open your comments area in WordPress.
- Check whether spam items are being filtered.
- Test a comment or form submission if needed.
- Confirm the plugin shows an active connection.
- Make sure Akismet is protecting your website properly.
Activation alone is not the full setup. Akismet starts protecting your site only after you connect it with an account, API key, or Jetpack-supported setup.
How to Connect Akismet After Activation in WordPress the Right Way
After plugin activation, the next step is connection setup. This step is very important for full spam protection. Many users think activation alone finishes the whole process. But that is not how Akismet works in WordPress. The plugin must connect with an Akismet account or API key.
Step 1: Open your WordPress dashboard
- Log in to your WordPress admin panel.
- Use an administrator account for full plugin access.
- Make sure the Akismet plugin is already activated.
- Then move to the plugin settings area.
Step 2: Go to the Akismet settings page
- Look at the left menu in your dashboard.
- Click Settings.
- Then click Akismet Anti-Spam.
- On some websites, it may appear under Jetpack.
- Open that page to start the connection process.
Step 3: Choose how you want to connect Akismet
- On the settings page, you will see connection options.
- You can create a new Akismet account.
- You can enter an existing API key.
- Some websites may also show a Jetpack option.
- Choose the option that fits your setup.
Step 4: Create a new Akismet account if needed
- Click the setup or account creation button.
- A new page or window may open.
- Follow the signup steps on the Akismet website.
- Choose the plan that matches your website use.
- Complete the signup process carefully.
Step 5: Return to WordPress after account setup
- After signup, come back to your dashboard.
- Open the Akismet settings page again if needed.
- Check whether the connection finished automatically.
- If not, continue with the next step manually.
- This helps complete the Akismet plugin setup.
Step 6: Enter your Akismet API key if you already have one
- Click the option to enter the API key manually.
- Copy your Akismet API key carefully.
- Paste it into the API key field.
- Make sure there are no extra spaces.
- Then continue to connect the plugin.
Step 7: Click the connect button
- After entering the key, click Connect with API Key.
- Wait a few seconds for the connection to complete.
- WordPress will verify the key with Akismet.
- If the key is correct, the setup will continue.
- This is how to use the Akismet API key properly.
Step 8: Use the Jetpack option if your site shows it
- Some websites connect Akismet through Jetpack.
- If that option appears, click the Jetpack connection button.
- Follow the login or connection steps shown there.
- Complete the process using your connected Jetpack account.
- Then return to the Akismet settings page.
Step 9: Check whether Akismet is now connected
- Look for a success or connected message.
- Make sure there is no warning on the page.
- Confirm the plugin no longer asks for setup.
- This means the service connection worked correctly.
- Your Akismet anti-spam WordPress setup is now complete.
Step 10: Review the settings after connection
- Check the available spam handling settings.
- Choose how spam should be managed on your website.
- Save your settings after reviewing them.
- This helps your WordPress spam protection plugin work better.
- Now Akismet is ready to protect your website.
Activating the plugin is only the first part. Akismet works fully after the connection is completed. Without connection, spam filtering will not work properly. Always complete both activation and connection steps. This is the right way to activate the Akismet plugin step by step.
Common Problems When Activating Akismet in WordPress and How to Fix Them
Sometimes Akismet setup looks simple, but users still face small issues. These problems usually happen during install, activation, or connection. The good news is that most of them are easy to fix. You just need to check each step carefully and calmly. This part will help readers understand the most common issues. It will also help them complete the Akismet plugin setup properly. If someone wants to Activate Akismet in WordPress, this section is very useful. It explains where users usually get stuck and why.
Akismet Is Not Installed on the Website Yet
One common problem is that Akismet is not installed yet. Some users open the plugin page and do not see it. This usually means the plugin was never installed before. In that case, they need to open Plugins > Add New. Then they should search for Akismet and install it. They should also confirm the author is Automattic first. This avoids mistakes caused by installing the wrong plugin. This is often the first fix in an activated Akismet plugin step by step guide. Once the correct plugin is installed, activation becomes easy. Akismet’s official guide says users should search for Akismet, confirm the author is Automattic, install it, and then click Activate.
Activate Button Does Not Appear in WordPress
Some users cannot find the Activate button after installation. In many cases, this means the plugin is already active. It can also happen if the page did not refresh properly. Another possible reason is limited dashboard permissions. A user without admin rights may not see full plugin options. That is why admin access matters before starting setup. If the button is missing, users should first refresh the page. Then they should check whether Akismet already appears as active. This small check often solves the issue quickly. Akismet’s official setup instructions say that once the plugin is installed, WordPress should show the blue Activate button as the next step.
Akismet Settings Page Is Missing After Activation
Another common issue is a missing settings page after activation. Users may expect it under the normal Settings menu. On many websites, that is exactly where it appears. But some websites show it under Jetpack instead. This usually happens when Jetpack is installed on the site. That difference can confuse new WordPress users very easily. If the settings page is not under Settings, check Jetpack next. This is a very important troubleshooting point for beginners. It also makes your Akismet anti-spam WordPress guide more complete. Akismet’s official instructions say the settings page is usually under Settings → Akismet Anti-Spam, or under Jetpack → Akismet Anti-Spam when Jetpack is installed.
Akismet API Key Is Not Working Correctly
Many users activate the plugin but then face API key errors. This usually happens during the connection part of setup. Sometimes the key was copied with an extra space. Sometimes one character is missing from the key field. In other cases, the wrong key was entered completely. That is why users should paste the key very carefully. The API key is what registers Akismet for the website. Without a valid key, the plugin cannot complete setup. If the key is lost, users can request it again. This is very helpful for people learning how to use the Akismet API key for the first time. Akismet says the API key is sent by email after signup, it is used to register the site, and lost keys can be resent.
Akismet Is Active but Spam Still Appears on the Website
Some users think Akismet failed because they still see spam. But that does not always mean the plugin is broken. First, they should confirm the plugin is fully connected. Activation alone does not start full spam filtering. After activation, Akismet still needs an account or API key. Users should also check whether their contact form plugin supports Akismet. This is important because not every form setup works the same way. If comments are protected but forms are not, compatibility may be the reason. This is why a good WordPress spam protection plugin guide should mention form support clearly. Akismet’s official guide says activation must be followed by connection, and users protecting contact forms should make sure the form plugin is compatible and configured.
Setup Screen Looks Different on Some WordPress Websites
Some readers may notice that their Akismet screen looks different. This can happen because of plugin combinations or Jetpack integration. It can also happen because the site already has Akismet installed. In some cases, users start from Plugins and in others from Settings. Some users will see the account setup button first. Others will see the API key option right away. These small differences are normal in real WordPress websites. The important thing is to follow the same setup goal. Users need to install, activate, then connect Akismet correctly. That is still the correct path for anyone asking how to enable Akismet WordPress today. Akismet’s official instructions describe multiple valid paths, including installing from Plugins, entering an API key manually, and connecting through Jetpack when available.
Conclusion
Activating Akismet in WordPress is a smart step for any website owner. Spam can grow quickly and create extra work every day. It can affect comments, contact forms, and user trust badly. That is why proper setup matters from the beginning. You should not stop after only activating the plugin. The full process includes installation, activation, connection, and testing. Once that setup is complete, Akismet can start filtering spam properly. This helps save time and keeps your website cleaner. It also gives your visitors a better experience on your site.
A clean website always feels more professional and more trusted. Visitors do not want to see junk comments or fake messages. Website owners also do not want to waste hours removing spam. Akismet helps reduce that daily problem in a simple way. It works quietly in the background after proper setup. That makes it useful for blogs, business sites, and WooCommerce websites. It is one of the easiest ways to improve basic spam control. If your website accepts any kind of public submission, this plugin can help a lot. When used correctly, it supports a safer and more organized website environment.
Still, many users face problems during plugin setup. Some struggle with activation. Others get confused during API key connection. Some do not know if the plugin is working correctly. That is why expert help can make things easier. A small setup mistake can stop protection from working fully. Getting the setup right from the start can save time later. It can also prevent confusion, spam issues, and missed settings. If you want your WordPress website set up the right way, professional support is a smart choice.
Need help activating Akismet on your WordPress website? 24x7WPSupport can help you with plugin setup, API key connection, spam protection, and complete WordPress support services. Their team can also help with plugin issues, website errors, speed improvements, malware cleanup, WooCommerce problems, and regular maintenance work. If you want fast and reliable WordPress help, visit 24x7wpsupport and connect with their support team today. A properly managed website stays cleaner, safer, and easier to run.

Brian is a WordPress support specialist and content contributor at 24×7 WP Support. He writes practical, easy-to-follow guides on WordPress troubleshooting, WooCommerce issues, plugin and theme errors, website security, migrations, performance optimization, and integrations. With a focus on solving real website problems, Brian helps business owners, bloggers, and online store managers keep their WordPress sites running smoothly.
