
How to Add Google AdSense to Your WordPress Website or Blog
Introduction
Many website owners want to earn money from their blogs. WordPress makes this goal simple for many users. You can publish helpful content and attract regular visitors. After that, you can show ads and earn revenue. This is where Google AdSense on WordPress becomes useful.
Google AdSense is one of the most common ad programs. It helps website owners display ads on their pages. These ads can appear inside posts, sidebars, headers, or other areas. Google manages the ads and shows them to suitable visitors. So, you do not need to contact advertisers directly.
Many bloggers use Google AdSense for WordPress blog monetization. It works well for content-based websites and niche blogs. It is also useful for news sites, guides, and tutorials. If your website gets steady traffic, AdSense can support income growth.
The fact that setup is simple is a plus. Google AdSense can be integrated into WordPress with a plugin. For basic setup, you don’t need to know complex coding. Your website can be linked to Google with the use of a plugin. Additionally, it might lessen setup errors.
In this guide, you will learn the basic idea first. You will understand what AdSense is and how it works. Then, the next parts will explain requirements and setup steps. This makes the full process easier for beginners.
What Is Google AdSense and Why Is It Useful?
Google offers a service called Google AdSense for advertisements. It enables website owners to display advertisements on their platforms. These advertisements typically have something to do with the content of the website. Additionally, they might match the interests and search habits of visitors.
For example, a cooking blog may show kitchen product ads. A technology blog may show software or hosting ads. A finance blog may show banking or investment ads. Google handles this ad matching process automatically.
This makes AdSense useful for WordPress website owners. You can focus on writing helpful content for users. Google manages advertisers, ad delivery, and basic revenue tracking. This saves time and keeps the process simple.
A proper WordPress AdSense integration can help monetize website traffic. Your blog visitors read your content and may see ads. When ads receive valid views or clicks, revenue may be generated. The exact earning depends on many different factors.
Website traffic, topic, visitor location, and ad demand are some of these aspects. The user experience can also be enhanced by excellent content. Improved user experience could lead to improved long-term ad performance.
Google AdSense is not a quick-rich method. It works best with regular content and steady visitors. Website owners should treat it as a long-term earning method. Good content and clean design are very important here.
Things You Need Before Adding Google AdSense to WordPress
Prepare Your WordPress Website Before AdSense Setup
Before you add Google AdSense on WordPress, your website must be ready. Google reviews your site before showing ads. So, your site should have useful content, clear pages, and a clean design. If your website looks unfinished, approval may become difficult.
Make Sure Your WordPress Website Is Live
Your website should be live and open to visitors. Google must access your pages during review. Do not apply while your site is private or under maintenance. Check that your homepage, blog posts, and main pages open properly.
Add Original and Helpful Content
Your content should be unique and useful. Do not copy content from other websites. Each post should answer real user questions. Avoid thin pages with very little information. If you want Google AdSense for WordPress blog, publish helpful guides, tips, or articles first.
Create Important Website Pages
Key pages provide your website a polished appearance. Make these pages before to adding Google AdSense to WordPress:
- About Us
- Contact Us
- Privacy Policy
- Terms and Conditions
- Disclaimer, if needed
Add these pages in your menu or footer. Visitors and Google should find them easily.
Keep Your Website Design Clean
Your website should be simple and easy to use. Menus should work properly. Text should be easy to read. Avoid broken layouts, too many popups, or confusing sections. A clean design supports better WordPress AdSense integration.


Check Mobile-Friendly Layout
Many visitors use mobile phones. So, your website must work well on small screens. Text, images, buttons, and menus should display correctly. Test your homepage and blog posts on mobile.
Get WordPress Admin Access
You need WordPress admin access for setup. Admin access lets you install plugins and manage settings. Most beginners use plugins for Google AdSense on WordPress. Without admin access, the setup process becomes difficult.
Create Your Google AdSense Account
Both an AdSense and a Google account are required. When registering, enter the right URL of your website. When setting up a plugin, use the same Google account. Google will review your website after it has been submitted. Once authorised, you are able to display advertisements.
Understand Basic AdSense Rules
Follow AdSense rules carefully. Do not click your own ads. Do not ask others to click your ads. Avoid copied content and misleading ad placement. Do not overload pages with ads. These rules protect your account and website.
Step By Step Guide to Add Google AdSense On WordPress Website
Step 1: Log In to Your WordPress Dashboard
- Open your WordPress admin login page.
- Enter your username and password.
- Click the Login button.
- Make sure you have admin access.
- Admin access is needed to install plugins.
- This starts your AdSense setup WordPress process.
Step 2: Go to the Plugin Section
- Look at the left-side WordPress menu.
- Click on Plugins from the menu.
- Then click on Add New.
- This page lets you install new plugins.
- You will install the AdSense plugin from here.
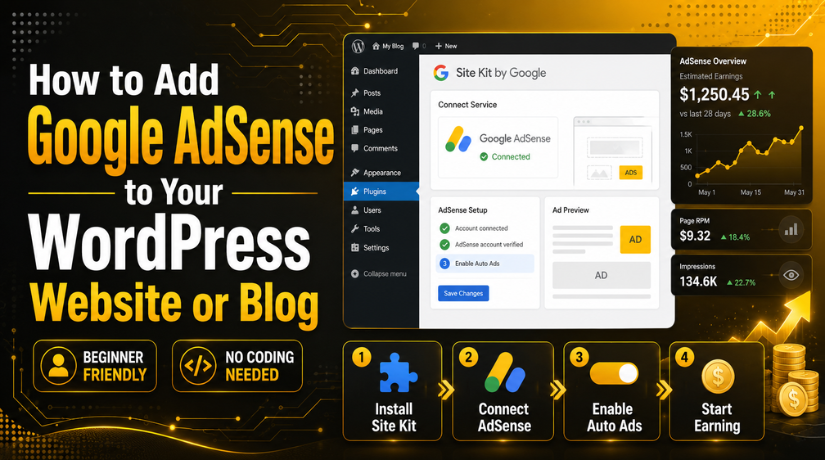
Step 3: Search for Site Kit by Google
- Go to the plugin search box.
- Type Site Kit by Google there.
- Wait for WordPress to show the plugin.
- Site Kit is the official Google plugin.
- It helps with Google AdSense on WordPress setup.
Step 4: Install the Site Kit Plugin
- Find the Site Kit by Google plugin.
- Click the Install Now button.
- Wait until WordPress installs the plugin.
- Do not refresh the page during installation.
- The button will change after installation finishes.
Step 5: Activate the Plugin
- Click the Activate button after installation.
- This will turn on the Site Kit plugin.
- Site Kit will appear in your dashboard menu.
- Your website is now ready for WordPress AdSense integration.
Step 6: Start the Site Kit Setup
- Click Site Kit from your dashboard menu.
- Click the Start Setup button.
- Site Kit will ask you to connect Google.
- Use the Google account linked with AdSense.
- This keeps the setup smooth and simple.
Step 7: Sign In With Your Google Account
- Sign in using your Google account.
- Allow the required permissions carefully.
- These permissions connect your site with Google tools.
- Follow each screen shown during setup.
- Continue until Site Kit setup is complete.
Step 8: Verify Your Website Ownership
- Site Kit may verify your website automatically.
- This proves that you manage the website.
- Follow the instructions shown on your screen.
- Wait until the verification process finishes.
- After verification, Google tools can connect properly.
Step 9: Connect Google AdSense Inside Site Kit
- Open the Site Kit dashboard again.
- Find the AdSense section.
- Click Connect Service under AdSense.
- Choose your Google account again.
- Follow the process shown by Google.
- This helps Add Google AdSense to WordPress without coding.
Step 10: Create or Select Your AdSense Account
- Select your existing AdSense account, if available.
- Create a new AdSense account, if needed.
- Add your correct website URL carefully.
- Check the URL before submitting it.
- Google will review your website before showing ads.
Step 11: Enable Auto Ads
- Open your Google AdSense account.
- Go to the ads settings area.
- Enable Auto Ads for your website.
- Auto Ads place ads automatically on pages.
- This is useful for beginners and bloggers.
- It makes Google AdSense for WordPress blog setup easier.
Step 12: Wait for Google Review
- Google may take time to review your website.
- Ads will not show before approval.
- Keep checking your AdSense account status.
- Do not remove Site Kit during review.
- Do not remove the AdSense code during review.
Step 13: Check Your Website After Approval
- Open your website after approval.
- Check your homepage first.
- Then check blog posts and category pages.
- Test your website on mobile devices.
- Make sure ads do not break the design.
- Clear cache if ads do not appear.
Step 14: Monitor AdSense Performance
- Open your Google AdSense dashboard.
- Check impressions, clicks, and earnings.
- Review which pages perform better.
- Do not click your own ads.
- Do not ask others to click ads.
- Follow Google rules for safe monetization.
Keep publishing helpful content regularly. Update plugins and themes safely. Avoid too many ads on one page. A clean website gives users a better experience. It also supports long-term Google AdSense on WordPress performance.
Common Reasons Google AdSense Ads May Not Show on WordPress
AdSense Account Is Not Approved Yet
Ads will not show before Google approves your website. This is a common issue for new users. After you submit your site, Google reviews your content and setup. It checks your pages, navigation, and policy status. If your account is still pending, wait for the final response.
Website Is Still Under Review
Sometimes your website stays under review for some time. This can happen after a new AdSense setup WordPress process. Google may need time to check your site properly. During this period, ads may not appear on pages. Keep publishing helpful content while you wait. Also, check your AdSense dashboard for updates. Do not make major changes during review.
AdSense Code Is Missing or Incorrect
Ads may not show if the code is missing. This can also happen when code is placed incorrectly. If you use Site Kit, check the plugin connection first. Make sure AdSense is connected inside Site Kit. If you added code manually, check the header section.
Cache Plugin Is Showing Old Pages
Plugins for caching might display older versions of your website. This could prevent visitors from seeing updated AdSense modifications. After setup, empty the WordPress cache. Clear the cache in both your browser and CDN. Clear any server cache that may be present on your hosting. Once your cache has been cleared, reopen your website.
Browser Ad Blocker Is Enabled
Ad blockers can hide ads during testing. Your setup may be correct, but ads may still not appear. Try opening your website in another browser. You can also disable the ad blocker temporarily. Check your site in incognito mode as well.
Auto Ads Are Not Enabled
Connecting AdSense is not always enough. You must also enable ads inside your AdSense account. If Auto Ads are off, ads may not appear automatically. Open your AdSense dashboard and check ad settings. Make sure your website is listed correctly.
Website Has Low-Quality or Thin Content
Low-quality content can affect ad approval and display. Google prefers useful, original, and complete content. Thin pages with little information may create problems. Copied content can also affect your website trust. Improve weak pages before expecting strong ad results.
Conclusion
Adding Google AdSense to WordPress becomes easier when your website is ready. Start with useful content, clear pages, and a clean design. Then use a trusted plugin like Site Kit by Google. It helps connect AdSense without editing code manually. After setup, check your website carefully on desktop and mobile. If ads do not appear, review your approval status, cache, plugin conflicts, Auto Ads settings, and ads.txt file.
For WordPress users who need help with AdSense setup or ad display issues, 24×7 WP Support provides assistance for self-hosted WordPress websites. You can contact their team through the official website or call the United States and Canada toll-free number: +1-888-818-9916.

Brian is a WordPress support specialist and content contributor at 24×7 WP Support. He writes practical, easy-to-follow guides on WordPress troubleshooting, WooCommerce issues, plugin and theme errors, website security, migrations, performance optimization, and integrations. With a focus on solving real website problems, Brian helps business owners, bloggers, and online store managers keep their WordPress sites running smoothly.
