
How to Embed a Twitter Feed in WordPress Without Plugins
Introduction
Many website owners use X, formerly Twitter, to share quick updates. These updates may include news, offers, tips, events, or brand messages. Adding those updates to your WordPress site can make your page feel more active.
You do not always need a plugin for this task. You can embed Twitter feed in WordPress without plugin using official embed code. This method is useful when you want a simple timeline display.
It also helps reduce extra plugin load on your website. Fewer plugins can make site management easier. This is helpful for small businesses, bloggers, and service websites.
A Twitter/X feed can help visitors:
- View your latest social updates.
- Follow your brand activity.
- Stay connected with your business.
- Trust that your website is active.
- Move from your site to your X profile.
This method works best for public X accounts. Private or restricted profiles may not show properly. So, always use a public profile URL before starting.
What Does Embedding a Twitter Feed Mean?
Embedding a Twitter feed means showing your X timeline inside WordPress. It does not mean copying tweets manually into your content. Instead, WordPress displays the feed through official embed code.
When you display Twitter timeline in WordPress, visitors can see recent posts from your profile. The feed may include posts, images, links, and engagement options. Users can scroll through updates without leaving your website.
You can place the embedded feed in different areas, such as:
- A blog post
- A website page
- A sidebar
- A footer section
- A custom HTML area
This setup is useful for websites needing live social proof. It shows visitors that your brand posts regular updates. It also keeps your WordPress page fresh without manual editing.
Before You Start: Things You Need
Before adding the feed, prepare a few basic details first. This helps you avoid display errors during the setup process.
You need a public X/Twitter profile URL. The account should not be private or restricted. A private profile may not show posts on your website.
You also need WordPress admin access. This allows you to edit pages, posts, widgets, or footer areas. Without admin access, you may not add custom embed code.
Make sure you know where the feed should appear. You can place it in a blog post, service page, sidebar, or footer. Choose a location that supports your page goal.
You should also check these things:
- Correct X/Twitter profile URL
- WordPress dashboard access
- Custom HTML block access
- Page or widget editing access
- Clear placement area for the feed
This preparation makes the process simple and smooth.
Step 1: Open the Official X Publish Tool
The official X Publish tool helps you generate embed code. You do not need coding knowledge for this step. The tool creates the timeline code for your website.
Open the X Publish tool in your browser. It gives options for posts, timelines, and buttons. For this guide, you need the timeline option.
This step is important when learning how to add X Twitter feed to WordPress manually. It keeps the process safe and clean. You should avoid using random third-party code generators.
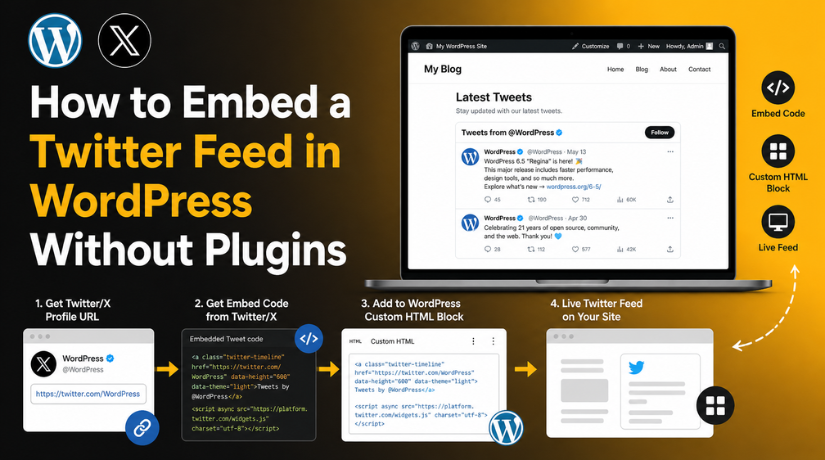
Step 2: Copy the X Profile URL
Now open the X profile you want to show. Copy the full profile URL from your browser address bar.
The URL usually looks like this:
https://x.com/username
Check the username before copying the link. A wrong URL can stop the timeline from loading. Also, do not copy a single post URL here. You need the full profile URL for a timeline feed.
Step 3: Paste the Profile URL
Go back to the X Publish tool. Paste the copied profile URL into the input box. The tool will check the link and show available display options.
Choose the timeline-related option in the next step. This prepares your feed for WordPress embedding.
Step 4: Choose the Embedded Timeline Option
After pasting the profile URL, X will show display options. Choose the Embedded Timeline option for your WordPress website. This option shows multiple recent posts from the selected profile.
Do not choose the button option for this purpose. Buttons are mainly used for follow or mention actions. They do not show a full timeline feed.
This step is important when you want to embed Twitter timeline in WordPress. It helps visitors view active social updates directly on your page.
Step 5: Customize the Timeline
After selecting the timeline option, customize the feed settings. These settings help the feed match your WordPress layout.
You can usually adjust:
- Timeline height
- Timeline width
- Light or dark theme
- Language settings
- Link color, if available
Keep the design simple and clean. A very tall feed can distract visitors from your main content. A very wide feed may break your page layout.


For most content areas, use a balanced width. For sidebars, keep the width flexible and clean. A height of around 500 to 600 pixels usually works well.
Also, match the theme with your website design. Use the light theme for clean pages. Use the dark theme only when it fits your design.
Step 6: Copy the Embed Code
Once the timeline looks right, copy the full embed code. Make sure you copy every line shown by X. Missing code can stop the timeline from loading.
The code may include HTML and a script file. Both parts help the timeline display correctly. Do not edit the code unless you understand it.
This is the main code used to add Twitter feed to WordPress without plugin. Keep it ready before opening your WordPress editor.
Step 7: Add Code in WordPress
Now open your WordPress dashboard. Go to the page, post, or widget area. Add a Custom HTML block where the feed should appear.
Paste the copied embed code inside that block. Then click preview to check the display. If everything looks correct, update or publish the page.
You can also use this code in:
- Custom HTML widget
- Page builder HTML module
- Footer widget area
- Theme template file, if needed
Use a theme file only when you know basic coding. A wrong edit can affect your site layout. For most users, the Custom HTML block is safer.
How to Add the Feed in WordPress Block Editor
The WordPress Block Editor makes this process very simple. You can place the feed inside any page or post. This method is best for blog pages, landing pages, and contact pages.
First, open your WordPress dashboard. Then go to the page or post you want to edit. Click the plus icon where the feed should appear.
Search for the Custom HTML block. Add this block to your content area. Now paste the X timeline embed code inside it.
After pasting the code, click the Preview option. This helps you check the timeline before publishing. If the feed looks correct, click Update or Publish.
Follow these simple steps:
- Open the page or post.
- Click the plus icon.
- Search for Custom HTML.
- Paste the timeline embed code.
- Preview the feed display.
- Update or publish the page.
Do not paste the code into a normal paragraph block. The script may not work correctly there. Always use the Custom HTML block for embed code.
How to Add the Feed in Sidebar or Footer
You can also show the timeline in a sidebar or footer. This is useful for blogs and business websites. It works like a Twitter feed widget WordPress setup without using plugins.
Go to your WordPress dashboard first. Then open Appearance and select Widgets. If you use a block theme, open the Site Editor instead.
Choose the sidebar or footer area. Add a Custom HTML block in that section. Paste the X timeline embed code into the block. Save your changes after checking the placement.
Use this simple process:
- Open Appearance from the dashboard.
- Go to Widgets or Site Editor.
- Choose sidebar or footer.
- Add a Custom HTML block.
- Paste the timeline code.
- Save the changes.
- Check the live website.
Always test the layout on mobile devices. A wide feed may not fit smaller screens. Keep the height balanced for better scrolling.
Best Practices After Adding the Twitter Feed
After adding the feed, check how it looks on your website. A clean layout gives users a better reading experience. Keep the timeline height balanced and easy to scroll.
Use a theme style that matches your website design. A light timeline works well on most clean layouts. Use a dark style only when it fits your brand.
Also, avoid adding too many social embeds on one page. Extra embeds can slow down loading speed. Test the page on desktop, tablet, and mobile devices.
Follow these simple checks:
- Keep the timeline height clear and balanced.
- Match the feed style with your website.
- Avoid placing feeds on every page.
- Test speed after adding the embed.
- Keep your X/Twitter profile active and public.
Common Issues and Quick Fixes
Sometimes the feed may not show correctly. This usually happens because of small setup mistakes.
If the feed shows only a link, check the block type. Use a Custom HTML block instead of a Paragraph block.
If the timeline does not load, check the full embed code. Missing script code can stop the feed from appearing.
If the layout looks too large, adjust width and height settings. If it fails on mobile, check your theme layout.
When You Should Avoid the Manual Method
Manual embedding works well for a simple profile timeline. But it may not suit advanced social feed needs.
Avoid this method when you need:
- Hashtag-based feeds
- Multiple account feeds
- Post filtering options
- Custom grid layouts
- Social feed analytics
Conclusion
You can embed Twitter feed in WordPress without plugin using official embed code. Add it through a Custom HTML block or widget area. Always preview the timeline before publishing your page. Also, test it on desktop and mobile screens. This helps you confirm the feed looks clean and works correctly.
This manual method is simple, lightweight, and useful for basic timelines. It helps you show fresh X/Twitter updates without adding another plugin. Keep your profile public and active for better results.
Need help fixing embed or layout issues? Contact 24×7 WP Support for quick WordPress help.
Related posts:
WordPress featured image not showing – The Probable Reasons and How to Resolve this Issue?
How to Use IDX in WordPress: Complete Guide for Real Estate Websites
How To Create A Login Page In WordPress
How to Resolve the “Missing MySQL Extension” Error in WordPress Quickly
How to Add a Pingback in WordPress: Beginner’s Step-by-Step Guide

Brian is a WordPress support specialist and content contributor at 24×7 WP Support. He writes practical, easy-to-follow guides on WordPress troubleshooting, WooCommerce issues, plugin and theme errors, website security, migrations, performance optimization, and integrations. With a focus on solving real website problems, Brian helps business owners, bloggers, and online store managers keep their WordPress sites running smoothly.
