
How to Fix the HTTP Image Upload Error in WordPress
Last updated on May 23rd, 2025 at 11:52 am
If you’re seeing an HTTP error when trying to upload images to your WordPress site, you’re not alone. This error can appear suddenly and stop you from adding media to your posts or pages. But don’t worry—this guide covers all the possible causes and step-by-step solutions to fix it.
What Is the HTTP Image Upload Error in WordPress?
The HTTP image upload error in WordPress is a frustrating problem that typically occurs when you try to upload an image or other media file through the Media Library. Instead of completing the upload, WordPress shows a generic message: “HTTP error.” That’s it—no error code, no technical breakdown, just two words.
This vague error provides no clue as to what went wrong, making it difficult for users to identify the cause. Unlike other WordPress issues that point to specific files, settings, or plugin conflicts, this one is more ambiguous. It may happen suddenly—even if your site was working perfectly moments before.
The issue can affect:
- Single image uploads or bulk media uploads
- Common image formats like JPG, PNG, or GIF
- Files uploaded through the page/post editor or directly via the Media > Add New screen
In some cases, the image partially uploads, but you still see the error message. In other cases, the file doesn’t appear in your Media Library at all.
This error usually signals a server-side conflict, a resource limit, or a temporary issue in the way WordPress communicates with the server while handling media files.
Even though the message is short, the problem could be linked to:
- PHP memory usage
- File permission settings
- Plugin or theme behavior
- Image processing libraries like Imagick
- Hosting-level firewalls such as ModSecurity
Because of the lack of detail, fixing this error involves trying a few different solutions to see what works for your setup. The good news is—it’s very common, and in most cases, you can fix it without advanced technical skills.
Common Causes of the HTTP Image Upload Error
The “HTTP error” message during image uploads in WordPress can stem from several different sources. It’s not caused by one single issue, which makes troubleshooting a bit tricky. Below are the most common reasons behind this problem, explained in simple technical terms:
- Insufficient PHP Memory
WordPress needs enough memory to process image uploads—especially large or high-resolution files. If your site’s PHP memory limit is too low, WordPress may run out of resources mid-upload and return an HTTP error. This is particularly common on shared hosting plans where memory is tightly restricted.
- Plugin or Theme Conflicts
Sometimes a plugin or your active theme can interfere with how WordPress handles file uploads. For example, a security plugin may mistakenly block image uploads, or a page builder plugin might use custom upload scripts that conflict with the Media Library. These conflicts can silently trigger the HTTP error message.
- Server Timeout or Load Issues
Web servers have timeout settings that define how long a task is allowed to run. If the server is under heavy load or takes too long to process your upload request, it may cut the connection and trigger an HTTP error. This usually happens on busy websites or under low-performance hosting conditions.
- Incorrect File Permissions
Every file and folder on your server has permission rules that control who can read, write, or execute them. If the uploads folder in WordPress doesn’t have the correct permissions, WordPress won’t be able to save your images properly. This can lead to failed uploads and, ultimately, the dreaded HTTP error.
- ModSecurity or Firewall Blocks
Many hosting providers use ModSecurity, a server-level firewall that blocks suspicious activity. While it helps keep your website safe, it can also be overly sensitive. If ModSecurity thinks your upload looks like a threat—due to size, file name, or even the speed of the request—it may block it without warning.
- Imagick Library Issues
WordPress uses image processing tools like Imagick or GD Library to handle media uploads. If the server uses Imagick but it’s misconfigured, overloaded, or limited in threads or memory, it can cause image uploads to fail. Switching to GD Library (a more lightweight alternative) often resolves this issue.
Together, these causes represent 90% of the scenarios where WordPress throws an HTTP error during uploads. The key is identifying which one applies to your specific setup—and fixing it accordingly.
Quick Checks Before You Begin
Before diving into deeper technical fixes, it’s a good idea to start with a few simple checks. These quick steps can often resolve the HTTP image upload error without the need to modify code or settings. Sometimes, the issue is just temporary or related to the file itself.
- Refresh the Page and Try Again
Sometimes, the error occurs due to a session timeout or a momentary glitch in the browser or server response. Simply refreshing the WordPress admin page and attempting the upload again might fix the issue. This is especially true if your internet connection briefly dropped or your login session expired.
- Change the Image File or Format
There may be a problem with the specific file you’re uploading. Try a different image to rule out any corruption or format issues. Also, switch the image format—for example, upload a .PNG file instead of a .JPG. Some server configurations have stricter handling rules for certain file types.
- Rename the Image File
File names that include spaces, special characters (!@#$%), or non-English characters can confuse some servers during the upload process. Rename your image using only lowercase letters, numbers, or hyphens. For example, change new summer pic!.jpg to summer-pic.jpg. Then, upload it again and see if the error disappears.
- Reduce the Image File Size
Large image files take longer to upload and consume more server memory. If your hosting plan has tight memory or time limits, it may fail to complete the upload. Try resizing the image to a smaller resolution or compressing it using free tools like TinyPNG before uploading.
These quick checks are easy to perform and might save you a lot of time. If the error still persists after trying these, it’s time to move on to the more advanced troubleshooting steps.
Fixing the HTTP Image Upload Error in WordPress Using Various Methods
1: Increase PHP Memory Limit
One of the most common reasons for the HTTP image upload error in WordPress is a low PHP memory limit. WordPress needs sufficient memory to run its processes, especially when handling large media files or working with image editors like Imagick or GD Library. If the allocated memory is too low, uploads may fail unexpectedly, triggering the HTTP error.
How to Increase PHP Memory Limit
You can manually increase the memory limit by editing your WordPress core files. Here’s how:
Option 1: Edit the wp-config.php File
- Connect to your website via FTP or your hosting control panel.
- Locate the file named wp-config.php in your site’s root directory.
- Open the file and add the following line just before the comment line that says “That’s all, stop editing! Happy publishing.”
define(‘WP_MEMORY_LIMIT’, ‘256M’);
Option 2: Modify the .htaccess File
If you’re using an Apache server, you can also try increasing the memory limit through the .htaccess file:
- Locate the .htaccess file in the root directory of your WordPress installation.
- Add the following line of code at the end of the file:
php_value memory_limit 256M
Note: Not all servers allow changes via .htaccess. If you get a 500 Internal Server Error after adding this line, remove it immediately.
Or contact your hosting provider to increase it for you.
2: Switch to a Default Theme
Your current WordPress theme may look great, but behind the scenes, it might be causing upload errors. Some themes include custom functions or scripts that interfere with WordPress’s media handling system. If the theme is outdated, poorly coded, or not fully compatible with the latest WordPress version, it can trigger issues like the HTTP image upload error.
The fastest way to check whether your theme is the problem is to temporarily switch to a default theme provided by WordPress.
How to Test for Theme Conflicts
Follow these steps to test if your theme is the culprit:
- In your WordPress dashboard, go to Appearance > Themes.
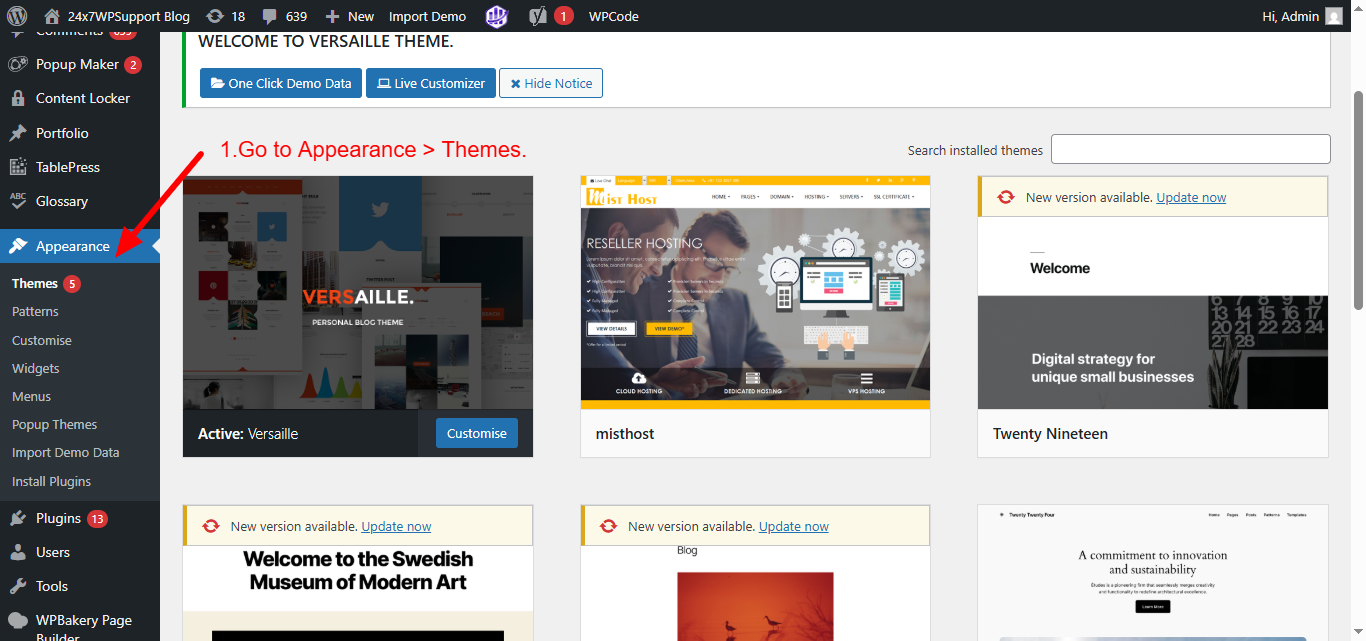
- Find and activate a default WordPress theme, such as Twenty Twenty-Four or Twenty Twenty-One.
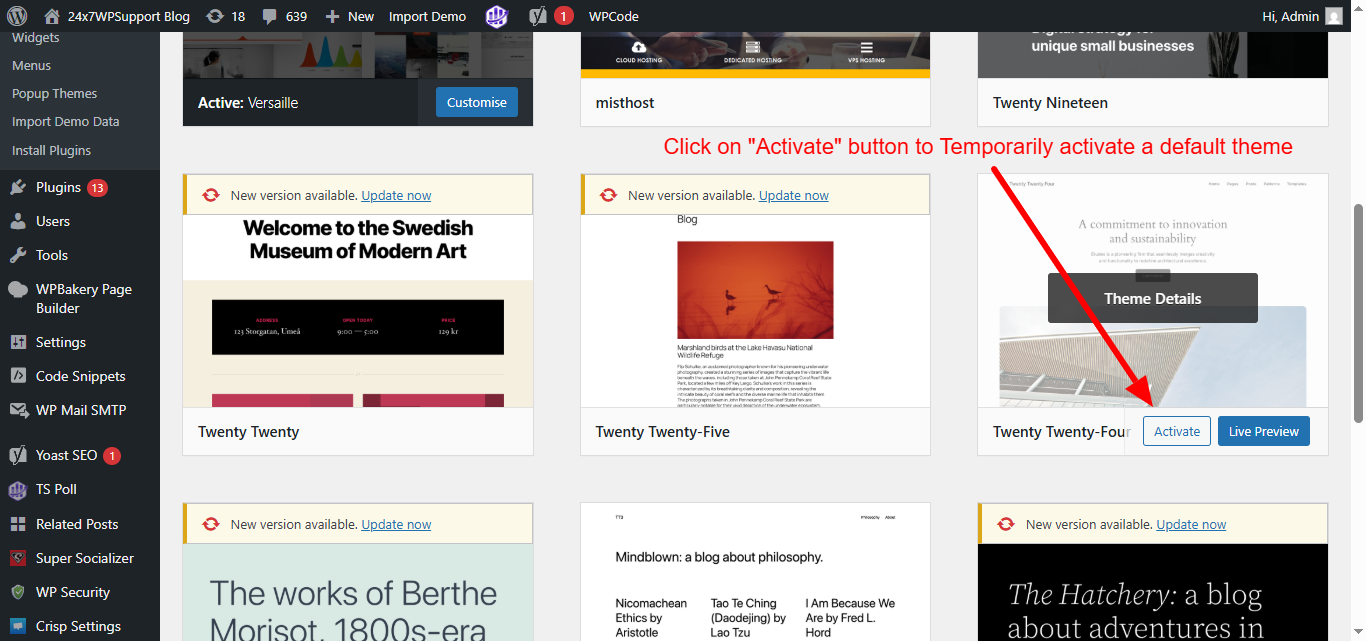
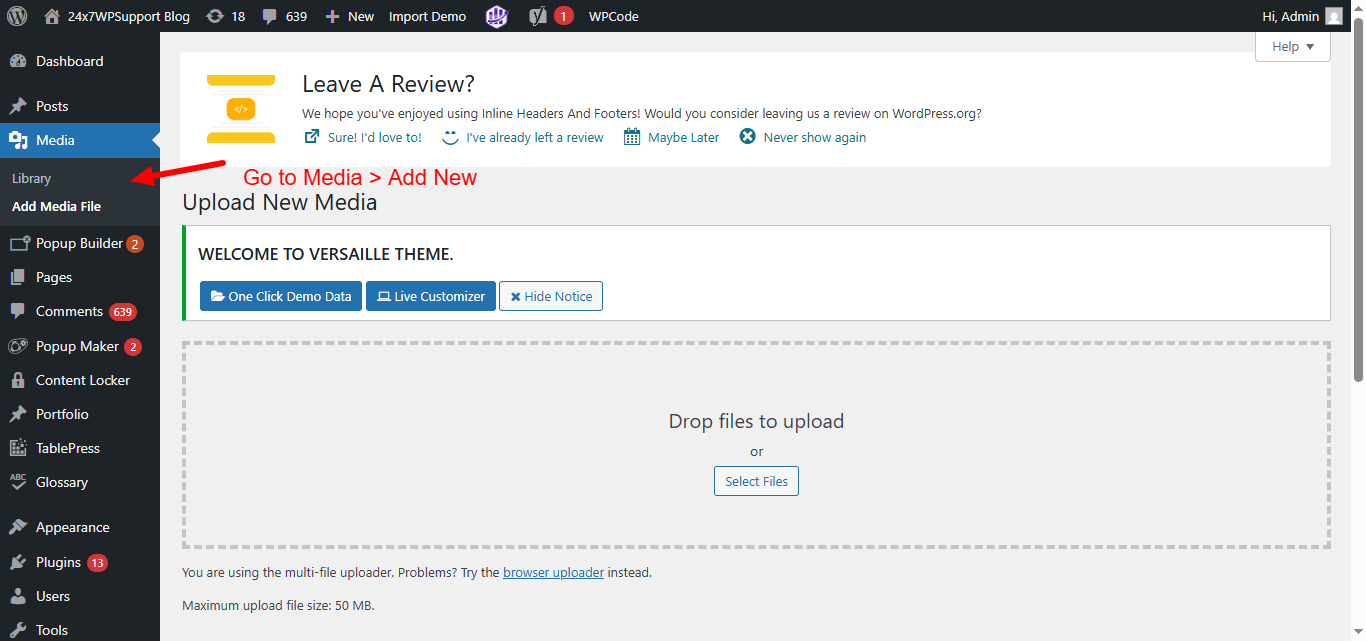
- Once the new theme is active, go to Media > Add New and try uploading the same image again.
If the image uploads successfully without showing the HTTP error, it means your previous theme was likely causing the problem.
What to Do Next
- If your theme is causing the error, check if an update is available.
- Contact the theme developer to report the issue.
- Consider switching to a more reliable, well-supported theme.
Testing with a default theme is a quick way to isolate theme-related issues without making permanent changes. Once the test is done, you can switch back and explore a fix if your original theme is important to your site design.
3: Deactivate All Plugins
Sometimes, the root cause of the HTTP image upload error isn’t your theme or server settings—it’s a plugin. A recently installed or updated plugin may contain buggy code, load conflicting scripts, or apply strict security rules that interfere with WordPress’s file upload process. Even plugins unrelated to media uploads can affect backend functionality.
To identify whether a plugin is to blame, you’ll need to temporarily deactivate all active plugins and then test the upload process.
Steps to Identify the Problem Plugin
- From your WordPress dashboard, go to Plugins > Installed Plugins.
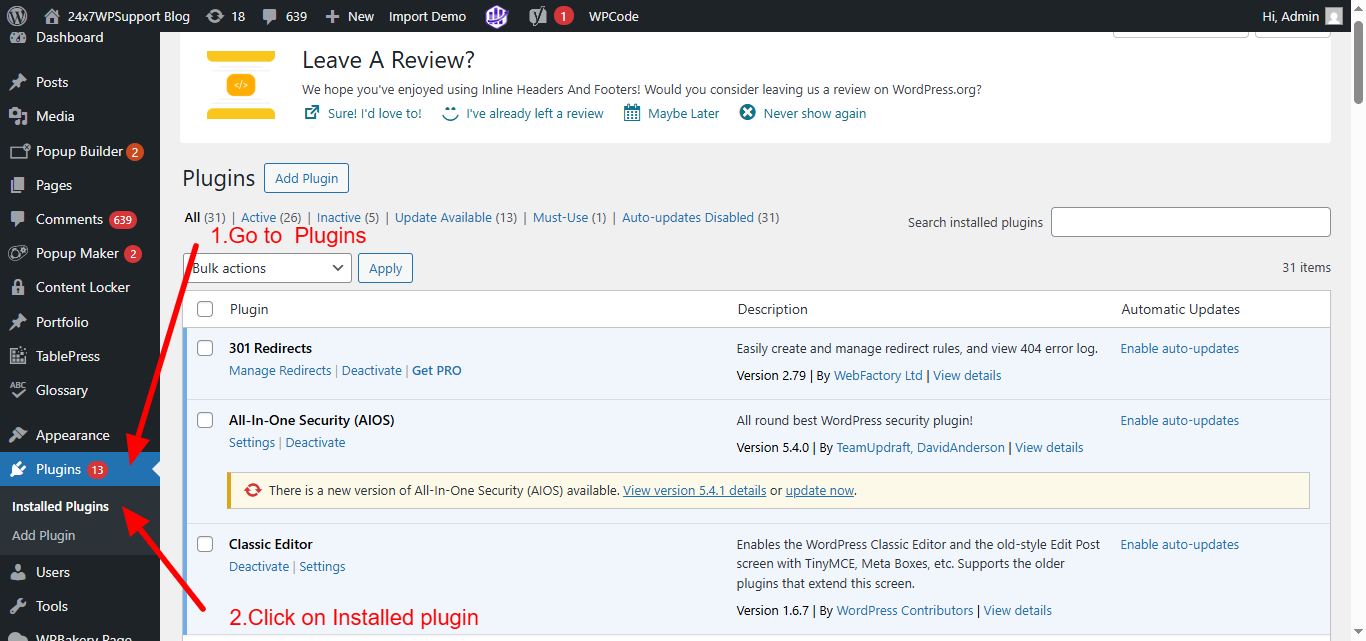
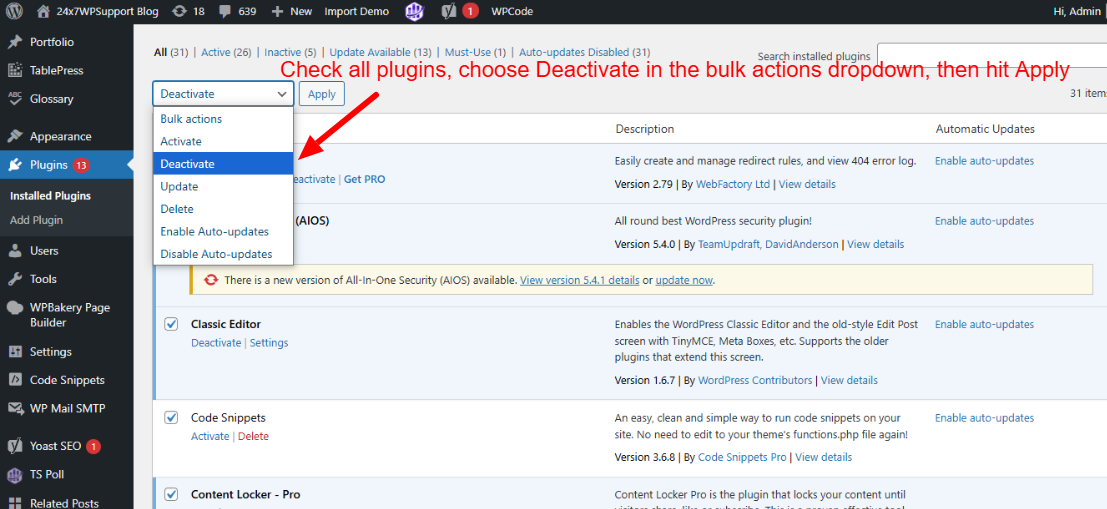
- Select all plugins by checking the box at the top of the list.
- From the Bulk Actions dropdown, choose Deactivate and click Apply.
- Try uploading the same image again through Media > Add New.
What to Do If It Works


If the image upload succeeds after deactivating the plugins, you’ve confirmed that one of them is causing the error.
Now, reactivate the plugins one by one:
- After enabling each plugin, try uploading the image again.
- As soon as the HTTP error reappears, the last plugin you activated is likely the source of the conflict.
Once identified, you can:
- Disable or remove the conflicting plugin.
- Check if there’s a newer version available.
- Contact the plugin developer for support or use an alternative plugin.
This method is simple but effective, especially when your site uses multiple plugins. Even one small conflict can break the media upload process, so isolating the cause step-by-step is the best approach.
4: Force WordPress to Use GD Library Instead of Imagick
WordPress uses Imagick or GD Library to handle images. Imagick can sometimes use too many resources, causing errors.
How to Change It
Add this code to your theme’s functions.php file:
function change_default_image_editor() {
return ‘WP_Image_Editor_GD’;
}
add_filter(‘wp_image_editors’, ‘change_default_image_editor’);
This forces WordPress to use GD Library, which is often more stable.
5: Set Correct File and Folder Permissions
Incorrect permissions may block file uploads.
Recommended Settings
- Folders: 755
- Files: 644
You can change these via:
- FTP client (like FileZilla)
- cPanel File Manager
If you’re unsure, ask your host to check and fix permissions.
6: Disable ModSecurity Temporarily
ModSecurity is a firewall tool used on many hosting servers. It sometimes mistakenly blocks image uploads.
How to Disable
- Check if your hosting provider allows you to toggle ModSecurity from cPanel.
If not, ask their support team to disable it temporarily for your domain.
7: Update WordPress, Theme, and Plugins
Running outdated versions of WordPress, your active theme, or installed plugins can lead to unexpected compatibility issues, especially during tasks like media uploads. As WordPress evolves, so do the rules and functions that handle images and server interactions. If your site’s components are out of sync, they might conflict with each other or with the hosting environment, triggering the HTTP image upload error.
Staying updated ensures your website runs with the latest bug fixes, security patches, and compatibility improvements.
What to Do
Here’s how to check and apply updates:
- In your WordPress dashboard, go to Dashboard > Updates.
- If a new version of WordPress is available, click Update Now.
- Scroll down to see if your themes and plugins have pending updates.
- Select all and click Update Plugins and Update Themes.
Once everything is up to date, go to Media > Add New and try uploading your image again.
Why This Works
- WordPress updates often fix known bugs related to media handling.
- Plugins and themes are updated to stay compatible with the latest WordPress core.
Security and performance improvements help reduce server errors.
Final Tips to Prevent Future Upload Errors
Once you’ve fixed the HTTP image upload error, it’s important to take steps to prevent it from happening again. Many upload issues are caused by simple oversights that can be avoided with a few good practices. Here are some tips to help keep your WordPress media uploads running smoothly:
1. Use Optimized Image Sizes
Large image files are one of the most common triggers for upload problems. They consume more server memory and take longer to process. Before uploading, resize your images and compress them using tools like TinyPNG or ImageOptim. Try to keep images under 2MB, especially on shared hosting environments.
2. Avoid Special Characters in File Names
WordPress and many web servers don’t handle special characters (like !, @, #, or spaces) well in file names. These characters can cause unexpected behavior or block the upload entirely. Use simple, lowercase file names with hyphens or underscores, like blog-header-image.jpg.
3. Keep Everything Updated
Outdated WordPress installations, themes, and plugins are more prone to errors and conflicts. Regularly check for updates to ensure your site runs the latest versions. Updated components work better with newer servers and provide improved compatibility with the media uploader.
4. Clear Your Site’s Cache
If your site uses a caching plugin or server-side caching, an old or broken cached file may interfere with new uploads. Clear your cache regularly—especially after making changes to your theme, plugins, or settings. Most caching plugins offer a one-click “Clear Cache” button from the WordPress toolbar or settings page.
By following these simple yet effective habits, you’ll greatly reduce the chances of seeing upload-related errors again—and keep your site running reliably.
Conclusion
The HTTP image upload error in WordPress may seem mysterious, but it’s fixable. In most cases, it’s related to memory limits, plugin conflicts, or server rules. Go through the steps one by one to identify and fix the root cause.
Still stuck? Don’t waste time guessing.
📞 Need Expert Help?
Contact the WordPress experts at 24×7 WP Support — available anytime at
+1-888-818-9916 for quick troubleshooting and support.
Related posts:
Why and How to Use Facebook Debugger to Fix Image Issues in Shared Posts?
How to Fix Destination Folder Already Exists Error in WordPress
Facing 429 Too Many Requests Error? Here is How You Can Deal with It
Is the site experiencing technical difficulties? Find out the reasons and the potential ways to fix ...
How to Fix White Text and Missing Buttons in WordPress Visual Editor

Brian is a WordPress support specialist and content contributor at 24×7 WP Support. He writes practical, easy-to-follow guides on WordPress troubleshooting, WooCommerce issues, plugin and theme errors, website security, migrations, performance optimization, and integrations. With a focus on solving real website problems, Brian helps business owners, bloggers, and online store managers keep their WordPress sites running smoothly.
