
How to Set Up 404 Redirects in WordPress Step by Step
Introduction
When a page is no longer available, a 404 error is displayed. Visitors usually see this error after clicking a broken link. Blog entries, product pages, and service pages may experience this. It can also happen after changing a page URL.
A terrible user experience can result from a broken page. It is possible for visitors to go from your website without visiting further pages. This can reduce trust and increase bounce rate. Search engines may also notice repeated broken URLs.
A proper WordPress 404 redirect helps solve this issue. It sends users from the missing page to a working page. This keeps visitors active on your website. It also helps search engines understand the correct page path.
404 redirects are useful when you:
- Delete an old page or post.
- Change a page URL or slug.
- Move content to a new location.
- Remove an old product or service page.
- Find broken links in menus or buttons.
For a WordPress website, redirects are not just technical fixes. They also protect user flow, SEO value, and website trust.
What Is a 404 Redirect in WordPress?
A 404 redirect is a simple website rule. It tells WordPress where users should go next. When someone visits a broken URL, the redirect moves them automatically.
For example, you may delete an old service page. But that page may still appear in Google results. Some users may also have saved the old link. Without a redirect, they will see a 404 error page.
With 404 redirects in WordPress, you can guide users better. You can send them to a related page, updated post, or service page. This makes the website easier to use.
A good redirect should always be relevant. Do not send every broken page to the homepage. That can confuse users and search engines. Instead, choose the closest matching page. This gives visitors a better experience and keeps your website cleaner.
Common Reasons 404 Errors Happen in WordPress
404 errors can happen for many simple WordPress reasons. Most issues start when a URL changes or disappears. When users click that old URL, WordPress cannot find it. Instead, a 404 error page appears.
Understanding the cause helps you fix WordPress 404 error issues correctly. It also helps you choose the right redirect page.
- Deleted Pages or Posts
Many 404 errors happen after deleting old pages or posts. The content may be removed from WordPress. But the old link may still exist online.
That link may appear in:
- Google search results
- Social media posts
- Email newsletters
- Other websites
- Old internal blog links
If users click that saved link, they reach a missing page. A redirect can send them to a better page.
- Changed URL Slugs
The last segment of a page link is called a URL slug. For example, /old-service-page/ is a slug. If you change it, the old link stops working.
This often happens during SEO updates. Website owners improve page titles and URL slugs. However, they neglect to reroute the previous URL. This creates a 404 error for old visitors.
- Permalink Structure Changes
WordPress permalink settings control your page URL format. Changing this structure can affect many existing links. Old indexed URLs may stop working after the change.
For example, posts may change from date-based URLs to clean URLs. This is useful for SEO. But redirects are needed to protect old links.
- Website Migration
A website migration can also create broken pages. This may happen when moving to a new host. It can also happen during redesigns or domain changes.
Some page paths may change during the migration. Images, blogs, products, and service pages may lose their old URLs.
- Broken Internal Links
Internal links help users move between website pages. These links may exist in menus, buttons, or blog content. The link is broken if a linked page is removed.
Broken internal links can hurt user flow. They can also make your website look unmanaged.
When Should You Set Up a Redirect?
You should set up a redirect when a missing page has value. This means the page had traffic, backlinks, or search visibility.
Use redirects when you:
- Delete a page with active visitors.
- Change any important page URL.
- Replace an old blog with a new one.
- Remove a product or service page.
- Find broken links inside your website.
Avoid rerouting all 404 pages to the main page. That can confuse users and search engines. Always choose the closest matching page. This keeps the user journey clear and helpful.
Best Redirect Type for 404 Pages
The best redirect type for most 404 pages is 301. A 301 redirect indicates that the page has permanently changed. It informs search engines and browsers about the updated URL.
A WordPress 301 redirect is useful for deleted or changed pages. It helps move visitors from the old page. Then it sends them to a working and related page. By doing this, users are prevented from reaching a dead page.
When the URL change is final, use a 301 redirect. This is common after editing slugs, removing pages, or updating content. It is also useful after website migration.
For example, you may remove an old service page. You may now have a better service page available. In this case, redirect the old URL to the new page. This provides the optimal next step for users.
For long-term modifications, stay away from temporary redirects. A temporary redirect tells search engines the change is not final. Users and search engines may become confused as a result.
On your WordPress website, stay away from redirect chains as well. When a URL reroutes itself, it creates a redirect chain. This may cause the page to load more slowly.
Follow these simple rules:
- Use 301 redirects for permanent URL changes.
- Redirect only to a close matching page.
- Avoid sending users through many redirects.
- Test every redirect after saving it.
- Update old internal links when possible.
A clean redirect setup keeps your WordPress site healthy. It also gives users a better browsing experience.
How to Find 404 Errors Before Redirecting
Before adding redirects, you need to find broken URLs. This helps you redirect broken links in WordPress correctly. You should not guess which pages need redirects.
- Google Search Console
Google Search Console can show missing page issues. Check the indexing reports for “Not Found” errors. These reports help you find URLs Google tried to crawl.
- WordPress SEO Plugins
Some WordPress SEO plugins include redirect or error reports. They can assist you in quickly locating broken URLs. Many plugins also let you add redirects directly.
- Website Analytics
Your website’s user activity can be displayed by analytics software. Check pages with sudden drops or poor engagement. Missing landing pages may also show traffic problems.
- Broken Link Checker Tools
Broken link checker tools scan your website links. They can find broken links in posts, pages, and menus. This saves time on large WordPress websites.


- Manual Checking
You can also check links manually. Test menus, buttons, old posts, and product links. Open important URLs in a private browser window.
Manual checking is helpful after major website changes. It also helps confirm that redirects work properly. Always fix the most important broken links first.
How to Set Up 404 Redirects Using a WordPress Plugin
For the majority of users, using a plugin is the simplest approach. A WordPress redirect plugin helps you create redirects without coding. Additionally, it lessens the possibility of website files malfunctioning.
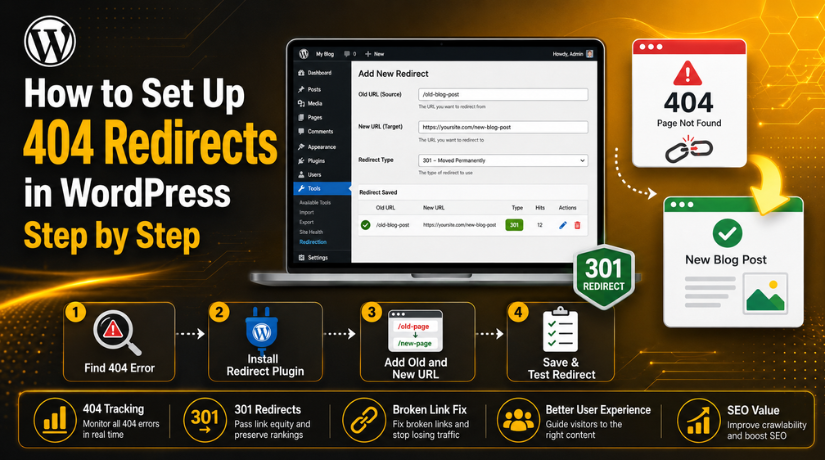
Step 1: Install a Trusted Redirect Plugin
First, go to your WordPress dashboard. Then open Plugins > Add New. Search for a trusted redirect plugin with good reviews. Choose a plugin that supports 301 redirects and 404 tracking.
After choosing the plugin, click Install Now. Then wait until WordPress completes the installation.
Step 2: Activate the Plugin
After installation, click the Activate button. Your dashboard menu will now display the plugin. Some plugins may also add settings under Tools or Settings.
Read the setup screen carefully. Complete any basic setup steps shown by the plugin.
Step 3: Open Redirect Settings
Next, open the redirect settings page. You can make new redirects here. Most plugins show fields for source URL and target URL.
The source URL is the broken old link. The target URL is the new working page.
Step 4: Add the Old Broken URL
Now add the old broken URL in the source field. You can add only the page path if allowed. For instance, rather than using the entire domain, use /old-page/.
Make sure the old URL is typed correctly. A small spelling mistake can stop the redirect.
Step 5: Add the New Working URL
Now add the correct destination URL. This should be the closest matching page. Do not send unrelated pages to the homepage.
For example, redirect an old service page to its updated version. This gives users a better experience.
Step 6: Choose Permanent Redirect
Once the modification is complete, select a permanent redirect. Most plugins call this a 301 redirect. This tells browsers the old page has moved permanently.
Step 7: Save and Test the Redirect
Click Save or Add Redirect after entering details. Then open the old URL in a private browser window.
Check if it moves to the correct new page. Test the redirect on desktop and mobile.
How to Set Up 404 Redirects Without a Plugin
Advanced users can create redirects without using any plugin. Usually, this is accomplished by making changes to the.htaccess file. This method is common on Apache servers.
Before editing, take a full website backup. One wrong line can break your website. Non-technical users should avoid this method. A plugin or expert help is safer for most websites.
Best Practices for WordPress 404 Redirects
A good redirect should always help the visitor first. It should take users to a useful and related page. This facilitates easy and seamless browsing.
Avoid rerouting all missing pages to your homepage. Despite its apparent simplicity, this leads to confusion. Users expect a page related to their clicked link. Search engines may also treat unrelated redirects as poor quality.
Use these best practices for better results:
- Redirect old URLs to the closest matching page.
- Use 301 redirects for permanent page changes.
- Avoid long redirect chains between many URLs.
- Update old internal links after adding redirects.
- Check broken links after theme or plugin updates.
- Review 404 reports inside your SEO tools.
- Remove outdated redirects that no longer serve users.
A clean redirect setup helps your website stay organized. A better user experience is also supported by it. Users find material more quickly when redirects are handled correctly.
Common Mistakes to Avoid
Many WordPress users create redirects without checking the purpose. Instead of solving issues, this could make things worse. Every redirect should have a clear reason and destination.
Avoid these common mistakes:
- Redirecting unrelated pages to random content.
- Sending all broken pages to the homepage.
- Forgetting to test redirects after setup.
- Creating many redirects for one old URL.
- Ignoring broken links in menus and buttons.
- Using temporary redirects for permanent changes.
- Deleting important pages without checking traffic first.
These mistakes can hurt user trust. They can also make your website harder to crawl. Always test redirects before considering the issue fixed.
Conclusion
404 errors are common on WordPress websites. They usually happen after deleting pages, changing URLs, or moving content. Users can get to the correct page with the help of an appropriate redirect. It also keeps your website cleaner and easier to use.
Your comfort level determines the optimal approach. Most users can use a plugin for simple redirects. Advanced users can edit server files with care. Always choose a relevant destination page for every redirect.
If your website has broken links, missing pages, or redirect issues, 24×7 WP Support can help. Our team can review your WordPress site and fix redirect problems safely.
FAQs
1. What is a 404 redirect in WordPress?
A 404 redirect sends users from a missing page to a working page. It assists users in avoiding broken pages. Additionally, it keeps people engaged on your website.
2. When should I use a WordPress 404 redirect?
Use a redirect when a page is deleted, moved, or renamed. You should also use it when old links still get traffic. Always redirect users to a related page.
3. Is a 301 redirect good for fixing 404 errors?
Yes, a 301 redirect is best for permanent URL changes. It tells browsers and search engines that the page has moved forever. This helps protect user experience and SEO value.
4. Can I set up 404 redirects without a plugin?
Yes, advanced users can set redirects using the .htaccess file. But this method needs care. One wrong line can break the website. Most users should use a plugin.
5. Should I redirect all 404 pages to the homepage?
No, this is not a good practice. It can confuse users and search engines. Always redirect each broken URL to the closest matching page.
Related posts:

Brian is a WordPress support specialist and content contributor at 24×7 WP Support. He writes practical, easy-to-follow guides on WordPress troubleshooting, WooCommerce issues, plugin and theme errors, website security, migrations, performance optimization, and integrations. With a focus on solving real website problems, Brian helps business owners, bloggers, and online store managers keep their WordPress sites running smoothly.
