
How to Add Klaviyo Forms and Popups to WordPress Easily (Detailed Guide)
Introduction
If you want more leads from your website, Klaviyo can help. It is a popular marketing tool for email and SMS growth. Many businesses use it to collect visitor details and send useful updates later. When used well, Klaviyo Forms WordPress setup can help turn simple traffic into real subscribers. It can also support better offers, better follow-up, and better customer journeys. This is why many site owners now connect Klaviyo email marketing WordPress tools with their websites.
On a WordPress site, Klaviyo forms can appear in different ways. You can show them as popups, flyouts, or simple signup sections. You can also place them inside pages, sidebars, or footers. A well-made Klaviyo popup WordPress setup can catch attention quickly and help visitors act faster. At the same time, a clean embedded form can stay visible without disturbing the page experience.
This guide explains the basics in a simple way. You will learn what these forms are and how they work. You will also understand why so many WordPress users rely on them today. If you plan to add Klaviyo form to WordPress, this section will help you start with clarity. It will also help you choose the right form type before setup begins.
What Are Klaviyo Forms and Popups in WordPress?
Klaviyo forms are signup tools made inside the Klaviyo dashboard. They help collect email addresses, phone numbers, and other customer details. These details then move into your Klaviyo lists for later marketing use. This is why many store owners use Klaviyo signup forms and WordPress tools on key website pages. They help collect leads without using long and heavy contact forms.
Klaviyo popups are forms that appear over the page content. They do not stay fixed like normal page sections. Instead, they show based on a rule or visitor action. A popup may appear after a few seconds on the page. It may also appear after scrolling or before the visitor leaves. This makes WordPress popup forms Klaviyo setups useful for growing lists faster.
Klaviyo gives users several form types for different goals. Popup forms appear in the center and grab attention fast. Flyout forms slide in from a corner and feel less direct. Embedded forms stay inside the page content and remain visible there. Banner forms sit at the top or bottom of the screen. Full-page forms take over the whole screen and focus on one action. Each type serves a different website goal and visitor experience.
The biggest difference is between popup forms and embedded forms. Popup forms appear when a trigger tells them to open. Embedded forms stay placed in one fixed area of the site. A popup is often better for special offers and quick list growth. An embedded form is often better for footer signups and blog subscriptions. If you want a steady page element, a Klaviyo embed form WordPress setup is usually the better option. If you want stronger attention, a popup may work better.
These forms work inside WordPress through a connected setup. Klaviyo handles the form design, behavior, and subscriber list settings. WordPress shows the form to your site visitors on the front end. In many cases, popup forms appear after the Klaviyo setup is active. Embedded forms usually need placement inside a block, widget, or page builder area. This is where a proper Klaviyo integration WordPress setup becomes important. When both sides work together, form display becomes much smoother and easier to manage.
Why You Need to Use Klaviyo Forms and Popups on a WordPress Website
Build Your Email List Faster
Many visitors leave a website without taking any action. Klaviyo forms help you capture those visitors before they leave. You can offer a discount, a newsletter, or a useful update. This gives people a reason to sign up quickly. That is why Klaviyo Forms WordPress setup is helpful for steady email list growth.
Collect SMS and Email Subscribers in One Place
Many businesses now use both email and SMS marketing together. Klaviyo helps collect both types of subscribers through one system. This keeps your marketing process simple and organized. You do not need to manage too many separate tools. This makes Klaviyo email marketing WordPress more useful for growing brands.
Increase Leads and Sales More Effectively
A well-timed popup can help convert visitors into leads. You can show a welcome offer, a discount, or a special update. This works well for stores, service sites, and landing pages. A smart Klaviyo popup WordPress setup can turn website traffic into more business opportunities.
Improve Visitor Engagement on Important Pages
Many visitors need a clear reason to take the next step. Klaviyo forms help guide them in the right direction. You can place them on blog posts, product pages, or homepage sections. This keeps users engaged with your content and offer. It also helps your site feel more active and useful.
Support Automated Marketing Flows
Klaviyo forms do more than collect visitor details. They also send those details directly into your Klaviyo lists. After that, you can trigger welcome emails and follow-up messages automatically. This saves time and improves your marketing process. That is why Klaviyo signup forms WordPress are useful for long-term growth.
Show More Relevant Offers with Better Targeting
Basic signup boxes often appear the same way for every visitor. Klaviyo gives you more control over when and where forms appear. You can target pages, devices, and visitor actions easily. This helps the message feel more relevant to the user. Better targeting often brings better signup results.
Use Popups or Embedded Forms Based on Your Goal
Different websites need different types of forms. Popups work well when you want quick attention and faster action. Embedded forms work better when you want a steady signup area. You can choose the right style based on your page goal. If needed, you can even use both together. This is why many users choose to add Klaviyo form to WordPress in different ways.
Fit Many Types of WordPress Websites
Klaviyo forms are not only for online stores. They also work well for blogs, business sites, and landing pages. A store can use popups for discounts and product offers. A blog can use embedded forms for newsletter signups. A service website can use forms for lead capture. This flexibility makes Klaviyo integration WordPress a smart option for many site owners.
Turn Existing Website Traffic into Real Subscribers
Getting traffic is only one part of website growth. The next step is turning that traffic into subscribers and leads. Klaviyo helps you do that with better form design and targeting. A Klaviyo embed form WordPress setup can stay visible all the time. At the same time, WordPress popup forms Klaviyo can catch attention at the right moment.
Build a Stronger Long-Term Marketing System
A good form helps today, but it also supports future growth. Every signup can become part of your email and SMS strategy. You can build lists, send campaigns, and improve customer relationships over time. This makes Klaviyo more than just a form tool. It becomes part of a stronger WordPress marketing system.
What You Need Before Adding Klaviyo Forms and Popups to Your WordPress Website
Before you start, you need the right base setup. Klaviyo asks users to connect to their website first. It also asks users to confirm that sign-up forms are enabled. This step matters because forms will not display properly without it. A smooth Klaviyo integration WordPress setup always starts with the website connection before form design begins.
Make Sure Your WordPress Website Gives You Full Admin Access for Setup
You need full access to your WordPress website before starting. This helps you manage plugins, settings, pages, and design areas. If you plan to place an embedded form, you also need access to the page where it will appear. This becomes even more important when you want to add Klaviyo form to WordPress without display errors later.
Make Sure You Have an Active Klaviyo Account Ready to Use
You also need an active Klaviyo account before doing anything else. Your account is where you create forms, choose lists, and manage behavior settings. Klaviyo’s sign-up form process begins inside its dashboard, not inside WordPress itself. That is why your account should be ready before you start the design process.
Connect Your WordPress or WooCommerce Website with Klaviyo First
Your site should be connected to Klaviyo before you publish forms. Klaviyo’s current guidance says the website integration must be live first. After that, you should verify that sign-up forms are enabled on the site. For store owners, the WooCommerce extension can also add newsletter sign-up support and website activity tracking. This makes Klaviyo Forms WordPress setup easier for many ecommerce websites.
Confirm That Klaviyo Onsite Tracking and Form Support Are Enabled Properly
Popup and flyout forms depend on the right form support settings. Klaviyo says sign-up forms need Klaviyo onsite JavaScript to work correctly on supported integrations. It also notes that tracking and form behavior should be checked before testing display. If this step is skipped, your form may be live but still not show correctly. This is a key part of a working Klaviyo popup WordPress setup.
Create or Choose the Correct Klaviyo List Before Building Any Form
Before building a form, decide where new subscribers should go. Klaviyo forms connect to lists, and that list controls later email or SMS actions. When the wrong list is selected, your follow-up flow becomes messy. A clean list setup helps Klaviyo email marketing WordPress work in a more organized way from the start.
Make Sure You Can Access the Area Where the Form Will Appear
You also need access to the exact area where the form will show. Popup and flyout forms usually rely on Klaviyo’s display rules. Embedded forms need code placement inside the website area you choose. Klaviyo’s embed guidance explains that you first publish the form, then copy its embed code, and then place it on the site. This step is essential for a working Klaviyo embed form WordPress setup.
Prepare Your Brand Colors, Offer Text, and Button Message Before Design Starts
A form performs better when the message is already planned. Before starting, prepare your headline, offer, and button text. You should also know your brand colors and basic form style. This makes the design process faster and keeps the message clear. It also helps your Klaviyo signup forms WordPress setup look more professional and focused from the beginning.
Keep Mobile Design in Mind Before You Build the First Form
Klaviyo gives users device settings inside the form editor. This means you can control whether a form shows on desktop, mobile, or both. Because of that, mobile planning should happen before form creation starts. A design that looks clean on a desktop may need changes for smaller screens. This matters a lot for WordPress popup forms Klaviyo because mobile users react quickly to cluttered popups.
Important Things You Should Decide Before You Start Creating a Klaviyo Form in WordPress
Good setup starts with clear decisions. Klaviyo’s own form process begins with form goals before design changes. It recommends confirming form support first, then planning the goal, then building the design and targeting rules. So, before you begin, decide exactly what you want the form to do.
Decide Whether You Need a Popup Form or an Embedded Form First
Your first decision is the form type. A popup works well when you want quick attention. An embedded form works better when you want a fixed signup area on the page. Klaviyo treats these form types differently inside its setup and behavior settings. For many websites, this choice shapes the full design plan from the start.
Decide Where You Want the Klaviyo Form to Appear on Your Website
Next, decide the exact page area where the form should appear. Some forms work best on the homepage, while others fit blog pages or store pages better. Klaviyo also allows targeting by URL, which means placement planning matters early. When the location is clear, adding Klaviyo form to the WordPress process becomes much easier.
Decide What Offer or Message Will Give Visitors a Reason to Sign Up
A form without a strong reason often gets ignored. Before design starts, decide what you will offer visitors. This could be a discount, newsletter, free update, or early access. Your message should be short, useful, and clear. This helps Klaviyo Forms WordPress convert better because users understand the value quickly.
Decide Which Klaviyo List Should Collect New Subscribers from the Form
You should also choose the list before building the final form. This keeps new contacts organized from the first day. It also helps later when you build welcome emails or marketing flows. A strong list decision supports better Klaviyo email marketing WordPress results over time.
Decide Which Pages Should Show the Form and Which Pages Should Stay Clean
Not every page needs the same form experience. Klaviyo allows targeting by URLs and also by visitors and other rules. That means you can choose exactly where the form should show. This is useful when you want to avoid showing a popup on sensitive pages. Good targeting decisions make Klaviyo popup WordPress feel more helpful and less distracting.
Decide Whether the Form Should Show on Mobile, Desktop, or Both Devices


Device planning is another smart step before form creation. Klaviyo includes display controls for mobile and desktop inside the editor. Some offers work better on desktop, while others need a mobile-first layout. When you decide this early, your design work becomes cleaner and faster.
Decide How and When the Form Should Appear to Website Visitors
Klaviyo also lets users control timing and display behavior. A form can show immediately or based on rules like timing, visitor action, and frequency. These settings are managed in the Targeting & behavior section of the editor. Planning this before design helps you avoid weak timing later. It also improves the quality of your Klaviyo signup forms WordPress setup.
Decide If You Want a Simple Signup Form or a More Targeted Marketing Form
Some websites only need a basic email box in the footer. Other websites need page-based targeting, popups, and different offers for different visitors. Klaviyo supports both simple and more advanced form strategies. So, decide your goal before you start building anything. That way, your Klaviyo integration WordPress setup stays focused, clean, and easier to manage.
This preparation stage saves time and prevents setup mistakes later. Once these items are ready, the next step becomes much easier. In the next part, you can move into the full process of creating and placing Klaviyo forms and popups on your WordPress website.
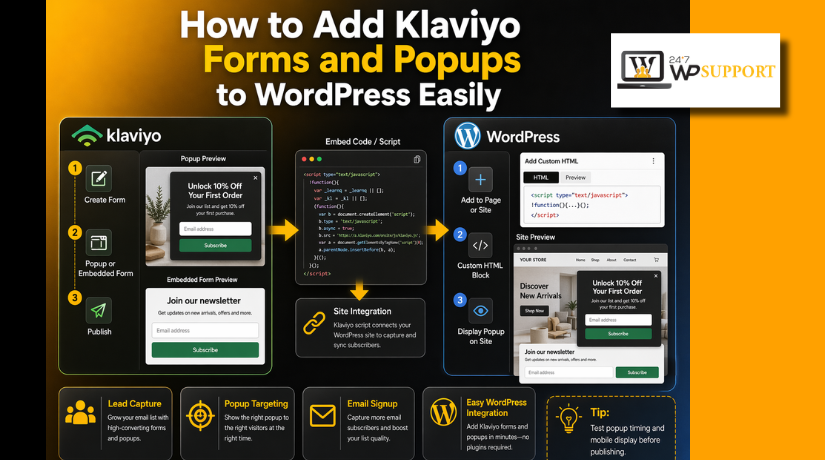
How to Add Klaviyo Forms and Popups to WordPress (Step By Step Guide)
This is the main setup section of the guide. The current Klaviyo flow starts with site connection first. After that, you create the form, design it, add targeting rules, and publish it. If you create an embed form, you must also copy the embed code and place it on your site. This is the clearest way to add Klaviyo form to WordPress without missing key setup steps.
Step 1: Connect Klaviyo to Your WordPress or WooCommerce Website Before Creating Any Form
- Log in to your WordPress dashboard.
- Install the Klaviyo plugin or extension if needed.
- Activate the plugin after installation.
- Open the Klaviyo settings area in WordPress.
- Connect your Klaviyo account.
- Approve the required permissions.
- Make sure the connection is active.
- Confirm your website or store is syncing correctly.
- Do not create forms before this step is complete.
Step 2: Open the Sign-Up Forms Area Inside Your Klaviyo Dashboard
- Log in to your Klaviyo account.
- Go to the main dashboard.
- Find the Sign-up forms section.
- Open that section to manage your forms.
- Make sure sign-up forms are enabled.
- Click the option to create a new form.
- Start the setup from there.
Step 3: Choose the Right Klaviyo Form Type Based on Your Website Goal
- Decide what kind of form you need first.
- Choose Popup if you want strong attention.
- Choose Flyout if you want a softer display style.
- Choose Embed form if you want the form inside page content.
- Choose Banner if you want a top or bottom strip.
- Choose Full-page form if you want full focus on one action.
- Match the form type with your goal.
- Use popup for offers and quick email capture.
- Use embed form for footer, blog, or sidebar signup areas.
Step 4: Pick a Ready Template or Start from Scratch for Better Control
- After choosing the form type, select a template.
- You can use a ready-made layout.
- You can also start from scratch.
- Pick a design that fits your website goal.
- Keep the layout simple and clean.
- Avoid using too many design elements.
- Choose a layout that is easy to edit later.
- If using an embed form, choose an embed-friendly template.
Step 5: Customize the Form Design So It Matches Your Brand and Message
- Add a clear form heading.
- Write short supporting text below the heading.
- Add only the fields you really need.
- Keep the form easy to fill out.
- Add a strong button label.
- Match the form colors with your website branding.
- Use clear fonts and readable spacing.
- Add an image only if it supports the message.
- Make sure the design also looks good on mobile.
- Keep one clear purpose for the form.
Step 6: Connect the Form to the Correct Klaviyo List Before Publishing It
- Open the list selection area in the form settings.
- Choose the correct Klaviyo list.
- Make sure new subscribers go to the right list.
- Double-check the list name before saving.
- Avoid sending all form leads into the wrong group.
- Keep your email and SMS lists organized from the start.
- This will make future campaigns easier to manage.
Step 7: Set Targeting and Behavior Rules So the Form Shows to the Right Visitors
- Open the targeting and behavior section.
- Choose when the form should appear.
- Set a time delay if needed.
- Add a scroll trigger if needed.
- Use exit intent if you want to catch leaving visitors.
- Choose whether the form should show on desktop, mobile, or both.
- Select the pages where the form should appear.
- Exclude pages where the form should not appear.
- Review all display rules carefully.
- Keep the setup simple for the first form.
Step 8: Publish the Form So It Can Go Live on Your Website
- Save all form settings first.
- Check the design one more time.
- Check the targeting rules again.
- Make sure no required setting is missing.
- Click the publish button.
- Confirm the form is live.
- Remember that draft forms will not appear on the website.
- Only published forms can display to visitors.
Step 9: Copy the Embed Code and Place It in WordPress if You Created an Embedded Form
- This step is only for embedded forms.
- Publish the form first.
- Copy the embed code from Klaviyo.
- Keep the full code unchanged.
- Go back to your WordPress website.
- Open the page, post, or widget area where the form should appear.
- Paste the code into the correct HTML area.
- Save the changes after pasting the code.
- Refresh the page to check the display.
Step 10: Place the Embedded Form in the Exact WordPress Area Where You Want It to Appear
- Decide the exact position before placement.
- Use a Custom HTML block if using Gutenberg.
- Use an HTML widget if using widget areas.
- Use a footer or sidebar area if needed.
- Use an Elementor HTML widget if using Elementor.
- Place the form where visitors can notice it easily.
- Make sure it does not break the page layout.
- Save the page after placing the code.
- Preview the final placement on the front end.
Step 11: Use a Custom Button Trigger if You Want the Popup to Open on Click
- Use this only if you want a click-based popup.
- Create a button like Subscribe Now or Get Discount.
- Link the button to the popup trigger setup.
- Use this method for popup or flyout forms.
- Do not use this method for embedded forms.
- Place the button in a clear page section.
- Test the button after setup.
- Make sure the popup opens correctly after the click.
- Use this option when you want better control over form timing.
Step 12: Preview the Form on Desktop and Mobile Before You Call the Setup Complete
- Open the page on a desktop screen.
- Check the form size and spacing.
- Test the form on mobile also.
- Make sure the close button works well.
- Check that text is readable on all devices.
- Confirm the popup appears at the right time.
- Confirm the embedded form appears in the correct area.
- Review the full user experience once.
- Fix any small design or display issue.
- Complete the setup only after full testing.
This step-by-step path is the safest way to handle Klaviyo popup WordPress, Klaviyo embed form WordPress, and full Klaviyo email marketing WordPress form setup.
How to Test Klaviyo Forms and Popups on WordPress the Right Way
Before you trust the setup, test everything carefully. Klaviyo says forms should be checked after publishing. It also recommends reviewing display settings and testing in a fresh session. This helps you confirm that your Klaviyo Forms WordPress setup is working as expected.
Check That the Klaviyo Form Is Live Before Testing Anything Else
Start by opening the form inside your Klaviyo account. Make sure the form status is set to live. A draft form will not appear on the website. This is the first thing to check for any Klaviyo popup WordPress test.
Test the Form in an Incognito Window So Old Cookies Do Not Interfere
Open your site in a private or incognito window next. Klaviyo recommends this because cookies can block repeat form displays. Its troubleshooting guide says once someone closes a popup, they may not see that same popup again for one year unless cookies are cleared. This makes incognito testing very important for WordPress popup forms Klaviyo.
Test the Display Timing and Trigger Rules One by One
Now test how the form actually appears on the page. Wait for the delay if a timer is set. Scroll if you added a scroll trigger. Try exit intent if that rule is active. Klaviyo’s targeting and behavior settings control when the form appears and who sees it. That is why you should test each rule slowly and clearly.
Submit a Test Entry to Confirm the Form Works Properly
After the form appears, submit a test email or phone number. Check that the success message appears after submission. Then confirm that the new contact reaches the correct list inside Klaviyo. This step matters because a form can display correctly but still send data to the wrong place. That is an important test for Klaviyo signup forms WordPress.
Test the Embedded Form Placement on the Exact WordPress Area You Chose
If you created an embed form, test the exact area where you placed it. Refresh the page after pasting the code and saving the page. Klaviyo’s embed guide says the code must be added exactly as provided and saved on the site after placement. This is the most important check for a Klaviyo embed form WordPress setup.
Test the Form on Mobile and Desktop Before You Finish the Setup
Do not test only on one device. Klaviyo allows forms to display on desktop, mobile, or both. That means device settings can affect whether a form appears at all. Check text size, spacing, button visibility, and close icon on each device. This makes your Klaviyo integration WordPress setup more reliable for real visitors.
Clear Cache and Test Again If the Form Still Does Not Show Correctly
If the form still behaves oddly, clear your browser and site cache. Klaviyo’s troubleshooting guidance for forms and embed forms both recommends refreshing cache during testing. This is helpful when you recently changed targeting, code, or display settings. It can save time when you add a Klaviyo form to WordPress and changes do not appear immediately.
Common Reasons Klaviyo Form Or Popups Do Not Show in WordPress
Sometimes the form is created correctly but still does not appear. In most cases, the problem comes from live status, tracking, targeting, timing, code placement, or cache. Klaviyo’s official troubleshooting guide points to these areas first. That is why checking each issue one by one is the safest approach.
The Form Is Still in Draft Mode and Was Never Published Properly
A very common issue is simple. The form was saved, but it was not published. Klaviyo says the form must be live before it can appear on the site. Many users finish the design and forget this final step. Always confirm live status first for any Klaviyo popup WordPress issue.
Sign-Up Forms or Onsite Tracking Are Not Enabled on the Website
Popup and flyout forms depend on Klaviyo’s onsite form support. Klaviyo’s embed troubleshooting guide says you should confirm that sign-up forms are enabled, which it describes as the same thing as enabling onsite tracking. If this is missing, the form may stay invisible even after publishing. This can affect both Klaviyo Forms WordPress and Klaviyo email marketing WordPress setup.
The Popup Already Showed Once and Cookies Are Now Hiding It
Sometimes the popup worked once, but you do not see it again. Klaviyo explains that once a user closes a popup, cookies can stop the same popup from showing again for one year unless cookies are cleared. This can confuse many WordPress users during testing. That is why private browsing matters so much here.
The Targeting Rules Are Too Strict for the Page You Are Testing
Targeting settings can block a form even when it is live. Klaviyo allows targeting by URL, device type, list membership, location, UTM data, and more. If the current page does not match those rules, the form will not appear. This is a very common reason behind WordPress popup forms Klaviyo display problems.
The Timing Settings Are Preventing the Form from Appearing During Your Test
Timing rules can also cause confusion. A form may wait for a delay, scroll action, or custom trigger before it appears. If you test too quickly, you may think it is broken. Klaviyo’s targeting and behavior settings control all of this. Review the timing carefully before assuming something failed.
The Embed Code Was Not Pasted Correctly Into the WordPress Page or Widget
Embedded forms have a separate issue path. Klaviyo says the embed code must be copied exactly as shown and pasted correctly into the site’s code. You also need to save the website changes after placement. If even one step is missed, the Klaviyo embed form WordPress output may not appear.
Cache or Optimization Tools Are Delaying or Blocking the Latest Form Changes
Another common issue comes from caching. Site cache or browser cache may keep showing the older version of the page. Klaviyo recommends refreshing cache when form changes do not appear correctly. This is especially important after editing code or display rules.
Your Theme or Custom CSS May Be Changing How the Form Looks on the Page
Sometimes the form loads, but it looks broken or hidden. Klaviyo says your site’s CSS can override form styling. Its troubleshooting guide recommends checking for strong CSS rules, including !important, that may interfere with the form design. This can affect both popup and embedded styles on WordPress.
Conclusion
Adding the right support partner can make WordPress management much easier. From plugin conflicts and theme issues to speed, security, updates, and ongoing maintenance, small problems can quickly grow into bigger website losses when they are ignored. That is why many business owners choose expert help instead of spending hours trying to fix technical issues alone. 24x7WPSupport presents itself as a dedicated partner for self-hosted WordPress websites, offering help for one-time fixes, ongoing support, hourly support, malware and hacking issues, speed improvements, hosting-related needs, and WordPress SEO support. The company also states that it provides round-the-clock support, a result-focused approach, and options for both short-term and long-term help. Its website further highlights support channels such as chat, phone, and email, along with a 30-day money-back guarantee on unsatisfied services.
If your WordPress website needs expert attention, now is a good time to act. Whether you need help fixing a sudden issue, improving site speed, cleaning malware, managing updates, or getting dependable long-term website care, 24x7WPSupport offers services built around those needs. Instead of letting technical issues slow down your business, get support from a team that focuses on self-hosted WordPress websites and offers flexible help through one-time, hourly, or ongoing plans. Reach out to 24x7WPSupport to get your website checked, fixed, secured, and running more smoothly so you can focus on growing your business with confidence.
Related posts:
WordPress Custom Post Types – What is it and the Best Plugins to Create them
Is WordPress GPL Licensed, and Are GPL Plugins Legal?
Do People Still Use WordPress for Blogging in 2026? The Complete Answer
How Much Does WordPress Cost? Complete Pricing Guide 2026
How to Fix Chinese Characters Appearing on My Website in Google Search Results

Brian is a WordPress support specialist and content contributor at 24×7 WP Support. He writes practical, easy-to-follow guides on WordPress troubleshooting, WooCommerce issues, plugin and theme errors, website security, migrations, performance optimization, and integrations. With a focus on solving real website problems, Brian helps business owners, bloggers, and online store managers keep their WordPress sites running smoothly.
