
How to Install a WordPress Theme on GoDaddy
Introduction
So you’ve got your WordPress site set up on GoDaddy, and now you’re ready to make it look the way you’ve always imagined — with the perfect theme. Whether you’re using GoDaddy’s Managed WordPress hosting or a shared cPanel plan, installing a WordPress theme is a straightforward process once you know the different methods available to you.
In this guide, we’ll walk you through three proven ways to install a WordPress theme on GoDaddy in 2026 — from the simplest dashboard method to FTP uploads for larger or custom themes. We’ll also cover how to activate your theme, set up child themes, and troubleshoot the most common installation hiccups so you can get your site looking great without a headache.
What You Need Before Installing a Theme on GoDaddy
Before diving into the installation steps, a few quick things to confirm. First, make sure you have an active WordPress installation on your GoDaddy account. If you haven’t done that yet, check out our guide to installing WordPress on GoDaddy to get your environment ready.
You’ll also want to have your theme ready — either the name of a free theme from the WordPress.org repository, or a .zip file if you purchased a premium theme. GoDaddy’s Managed WordPress and cPanel-based hosting both support all three installation methods we’ll cover below. The method you choose will depend mostly on where your theme comes from and its file size.
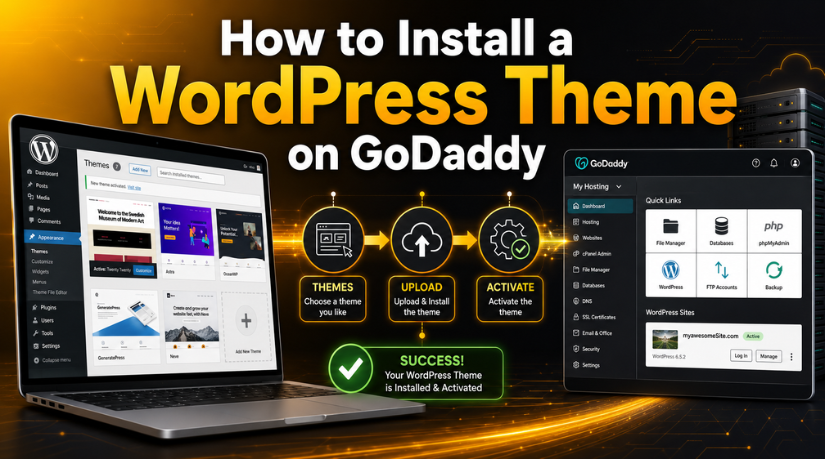
Method 1: Install a Theme from the WordPress Repository (Easiest)
If you’re looking at free themes from WordPress.org — the official theme repository — this is the fastest and most beginner-friendly approach. There’s no file to download in advance; you do everything right from your WordPress dashboard.
Here’s how:
- Log in to your WordPress admin panel. If you’re on GoDaddy Managed WordPress, navigate to your hosting dashboard and click Manage next to your site, then WP Admin. On shared hosting, go to your site URL and add
/wp-adminto the end. - In the left sidebar, hover over Appearance and click Themes.
- Click the Add New button at the top of the page.
- Use the search bar to find the theme you want, or browse by Featured, Popular, or Latest.
- Hover over any theme and click Install.
- Once the installation completes, click Activate to make it your live theme.
That’s it. The theme is now installed and active on your site. This works identically on GoDaddy Managed WordPress hosting and cPanel-based hosting plans. The repository has over 10,000 free themes, so there’s no shortage of choices — from minimal blogs to full-featured business layouts.
Method 2: Install a Theme from a .zip File (Premium Themes)
When you purchase a premium theme from marketplaces like ThemeForest, Elegant Themes, or StudioPress, you’ll receive a downloadable .zip file. This is the method for uploading it directly to GoDaddy. It’s only slightly more involved than the repository method.
Important note before you start: many premium theme packages include multiple .zip files inside a larger download — documentation, demo content, the theme itself, and sometimes a child theme. Make sure you’re uploading only the theme’s .zip file (usually the one that matches the theme name), not the outer bundle.
- From your WordPress dashboard, go to Appearance → Themes → Add New.
- Click Upload Theme at the top left of the screen.
- Click Choose File, then find and select your theme’s .zip file on your computer.
- Click Install Now.
- When installation finishes, click Activate.
GoDaddy’s servers have a default maximum file upload size (usually 64MB or more on Managed WordPress). Most themes are well under that. If your theme upload fails with a file size error, move to Method 3 below or contact GoDaddy support to temporarily increase the upload limit.
If you’re still exploring your options, our guide on the best WordPress theme marketplaces covers where to find high-quality paid and free themes worth considering before you commit to one.
Method 3: Install a WordPress Theme via FTP on GoDaddy
FTP (or SFTP for Managed WordPress) is the most technically involved method, but it’s the most reliable for larger themes or when the dashboard upload keeps timing out. You’ll need an FTP client — FileZilla is the most popular free option — and your GoDaddy FTP credentials.
Step 1: Get Your FTP Credentials from GoDaddy
For cPanel hosting: Log in to GoDaddy, go to My Products → Web Hosting → Manage, and look for the FTP section in cPanel. Your FTP host is typically your domain or the server IP, username is your cPanel username, and password is your cPanel password.
For Managed WordPress hosting: GoDaddy uses SFTP. Go to your hosting dashboard, find the SFTP/SSH section, and generate credentials there.
Step 2: Connect With FileZilla
- Open FileZilla and enter your Host, Username, Password, and Port (21 for FTP, 22 for SFTP).
- Click Quickconnect.
Step 3: Upload the Theme
- First, unzip your theme .zip file on your local computer so you have a folder containing all the theme files.
- In FileZilla’s remote site pane, navigate to
/public_html/wp-content/themes/(or/wp-content/themes/if you’re on Managed WordPress). - In the local site pane, find the unzipped theme folder.
- Drag and drop the entire theme folder from your local pane to the remote
themesfolder.
Step 4: Activate the Theme in WordPress
Once the upload completes, go to WordPress Dashboard → Appearance → Themes and you’ll see your newly uploaded theme. Click Activate to make it live.
Understanding Child Themes: Do You Need One?
Many premium themes — especially popular frameworks like Divi, Astra, and Genesis — come with a parent theme and a child theme bundled together. You need to install both, but you should only activate the child theme.
Here’s why this matters: when you make customizations to a WordPress theme and then the theme updates, those changes can get overwritten. A child theme inherits all the parent’s styling but keeps your customizations separate and safe from updates. When installing via the dashboard .zip method, install the parent theme first, then install the child theme separately, and activate only the child.
If your premium theme came with a child theme .zip, always follow this order:
- Install and activate the parent theme
- Install the child theme (don’t activate it yet)
- Go back and activate the child theme
This ensures both are properly recognized by WordPress before you switch over to the child.


How to Preview a Theme Before Activating It
Switching your live site to a new theme without previewing it first is a risk — especially if you have existing content that might not display perfectly. WordPress has a built-in Live Preview tool that lets you see exactly how a theme will look before you commit.
From Appearance → Themes, hover over any installed theme and click Live Preview instead of Activate. This opens the WordPress Customizer with your new theme applied to your actual content. You can browse around your site, check pages and posts, and even make basic customizations — all without affecting your live site. Only when you click Activate & Publish does the change go live.
This is especially useful if you’re running an established site on GoDaddy with real visitors and don’t want any unplanned downtime or layout surprises.
Troubleshooting Common Theme Installation Issues on GoDaddy
Even with the right steps, things sometimes don’t go smoothly. Here are the most common issues people run into when installing WordPress themes on GoDaddy and how to fix them:
Theme Won’t Upload — File Too Large
If you see a “file exceeds the maximum upload size” error, you have a few options. You can increase the upload limit by adding upload_max_filesize = 128M and post_max_size = 128M to your php.ini file through cPanel, or use the FTP method (Method 3 above) which bypasses the upload size limit entirely.
White Screen After Activation
A blank white screen after activating a theme is usually caused by a PHP error in the theme or a conflict with an active plugin. Access your site via FTP, navigate to /wp-content/themes/, and rename the newly activated theme folder to something else (e.g., themename-old). This forces WordPress to fall back to its default theme and restore access to your dashboard. Then, deactivate your plugins one by one to find the culprit.
Theme Doesn’t Show Up After FTP Upload
If the theme isn’t appearing in your Themes list after FTP upload, you likely either uploaded the outer bundle folder (rather than the actual theme folder) or the files landed in the wrong directory. Double-check that your theme folder is directly inside /wp-content/themes/ and contains a valid style.css file with the proper theme header comment.
Broken Layout or Missing Styles
If your theme activates but looks broken, make sure all theme files uploaded correctly — a partial upload due to a disconnected FTP session can leave files missing. Re-upload the theme folder via FTP, letting it overwrite the existing files, then clear your caching plugin and any GoDaddy-side server cache.
Best Practices After Installing Your WordPress Theme on GoDaddy
Installing the theme is just the beginning. A few things to do right after activation to set your site up for success:
Clear your cache. GoDaddy Managed WordPress has built-in caching. After activating a new theme, go to your GoDaddy hosting dashboard and purge the cache so visitors see the latest version of your site.
Install required plugins. Most premium themes will notify you about required or recommended plugins when you first activate them. Install those before you start customizing — some features of the theme won’t work without them.
Check mobile responsiveness. Open your site on a phone or use browser developer tools to simulate mobile view. GoDaddy’s servers don’t affect responsive design, but you want to confirm the theme renders properly at smaller screen sizes.
Run a speed check. Different themes have very different performance footprints. Use a tool like GTmetrix or Google PageSpeed Insights to benchmark your site speed with the new theme active. If your score drops significantly, look at enabling GoDaddy’s performance features or switching to a lighter theme.
Back up your site. GoDaddy’s Managed WordPress plans include automatic backups, but it’s always smart to trigger a manual backup through the GoDaddy dashboard or a plugin like UpdraftPlus right after major changes like a theme switch. If you ever need to go back, you’ll have a clean restore point.
Need Help Managing Your WordPress Site on GoDaddy?
Installing a WordPress theme on GoDaddy is something most site owners can handle on their own — but once your theme is in place, there’s a whole world of customization, optimization, and maintenance ahead. If you run into trouble, whether it’s a broken theme, a slow site, or errors after an update, the team at 24×7 WP Support is available around the clock to help.
We specialize in WordPress sites on GoDaddy and all major hosts — from quick theme fixes to full site migrations. Whether you’re running into a theme conflict, need help setting up your design from scratch, or just want someone to handle the technical side so you can focus on your content, we’ve got you covered. Learn how to log into your WordPress site through GoDaddy if you’re still getting oriented — or contact our team any time for expert WordPress support, available 24/7.

Brian is a WordPress support specialist and content contributor at 24×7 WP Support. He writes practical, easy-to-follow guides on WordPress troubleshooting, WooCommerce issues, plugin and theme errors, website security, migrations, performance optimization, and integrations. With a focus on solving real website problems, Brian helps business owners, bloggers, and online store managers keep their WordPress sites running smoothly.
