
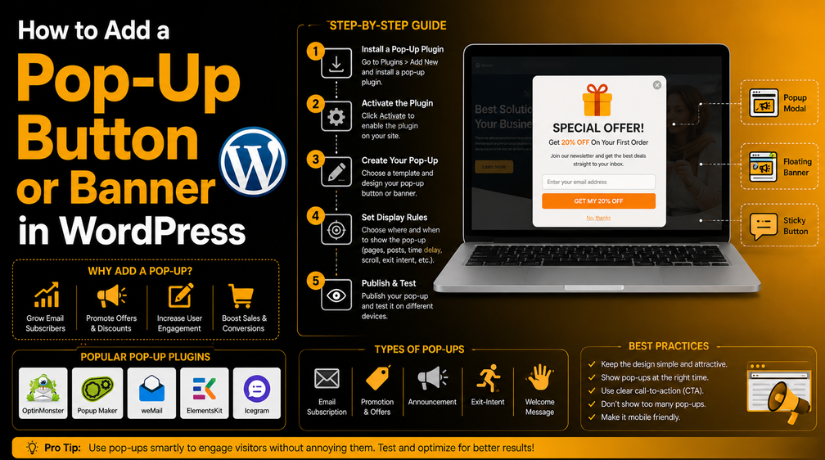
How to Add a Pop-Up Button or Banner in WordPress (Step By Step Guide)
Introduction
A popup can help you show important messages quickly. It can appear as a button, form, banner, or notice. Many website owners use popups for offers, leads, updates, and support forms. You can Add pop-up in WordPress without advanced coding skills. A good WordPress pop-up plugin makes the process simple and safe.
A popup button opens only when users click it. A popup banner may appear on the screen automatically. Both options can help improve user action. You can use them for contact forms, coupons, downloads, and announcements. You can also use a WordPress notification banner for service updates or important alerts.
Many business websites use popups to guide visitors clearly. A WordPress promotional banner can show discounts or seasonal deals. It can also promote a new service or product. For example, an online store can show a free shipping offer. A service website can show a “Request a Quote” button.
This guide explains how popup buttons work in WordPress. It also explains how banners can support your marketing goals. You will learn the basic meaning before moving to setup steps. This makes the process easier for beginners. You can later Create pop-up in WordPress using the right plugin and settings.
What Is a Pop-Up Button in WordPress and How Does It Work?
A pop-up button is a clickable button on your website. When visitors click it, a popup box appears. This popup can show any useful content inside it. You can add a contact form, offer, message, or video. You can also add a newsletter form or booking form.
The main benefit is simple user control. The popup does not appear without user action. This makes it less disturbing than automatic popups. Visitors click the button only when they need more details. That improves trust and keeps the page clean.
A WordPress popup maker can help create this button-based popup. Many popup tools give ready settings for triggers and design. A trigger tells the popup when it should open. For a popup button, the trigger is usually a click. This means the popup opens after the button is clicked.
When Should You Use a Popup in WordPress for Better User Action?
You should use a popup when it has a clear purpose. A popup should guide users toward one helpful action. It should not disturb them while reading your content. Many website owners add pop-up in WordPress to collect leads. Others use popups to promote offers, updates, or support options.
Use WordPress Popups for Lead Generation and Contact Forms
Popups are helpful for collecting leads from interested visitors. You can show a newsletter form inside the popup. You can also add a quote request or contact form. A WordPress pop-up plugin can connect forms with popup settings. This makes the setup simple for most beginners.
Use Popup Banners for Offers, Discounts, and Store Promotions
A popup banner works well for short promotional messages. You can use a WordPress promotional banner for seasonal discounts. Online stores can show coupon codes or sale alerts. Service websites can highlight limited-time support offers. A WordPress banner plugin can help create these banners quickly.
Use a WordPress Notification Banner for Important Announcements
A WordPress notification banner is useful for urgent website updates. You can show holiday hours, service delays, or event notices. You can also announce shipping updates or maintenance alerts. These banners should be short, clear, and easy to close. They work best when placed near the top area.
Things to Check Before Adding a Popup in WordPress
Define the Main Goal of Your Popup
Before you Create pop-up in WordPress, decide the main goal first. Your popup should focus on one clear action. You may want leads, sales, signups, calls, or downloads. Do not add too many messages in one popup. A clear goal helps users understand the next step. It also makes your popup more effective and useful.
Choose the Right Popup Type
Every popup type works for a different purpose. A click-based popup is best for forms and quotes. A time-delay popup works well for offers and newsletters. A scroll-based popup appears after users read some content. A floating banner works for short alerts and updates. Choose the popup type based on user behavior.
Keep the Popup Design Simple
Your popup design should look clean and easy to read. Use short text and clear button labels. Avoid adding too many images, colors, or links. A simple popup helps users focus on the message. It also looks more professional on your website. Match the design with your website branding.
Make the Popup Mobile-Friendly
Many visitors use mobile phones to browse websites. So, your popup must work well on small screens. Keep the popup size small and clean. The close button should be easy to find. Avoid full-screen popups unless they are really needed. A mobile-friendly popup improves user experience.
Check Website Speed Before Publishing
A heavy popup can slow down your website. Large images, animations, and scripts can affect loading speed. Choose a lightweight WordPress pop-up plugin for better performance. Also avoid loading popups on every page. A fast popup gives users a smoother browsing experience. It also helps keep visitors on your website.


Set Proper Timing and Frequency
Do not show the popup too early. Give users time to read the page first. You can show it after a few seconds. You can also show it after scrolling. Set frequency rules to avoid repeated popup displays. This helps your popup feel useful, not annoying.
Check Page Targeting Rules
Your popup should appear on relevant pages only. For example, show offers on product pages. Show contact forms on service pages. Show announcements on important website pages. Good targeting improves popup results. It also keeps users from seeing unrelated messages.
Add a Clear Close Button
Every popup should have a clear close option. Users should never feel stuck on your website. A visible close button builds trust and comfort. It also improves the browsing experience. Avoid hiding the close icon or making it hard to click. A simple close button keeps the popup user-friendly.
How to Add a Pop-Up Button in WordPress Using a Plugin
You can Add pop-up in WordPress using a simple plugin. This method is best for beginners and business owners. You do not need coding or theme file changes. A good WordPress pop-up plugin gives ready popup settings. You can create forms, offers, messages, and banners easily. It also helps you control when the popup appears.
Step 1: Choose the Right WordPress Popup Plugin
- Choose a trusted popup plugin for your WordPress website.
- You can use Popup Maker, Hustle, Poptin, or Elementor Pro.
- A good WordPress popup maker should be easy to manage.
- It should support click triggers, display rules, and mobile settings.
- It should also work smoothly with your active WordPress theme.
- If you run WooCommerce, check WooCommerce support before setup.
- Avoid heavy plugins with too many unused features.
- A lightweight plugin can help keep your website faster.
Step 2: Install and Activate the Popup Plugin
- Open your WordPress dashboard.
- Go to Plugins > Add New.
- Search for your selected popup plugin.
- For example, search for Popup Maker.
- Click the Install Now button.
- After installation, click the Activate button.
- The plugin will now appear in your dashboard menu.
- Open the plugin settings before creating your first popup.
Step 3: Create a New Popup in WordPress
- Open the popup plugin panel from your dashboard.
- Click Add New Popup or Create Popup.
- Add a simple internal name for your popup.
- This name helps you find the popup later.
- Add a popup title if your design needs one.
- Add your main popup content in the editor.
- You can write text or add a form shortcode.
- Save the popup before setting triggers.
Step 4: Add Useful Content Inside Your Popup Box
- Add content that matches your popup goal.
- Use a contact form if you want leads.
- Use a discount code if you want sales.
- Use a newsletter form if you want subscribers.
- Use a booking form for appointments or consultations.
- Use short text that users can understand quickly.
- Avoid adding too many buttons or links.
- One clear message and one action work best.
Step 5: Set the Popup Trigger to Open on Button Click
- Find the trigger settings inside your popup plugin.
- Choose the Click Trigger option.
- This trigger opens the popup after a button click.
- It gives visitors more control while browsing.
- Copy the trigger class, shortcode, or special link.
- The trigger format may depend on your selected plugin.
- Keep this trigger ready for your WordPress button.
- Save the trigger settings after making changes.
Step 6: Add the Popup Button to Your WordPress Page
- Open the page where you want the popup button.
- Use the WordPress block editor for this step.
- Click the plus icon and add a Button block.
- Write clear button text, like Contact Us or Get Quote.
- Connect the button with your popup trigger.
- Some plugins use CSS classes for popup buttons.
- Some plugins use shortcodes or special links.
- Update or publish the page after adding the button.
Step 7: Test the Pop-Up Button on Desktop and Mobile
- Open your website in a new browser tab.
- Test the popup as a logged-out visitor.
- Click the button and check if the popup opens.
- Check the popup form, design, and close button.
- Test the popup in an incognito browser window.
- Open the same page on a mobile phone.
- Make sure the popup fits the small screen.
- Clear cache if the new popup does not appear.
How to Add a Pop-Up Banner in WordPress for Offers and Notices
A pop-up banner helps you show short messages clearly. You can use it for offers, alerts, updates, and notices. A WordPress banner plugin makes this process simple for beginners. You can also use a WordPress promotional banner for discounts and deals. For important updates, a WordPress notification banner works very well. Follow these steps to create a clean banner in WordPress.
Step 1: Choose a Reliable WordPress Banner Plugin
- Choose a trusted plugin for your banner setup.
- Make sure it offers easy design controls.
- Check if it supports display rules and triggers.
- Confirm that it works well on mobile devices.
- Use a WordPress pop-up plugin with banner features.
- Choose a lightweight plugin for better website speed.
- Check WooCommerce support if you run an online store.
Step 2: Install and Activate the Plugin
- Open your WordPress dashboard.
- Go to Plugins > Add New.
- Search for your selected WordPress banner plugin.
- Click Install Now beside the plugin name.
- Click Activate after the installation is complete.
- Open the plugin settings from your dashboard menu.
- Review the available banner and popup options.
Step 3: Create a New Pop-Up Banner
- Open the plugin dashboard from your WordPress admin area.
- Click Add New, Create Popup, or Create Banner.
- Add a clear internal name for your banner.
- Choose a ready banner template if available.
- Select a top bar, bottom bar, or floating layout.
- Add a blank design if you want full control.
- Save the banner draft before adding final content.
Step 4: Add Your Banner Message and Call-to-Action
- Write a short message for your banner.
- Keep the message clear and easy to understand.
- Use simple offer text like “Get 15% off today.”
- Add one strong call-to-action button.
- Use button text like Shop Now or Claim Offer.
- Avoid adding too much text inside the banner.
- Keep the banner focused on one action only.
Step 5: Choose the Right Banner Position
- Choose where the banner should appear on your website.
- Use a top bar for important notices.
- Use a bottom bar for soft promotions.
- Use a floating banner for special offers.
- Use a center popup only for urgent messages.
- Make sure the banner does not block content.
- Test the position on desktop and mobile screens.
Step 6: Set Display Rules for Selected Pages
- Decide where your banner should appear.
- Show it on the homepage for general offers.
- Show it on service pages for lead generation.
- Show it on product pages for WooCommerce deals.
- Show it on cart pages for discount reminders.
- Avoid showing the same banner everywhere.
- Use page targeting to keep the message relevant.
Step 7: Set Timing and Frequency Rules
- Decide when the banner should appear.
- Show it after a few seconds if needed.
- Show it after users scroll down the page.
- Use exit intent for visitors leaving the website.
- Show the banner once per visitor session.
- Avoid showing it on every page load.
- Use timing rules to keep it user-friendly.
Step 8: Make the Banner Mobile-Friendly
- Preview the banner on mobile devices.
- Keep the message short on small screens.
- Make the button easy to tap.
- Keep the close button clearly visible.
- Avoid large images inside mobile banners.
- Reduce banner height for better viewing.
- Make sure it does not cover important content.
Step 9: Preview and Publish the Banner
- Preview your banner before publishing it.
- Check the text, button, color, and layout.
- Test the banner on desktop, tablet, and mobile.
- Open your website as a logged-out visitor.
- Click the button and check the target link.
- Clear your website cache if it does not appear.
- Publish the banner after final testing.
Common Popup Problems and Quick Fixes for WordPress Websites
Even a good popup can sometimes stop working. This can happen because of cache, plugin conflict, or wrong settings. A trusted WordPress pop-up plugin can reduce these issues. Still, you should know the common fixes before using popups.
Popup Button Is Not Opening After Clicking
This issue usually happens because of wrong trigger settings. First, check the popup trigger inside your plugin. Make sure the button class or link is correct. Then clear your website and browser cache. If the issue continues, disable script delay settings. Some speed plugins can block popup scripts. You can also test with another theme temporarily. This helps you find plugin or theme conflicts.
Popup Banner Is Not Showing on the Website
If the banner does not show, check display rules first. The banner may be limited to selected pages only. Also check if the popup is published properly. Review device visibility settings inside the plugin. Some banners may be disabled on mobile screens. Clear your cache after changing the settings. Then open the website in incognito mode. This helps you test it like a new visitor.
Popup Looks Broken on Mobile Devices
Mobile popup issues are very common on WordPress sites. The popup may look too wide or too tall. Reduce the popup width inside design settings. Use shorter text for small screens. Remove large images from mobile popups. Keep buttons large enough for easy tapping. Also check the close button placement carefully.
Popup Appears Too Often for Visitors
A popup should not appear on every page load. This can annoy visitors and increase bounce rate. Set frequency rules inside your WordPress popup maker. Show the popup once per session if possible. You can also set a delay before showing it. Avoid showing many popups on the same page.
Popup Slows Down the Website
A heavy popup can affect website loading speed. Large images, animations, and extra scripts cause delays. Use a lightweight plugin to create pop-up in WordPress safely. Avoid loading popups on every page. Use simple designs and compressed images. Remove effects that are not needed.
Conclusion
Adding a pop-up button or banner in WordPress is simple. You only need the right plugin and proper settings. A popup button works well for contact forms, quotes, bookings, and downloads. A popup banner works better for offers, notices, and updates. Keep your popup design clean and easy to read. Also make sure it works well on mobile devices. Do not show popups too often or too early.
A helpful popup can guide users without disturbing them. For support with popup setup, plugin conflicts, display issues, or WordPress errors, you can contact 24×7 WP Support Their website lists the US and Canada toll-free number as +1-888-818-9916. You can also visit 24x7wpsupport for WordPress support details.

Brian is a WordPress support specialist and content contributor at 24×7 WP Support. He writes practical, easy-to-follow guides on WordPress troubleshooting, WooCommerce issues, plugin and theme errors, website security, migrations, performance optimization, and integrations. With a focus on solving real website problems, Brian helps business owners, bloggers, and online store managers keep their WordPress sites running smoothly.
