
How to Create and Use the WordPress Loop (Complete Guide)
Introduction
If you want to build a dynamic WordPress website, you must understand the WordPress Loop. It is one of the most important parts of WordPress theme development. The Loop helps WordPress fetch content and display it on the page. It controls how posts appear on the blog page, archive page, and many other templates. This is why every good WordPress Loop tutorial starts with the basics.
The WordPress Loop is not only useful for developers. It also helps site owners, designers, and learners understand how WordPress shows content. When you know how to use WordPress Loop correctly, you can control post titles, images, excerpts, links, and full content with better accuracy. That makes your site more flexible and easier to manage. If you want to create WordPress Loop sections for custom layouts, this knowledge becomes even more valuable.
Today, the topic is still important because WordPress now supports both classic themes and block themes. In classic themes, the Loop is added directly in PHP template files. In block themes, WordPress also supports the Query Loop block for visual content layouts. Even with these newer tools, the core idea remains the same. WordPress still needs a way to pull content and display it in order. That is why learning the Loop is still a smart step for modern WordPress users.
This guide is made for users who want clear learning without confusion. You do not need to be an advanced developer to understand the basic idea. Once you learn the purpose of the Loop, the rest becomes easier. You start to see how WordPress builds pages from database content in a clean and repeatable way. That is the real reason the WordPress Loop remains such an essential topic.
What Is the WordPress Loop?
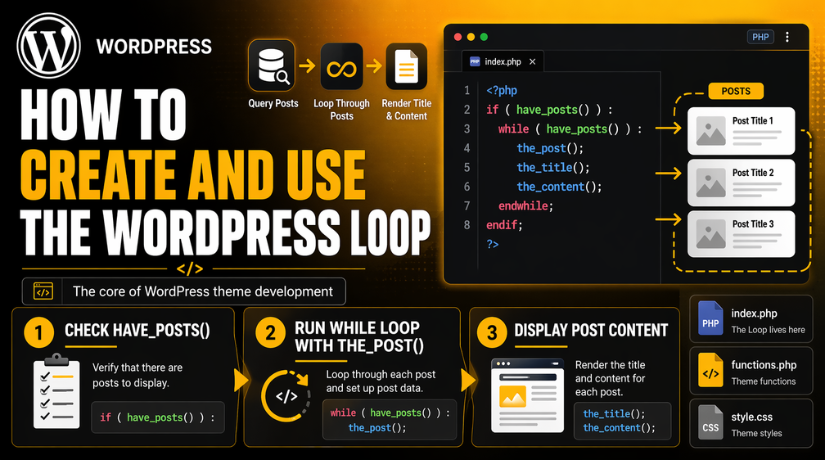
The WordPress Loop is the default system WordPress uses to display posts through template files. WordPress checks the current page query, finds matching posts, and then shows them one at a time. It inserts each post’s data into the template using special template tags. This is why the Loop is called a loop. It repeats the same process until all posts have been displayed.
In a simple setup, the Loop usually begins by checking whether posts are available. WordPress uses have_posts() for this step. If posts exist, the Loop starts running. Then WordPress uses the_post() to move to the next post in the result list. Once that post becomes active, template tags can print its data on the page. This is the basic flow behind almost every WordPress Loop tutorial.
You can think of the Loop as a content display engine. It does not only show blog posts. It can also display pages, custom post types, search results, and archive entries. The content shown depends on the query for that page. For example, a category page shows posts from one category. A search page shows matching search results. A single post page shows one post with its full content. The Loop adapts to each case based on what WordPress has already queried.
This is one reason the Loop is so useful in real projects. It saves time and keeps content output dynamic. You do not need to hardcode every post manually. WordPress pulls data from the database and places it where your theme tells it to appear. That makes the site easier to update later. When a new post is published, the Loop can show it automatically in the correct place. This is a major reason developers rely on it so often.
What the WordPress Loop Is Used for in Different Website Areas
Showing Blog Posts on the Homepage
The WordPress Loop is often used on the blog homepage. It helps WordPress show recent posts in the correct order. It can display the post title, featured image, excerpt, and link. This makes the homepage dynamic and easy to update. When you publish a new post, the Loop can show it automatically.
Displaying Full Content on Single Post Pages
The Loop is also used on single post pages. It helps WordPress load one full post with all important details. This can include the title, full content, author name, date, category, tags, and comments. It gives users a complete view of one post without extra manual work.
Showing Content on Static Pages
WordPress pages also use the Loop. It helps display the page title and page content properly. Even though a page is not a blog post, WordPress still uses the Loop structure to show its content. This keeps the template system simple and consistent across the website.
Displaying Category and Archive Pages
The Loop is very useful on archive pages. It can show posts from one category, one tag, one author, or one date range. WordPress first finds the matching posts, then the Loop prints them one by one. This helps users browse related content in an organized way.
Showing Search Results
When a visitor uses the website search, the Loop displays the matching posts or pages. It takes the search query results and shows them in a list format. This helps users quickly find the content they need. It also makes search pages dynamic and useful.
Creating Featured Post Sections
The WordPress Loop can be used to build featured content areas. For example, you can show the latest post, highlighted posts, or posts from one selected category. This is useful on homepages, landing pages, and custom sections. It helps site owners draw attention to important content.
Listing Custom Post Types
The Loop is not limited to normal posts and pages. It can also display custom post types like services, portfolios, testimonials, products, or case studies. This gives developers more flexibility when building business websites. It also helps create structured layouts without hardcoding content.
Building Recent Posts and Related Posts Blocks
Many websites use the Loop for recent posts, widgets or related post sections. It can show a small list of useful posts below the main content or in the sidebar. This improves internal linking and keeps users engaged for longer. It also helps visitors discover more useful pages.
Creating Dynamic Content Areas Without Hardcoding
One of the biggest uses of the Loop is dynamic output. You do not need to manually add every title, image, or link in the template. WordPress pulls the content from the database and shows it automatically. This saves time and makes content updates much easier in the future.
Supporting Flexible Website Layouts
The Loop gives developers freedom to build many layout styles. It can be used for grid layouts, list layouts, sliders, archive pages, and custom sections. Because of this flexibility, the WordPress Loop is a core part of theme development. It helps websites stay clean, dynamic, and easy to manage.
How to Create the WordPress Loop (Step By Step Guide)
Step 1. Understand What You Want the Loop to Show
- First, decide what type of content you want to display.
- You may want blog posts, pages, or custom post types.
- This helps you choose the correct template file later.
- It also makes the WordPress Loop easier to plan.
- A clear goal always makes development faster and cleaner.
Step 2. Open the Correct WordPress Template File
- Next, open the theme file where the Loop will go.
- This may be index.php, home.php, or archive.php.
- Sometimes it may also be single.php or page.php.
- The file depends on where the content should appear.
- This is an important step when you create WordPress Loop code.
Step 3. Start with the Basic Loop Structure
- Now add the basic Loop structure to the file.
- The standard Loop starts by checking for available posts.
- Then it runs through posts one by one.
- This is the base of every simple WordPress Loop tutorial.
- It tells WordPress how to start showing dynamic content.
Step 4. Use have_posts() to Check for Available Content
- The have_posts() function checks whether posts are available.
- It helps WordPress know if content exists for that page.
- If posts are found, the Loop can continue.
- If not, WordPress can show a fallback message.
- This step keeps the page from showing empty content.
Step 5. Use while ( have_posts() ) to Run the Loop
- After that, use the while statement in the Loop.
- This tells WordPress to repeat the process for each post.
- The Loop keeps running until all posts are displayed.
- This repeating structure is why it is called a loop.
- It is a core part of how to use WordPress Loop properly.
Step 6. Add the_post() to Load Each Post Properly
- Inside the while statement, add the_post().
- This function loads the current post data correctly.
- It prepares the post for display inside the template.
- Without it, template tags will not work as expected.
- This step is necessary in every basic WordPress Loop example.
Step 7. Add Template Tags Inside the Loop
- Now place template tags inside the Loop area.
- These tags show the title, content, excerpt, and permalink.
- You can also show the featured image and post date.
- This is where the actual content appears on the page.
- It turns your Loop into visible website output.
Step 8. Add a Message for No Posts Found
- It is good to handle cases with no matching content.
- Add an else section after the main Loop condition.
- In that section, show a simple helpful message.
- This improves the page experience for your visitors.
- It also makes your template feel complete and professional.
Step 9. Save the File and Test the Output
- After writing the Loop, save the template file.
- Then open the page and check the output carefully.
- Make sure posts appear in the correct order.
- Also check titles, images, links, and content display.
- Testing helps you find errors before publishing changes.
Step 10. Create a Custom Loop if You Need Special Content
- Sometimes the default Loop is not enough for your layout.
- In that case, use WP_Query for a custom Loop.
- This helps show featured posts or category-specific content.
- It is also useful for custom post type listings.
- Many developers use this when they create WordPress Loop sections.
Step 11. Reset Post Data After a Custom Loop
- If you use a custom Loop, reset post data after it ends.
- This keeps the rest of the template working correctly.
- Without resetting, later content may show incorrect post data.
- WordPress provides a function for this reset step.
- This small task is very important for stable output.
Step 12. Keep the Loop Clean and Easy to Read
- The final step is keeping your Loop clean.
- Use proper spacing and a simple structure.
- Only add the template tags you really need.
- Avoid adding too much logic inside the Loop.
- Clean code is easier to test, update, and manage later.
How to Use the WordPress Loop in WordPress Theme Files the Right Way
Step 1. Choose the Theme File Where You Want to Show Content
- First, decide where you want the content to appear.
- The Loop is usually added inside theme template files.
- Common files include index.php, home.php, and archive.php.
- It may also be used in single.php or page.php.
- The file depends on the page type and layout.
Step 2. Understand What Content That File Should Display
- Before using the Loop, know what that template should show.
- A homepage may show recent blog posts in order.
- A single post file may show one full article.
- An archive file may show grouped posts by category.
- This helps you use the WordPress Loop correctly.
Step 3. Add the Basic Loop Structure Inside the Template File
- After that, place the Loop structure in the file.
- The Loop starts by checking whether posts are available.
- Then it runs through the posts one by one.
- This is the standard way WordPress displays dynamic content.
- It is the base of every WordPress Loop tutorial.
Step 4. Let WordPress Check for Available Posts
- The Loop first checks whether posts exist for that page.
- This step helps prevent empty output on the screen.
- If posts are available, the Loop moves forward.
- If not, you can show a fallback message.
- This makes the template more useful and complete.
Step 5. Run the Loop for Each Post Found
- Next, WordPress starts repeating the process for each post.
- The Loop keeps running until all posts are displayed.
- This is why it is called a loop.
- It processes one item at a time in order.
- This is a core part of how to use WordPress Loop.
Step 6. Load Each Post Before Showing Its Data
- Inside the Loop, WordPress loads each post one by one.
- This step prepares the current post for output.
- It allows template tags to work with the correct post.
- Without this step, your content may not display properly.
- Every proper WordPress Loop example depends on this process.
Step 7. Add Template Tags to Show the Post Details
- Now place template tags inside the Loop area.
- These tags display the title, content, excerpt, and link.
- You can also show images, categories, and dates.
- This is where the page starts showing useful output.
- It turns post data into visible website content.
Step 8. Adjust the Output Based on the Template Type
- The output should match the page layout and purpose.
- On blog pages, show excerpts and read more links.
- On single posts, show the full content and details.
- On archive pages, keep the layout simple and clear.
- This helps you create WordPress Loop layouts more effectively.
Step 9. Use the Loop for Special Content Sections
- You can also use the Loop in custom sections.
- For example, show recent posts or featured posts.
- You can also display posts from one category only.
- This is useful for homepages and custom landing pages.
- It gives your website more flexibility and control.
Step 10. Use a Custom Query When the Default Loop Is Not Enough


- Sometimes the main Loop does not match your need.
- In that case, use a custom query for selected content.
- This helps when showing custom post types or featured items.
- It gives you more control over what appears.
- Many developers use this for advanced layouts.
Step 11. Reset Post Data After a Custom Loop
- If you use a custom Loop, reset post data later.
- This keeps the rest of the page working correctly.
- Without resetting, later content may show wrong details.
- This step is small but very important.
- It helps keep your template stable and clean.
Step 12. Learn the Difference Between Classic and Modern Theme Use
- In classic themes, the Loop is added with PHP code.
- In block themes, users may use the Query Loop block.
- Both methods display content in a repeatable format.
- The workflow is different, but the purpose is similar.
- Learning both methods is helpful in modern WordPress work.
Common Mistakes to Avoid When Using the WordPress Loop in Real Projects
Forgetting to Use the_post() Inside the Loop
Many beginners forget to add the_post() inside the Loop. This function prepares the current post data for output. Without it, WordPress cannot load each post correctly. As a result, template tags may not work as expected. This small mistake can break the content display very easily.
Using Template Tags Outside the Loop
Template tags like the_title() and the_content() are made to work inside the Loop. If you use them outside the Loop, WordPress may not know which post data to show. This can cause empty output or wrong content. That is why template tags should be placed in the correct Loop structure.
Not Handling the No Posts Found Case
Some developers only write the main Loop and skip the fallback part. When no posts are found, the page may look empty or unfinished. This creates a poor user experience for visitors. A simple message in the else section helps make the template complete and more useful.
Forgetting to Reset Post Data After a Custom Loop
When you use a custom query, you must reset the post data after it ends. If you skip this step, later template tags may show the wrong post details. This can affect titles, content, links, or images in other parts of the page. It is a common but serious mistake in custom Loop work.
Confusing the Main Query With a Custom Query
The main query is created by WordPress for the current page automatically. A custom query is created by the developer for special content sections. Many users mix these two without understanding the difference. This can lead to wrong output, extra complexity, and layout issues that are harder to fix later.
Adding Too Much Logic Directly Inside the Loop
The Loop should stay focused on displaying content clearly. Some developers add too many conditions, checks, and custom rules inside it. This makes the code harder to read and manage. A crowded Loop also becomes more difficult to test and update in future development work.
Writing Inefficient Custom Queries
A custom Loop should only request the content you really need. Some developers build queries that load too much data or use poor settings. This can make the page slower and less efficient. Clean and focused queries help improve both performance and code quality.
Ignoring Theme Structure Differences
Classic themes and block themes do not always handle content the same way. Some users apply old PHP Loop methods without checking the current theme structure. This can cause confusion during development. It is important to understand whether the website uses a classic theme or a modern block theme.
Using the Wrong Template File for the Loop
Even a correct Loop can fail if it is placed in the wrong file. For example, a Loop meant for archive pages may not work properly inside another template. WordPress uses different template files for different page types. Choosing the right file is an important part of proper Loop usage.
Not Testing the Loop After Adding It
Some developers write the Loop and move on without checking the output. This can leave small errors hidden in the layout. Titles, links, images, or content may not display correctly. Testing the Loop after adding it helps catch problems early and keeps the template reliable.
Best Practices for Working With the WordPress Loop in a Clean Way
Keep Your Loop Code Clean and Easy to Read
A clean Loop is always easier to understand and manage. Use proper spacing, simple structure, and clear formatting in your template file. This helps you find issues faster and makes future edits easier. Clean code also looks more professional and reduces confusion during development.
Keep Display Logic Separate From Heavy Custom Logic
The Loop should mainly focus on showing content on the page. It should not be overloaded with too many custom checks or complex conditions. When too much logic is placed inside the Loop, the file becomes harder to read and maintain. A simple structure always works better in the long run.
Use Template Tags Only Where They Belong
Template tags work best when they are used inside the Loop correctly. Tags like title, content, excerpt, and permalink depend on active post data. If you place them in the wrong location, the output may break or show incorrect data. Using them properly keeps the content accurate and stable.
Reset Post Data After Every Custom Loop
If you create a custom Loop, always reset the post data after it ends. This keeps the rest of the page working correctly. Without resetting, later template tags may use the wrong post information. This is a small but very important habit in WordPress development.
Use Custom Queries Only When You Really Need Them
The default Loop is enough for many pages in WordPress. You should create a custom query only when the layout needs special content. Extra queries can make the template more complex and harder to manage. A simple approach often gives better results and cleaner code.
Always Handle the No Posts Found Case
A good Loop should never leave the page empty without a message. If no posts are available, show a simple fallback message for users. This improves the page experience and makes the template feel complete. It also helps visitors understand what happened instead of seeing blank space.
Test the Loop on Different Page Types
The Loop may behave differently on different templates. You should test it on the homepage, archive pages, single posts, and search pages. This helps you catch missing content, layout problems, or wrong output early. Good testing always leads to a more stable website.
Avoid Repeating the Same Code Again and Again
If you use the same Loop structure in many places, try to keep it reusable. Repeated code makes editing harder and increases the chance of mistakes. A more organized setup saves time and keeps the theme easier to maintain. It also helps future updates stay consistent.
Keep Performance in Mind While Building the Loop
A Loop should be useful, but it should also stay efficient. Loading too much data or running too many custom queries can slow the page. Try to keep the output focused and only show the content you need. Better performance gives users a smoother website experience.
Learn Both the Classic Loop and the Modern Query Loop Block
Modern WordPress users should understand both ways of displaying content. Classic themes use the PHP Loop in template files. Block themes often use the Query Loop block for visual layouts. Learning both methods gives you more flexibility and helps you work better with modern WordPress websites.
Conclusion
The WordPress Loop remains one of the most important parts of WordPress development. It helps WordPress fetch content and display it in the correct order across many parts of a website. Once you understand how it works, building dynamic pages becomes much easier. You can control titles, content, excerpts, images, and custom layouts with better confidence. That is why learning the Loop is still valuable for beginners and developers today.
As WordPress continues to grow, the way people build themes may change, but the core content display idea still remains. Classic themes still use the PHP Loop, while modern block themes now offer the Query Loop block for visual layouts. Even with these newer tools, the basic concept of looping through content is still central to WordPress. So, learning the Loop gives you a strong base for both older and newer workflows.
If you want better control over your website layout, learning the Loop is a smart step. It helps you understand how WordPress displays content and how templates work behind the scenes. Once you practice the basic Loop and then move into custom queries, you can create much more flexible and useful website sections. That practical knowledge can improve both your development skills and your website results.
If you need help with WordPress Loop changes, custom theme work, or template updates, the team at 24x7WPSupport can help. We assist with WordPress development, WooCommerce fixes, theme customization, plugin issues, and performance improvements. If your website needs expert support for content layouts or custom template functionality, visit 24x7WPSupport and get professional help for your WordPress website.
Related posts:

Brian is a WordPress support specialist and content contributor at 24×7 WP Support. He writes practical, easy-to-follow guides on WordPress troubleshooting, WooCommerce issues, plugin and theme errors, website security, migrations, performance optimization, and integrations. With a focus on solving real website problems, Brian helps business owners, bloggers, and online store managers keep their WordPress sites running smoothly.
