
How to Install and Set Up Enfold Theme in WordPress (Beginner Guide)
Introduction
If you want to install the Enfold theme in WordPress, you need a clear path first. Many users buy the theme, upload files, and then hit errors. Some upload the wrong ZIP file. Others skip backups or child theme setup. This guide removes that confusion and keeps the process simple. In this first part, you will learn what Enfold is, how much it costs, and what you should prepare before you begin the real setup process. This Enfold theme installation guide is written for beginners, business owners, and anyone who wants easy WordPress theme installation steps without stress.
This guide also helps you avoid the common mistakes people make early. A wrong file upload can stop installation fast. A missing backup can create bigger problems later. A skipped child theme can make future edits risky. That is why good preparation matters before you install a premium WordPress theme on a live website. When you know how to install the Enfold theme the right way, the rest of the setup becomes much easier.
What is the Enfold WordPress theme and Why Many Users Choose It
Enfold is a premium multipurpose WordPress theme made for many site types. It works well for business websites, shop websites, portfolios, and blogs. The theme is fully responsive, so it adjusts across mobile, tablet, and desktop screens. It also includes its own drag and drop template builder, which helps users build pages without heavy coding work. That makes Enfold useful for both beginners and experienced website builders.
One reason users still like Enfold is its strong built-in control panel. You can adjust layouts, colors, fonts, and styling directly from the backend. ThemeForest also highlights its flexible design and builder elements like columns, buttons, galleries, tabs, accordions, pricing tables, and testimonials. This gives users many design tools in one package. So if you want an Enfold theme setup tutorial that feels practical, Enfold is a theme that gives you many options from the start.
Another strong point is its guided documentation structure. The official Enfold docs walk users through the main path in a logical order. That path covers installation, theme registration, child theme setup, demo imports, quick setup, page setup, layout builder basics, and theme updates. This kind of support is useful when you want to upload an Enfold theme WordPress correctly and move forward with fewer mistakes.
How Much the Enfold Theme Costs and What You Get With It
As of now, Enfold is listed on ThemeForest at $59 for the regular license. That regular license covers use by you or one client in one single end product where end users are not charged for access. The listed price includes the item price and buyer fee, while tax and handling fees are extra where applicable.
The regular license also includes future updates and six months of support from Kriesi. ThemeForest also shows an option to extend support to twelve months for an extra fee. This matters because many buyers want continued help during setup, updates, and early troubleshooting. If you plan to build a serious site and keep it active, that support can be helpful during the first stage.
For many users, Enfold offers good value because it gives design tools, page building, layout settings, and documentation in one purchase. It is not just a design skin. It is a full working system for building and styling a WordPress site. That makes the price easier to justify if you want a flexible theme for a business, blog, or online store.
Things You Should Prepare Before You Install Enfold Theme in WordPress
1. Make Sure Your WordPress Website Is Ready
Before you begin, your WordPress website should already be working properly. Your hosting should be active, your domain should be connected, and your admin login should work without issues. This is the first step because theme installation cannot go smoothly on a broken or incomplete website setup. If WordPress is not ready, the Enfold setup process may stop in the middle.
2. Download the Correct Enfold Theme File
This is one of the most important steps before installation. Many users download the full ThemeForest package and try to upload it directly in WordPress. That usually creates an error because the full package contains extra files. You should only use the installable Enfold ZIP file or the extracted Enfold theme folder. Using the correct file makes the upload process much easier.
3. Keep Your WordPress Admin Login Details Ready
You should make sure you can access your WordPress dashboard before starting. You will need your admin username and password to upload, activate, and configure the Enfold theme. If you do not have login access ready, the process can stop before it even starts. It is always better to confirm this first.
4. Take a Full Website Backup Before Theme Installation
Always create a full backup before changing your website theme. A backup helps you restore the site if something goes wrong during installation or setup. This is very important if your site is already live and has existing pages, settings, or plugins. A backup gives you safety and peace of mind during the process.
5. Keep FTP or File Manager Access Available
Sometimes a theme does not upload through the WordPress dashboard. In that case, FTP access or hosting file manager access becomes very useful. You can manually upload the Enfold theme files if needed. This also helps if you need to remove a broken theme upload or fix file issues later. It is a smart backup option for any premium theme setup.
6. Decide If You Will Use the Enfold Child Theme
Before installation, decide whether you want to use the Enfold child theme. If you intend to make custom design or coding changes later, this is a wise decision. When the primary Enfold theme is updated, your adjustments are protected by a child theme. Your custom work may be lost in subsequent upgrades if you don’t have a child theme.
7. Check Whether You Want a Blank Setup or Demo Import
You should decide early on how you want to start your website. If you want to construct everything from scratch, a blank setup is preferable. A demo import is better if you want a ready-made design quickly. This choice matters because it affects how you plan your pages, layout, and content after theme installation. A clear decision here saves time later.
8. Review Your Existing Plugins and Website Needs
Before installing Enfold, take a quick look at the plugins already active on your website. Some plugins may affect design, speed, or layout behavior after a new theme is activated. Knowing the type of website you are creating, such as a store, blog, or business website, is also beneficial. This aids you in selecting the best setup path right away.
9. Prepare Your Logo, Colors, and Basic Branding Files
It is helpful to keep your logo, favicon, brand colors, and font choices ready before setup begins. Once Enfold is installed, one of the first tasks is customizing the site design. If these items are already prepared, the setup becomes faster and more organized. Additionally, this helps you start off with a tidy and polished appearance.
10. Plan Your Main Pages Before Starting Installation
You do not need full content ready, but you should know which main pages your site will need. Most websites need pages like Home, About, Services, Blog, and Contact. When you plan these pages early, it becomes easier to build menus, choose demo layouts, and organize the site structure after installation. Good planning always makes the theme setup smoother.
How to Install and Set Up Enfold Theme in WordPress (Step By Step Guide)
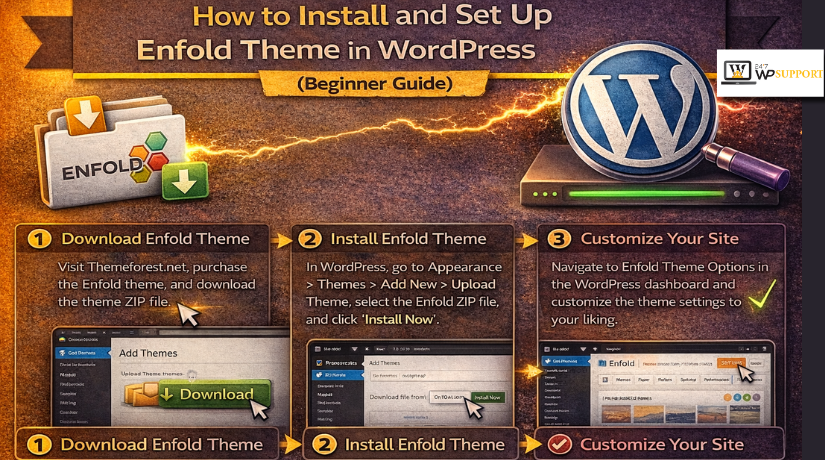
Step 1: Download the correct Enfold theme file
- Log in to your ThemeForest account.
- Download the Enfold theme package.
- Extract the package if needed.
- Keep the installable Enfold ZIP file ready.
- Do not upload the full package directly in WordPress.
Step 2: Log in to your WordPress dashboard
- Open your WordPress admin panel.
- Go to the left sidebar menu.
- Click Appearance.
- Then click Themes.
Step 3: Upload the Enfold theme file
- Click Add New on the Themes page.
- Click Upload Theme.
- Select the installable Enfold ZIP file.
- Click Install Now.
- Wait for WordPress to finish the upload.
Step 4: Activate the Enfold theme
- After installation, click Activate.
- Your website will now use the Enfold theme.
- This completes the basic theme installation step.
Step 5: Use FTP if normal upload does not work
- Extract the Enfold ZIP file on your computer.
- Open your FTP tool or hosting file manager.
- Go to wp-content/themes.
- Upload the enfold folder there.
- Return to WordPress and activate the theme.
Step 6: Register the Enfold theme
- Open the Enfold theme settings area.
- Add your registration details or token.
- Complete the verification process.
- This helps with future theme updates.
- It also makes theme maintenance easier.
Step 7: Install the Enfold child theme
- Download or keep the child theme ZIP file ready.
- Go back to Appearance > Themes.
- Click Add New and then Upload Theme.
- Upload the child theme ZIP file.
- Click Install Now.
Step 8: Activate the Enfold child theme
- After installation, click Activate.
- The child theme will now control your site design.
- The parent Enfold theme will still stay installed.
- This step helps protect future custom changes.
Step 9: Import parent theme settings if needed
- Check your website after child theme activation.
- If the layout looks different, export old settings first.
- Import those settings into the child theme.
- This helps keep the same design and theme options.
Step 10: Decide between blank setup or demo import
- Choose a blank setup if you want full control.
- Choose a demo import if you want faster design setup.
- Make this choice before moving deeper into customization.
Step 11: Import an Enfold demo if needed
- Open the Enfold demo import section.
- Select the demo that matches your website type.
- Start the import process.
- Wait for the demo content to load.
- Check if any images or elements need replacement.
Step 12: Upload your logo and favicon
- Open Enfold theme options.
- Upload your website logo.
- Add your favicon image.
- Make sure both display correctly on the site.
- This gives your website its brand identity.
Step 13: Set your colors and typography
- Choose your main brand colors.
- Set heading and body font styles.
- Adjust font size if needed.
- Keep the design clean and readable.
- These settings improve the full website look.
Step 14: Configure the header and footer
- Select the header style you want.
- Set menu position and header layout.
- Configure footer columns and widgets.
- Review the structure on desktop and mobile.
Step 15: Create the main website pages


- Create pages like Home, About, Services, Blog, and Contact.
- Keep the page names clear and simple.
- These pages will help build the main site structure.
Step 16: Set the homepage and blog page
- Open WordPress reading settings.
- Choose your homepage as a static page.
- Assign the blog page if needed.
- Save the changes.
- This gives your site the correct page structure.
Step 17: Create and assign the main menu
- Go to the WordPress menu section.
- Add your main pages to the menu.
- Arrange them in the right order.
- Assign the menu to the primary location.
- Check that the menu works on mobile too.
Step 18: Start using the Enfold builder
- Open one page in the builder.
- Add a heading first.
- Then add text blocks, buttons, or columns.
- Start with simple layout elements.
- This makes the builder easier to learn.
Step 19: Check the website on different devices
- Review the site on the desktop.
- Check the tablet layout next.
- Then test it on mobile.
- Look at the menu, spacing, images, and buttons.
- Fix anything that looks broken.
Step 20: Take a backup after the first clean setup
- Create a fresh backup after setup is done.
- Save it in a safe place.
- This backup helps if future changes create issues.
- It is a smart final step before deeper customization.
What to Do Right After Installing Enfold Theme in WordPress
Check That the Enfold Theme Is Working Properly on Your Website Right After Activation
After you install the Enfold theme in WordPress, check the website carefully first. Open the frontend and see how the design looks. Check the header, menu, logo, and page width. Make sure the layout is loading without broken sections. If you used the normal upload method, confirm the theme activated correctly. If you used FTP, confirm the files loaded in the right folder. This step matters because small problems often appear right after activation. A careful review helps you catch them early. It also makes the next Enfold theme setup tutorial steps easier to manage.
Save or Export Your Enfold Theme Settings Before Making More Design Changes
Once the theme looks stable, save your settings as soon as possible. This is one of the safest steps after theme activation. If you later import a demo or test new settings, your backup will help. It can save your time and reduce setup stress. Many users skip this step and then repeat their work again. That is why a settings backup should be part of your Enfold theme installation guide process. After you install a premium WordPress theme, always create a safe restore point before deeper setup work begins.
Review the Main Enfold Theme Options Before You Start Building Pages
Now open the Enfold theme options and review the main settings. Check the header settings, layout settings, and front page options. Review colors, fonts, spacing, and general style controls too. You do not need to change everything at once. Just understand where each important setting is placed. This makes later editing much easier. It also helps you avoid random changes during setup. If you are learning how to install the Enfold theme for the first time, this step builds confidence. It shows you how the theme works before real page design begins.
Set Up a Homepage or a Coming Soon Page Before Visitors See an Empty Website
After the main review, create a homepage or a coming soon page. This step is very useful for live websites. It gives visitors a clean first impression while setup continues. If the site is still under work, a coming soon page looks more professional than an empty layout. If the site is ready for early content, set a proper homepage instead. This should be done soon after the basic WordPress theme installation steps are complete. A clear homepage also helps you test the menu, logo, and layout in a real way.
Test the Enfold Builder and Basic Design Elements on One Sample Page First
Before building the full site, test the builder on one page first. Add a heading, text block, button, and one color section. Then check how those elements look on the frontend. This small test helps you understand the Enfold builder faster. It also helps you see spacing and styling before bigger design work begins. Do not start with a full homepage first. Start with a simple page and learn the workflow. This approach keeps the Enfold theme setup tutorial easy and less confusing. It also reduces editing mistakes during early page design.
Install Only the Important Plugins You Really Need After Theme Activation
After the theme is working, install only the plugins you truly need. Start with an SEO plugin, a cache plugin, and a security plugin. Add WooCommerce only if you plan to run a shop. Avoid installing many plugins at once. Too many plugins can slow the site and create theme conflicts. This point is very important after you upload the Enfold theme to WordPress and begin setup. A clean plugin setup makes the website more stable. It also keeps your design and performance easier to manage during the next steps.
Check the Website on Mobile and Desktop Before Moving to Advanced Customization
Now test the website on desktop and mobile screens. Look at the menu, header spacing, images, and button sizes. A design may look good on desktop but break on mobile. That is why this check should happen early. You do not want to build many pages and then find layout issues later. This is a smart step after you install the Enfold theme in WordPress because responsive issues are easier to fix early. A smooth design on all screens gives the website a more professional feel from the beginning.
Make Sure the Website Feels Stable Before You Move Into Full Enfold Customization
At this stage, your goal is stability, not perfection. The theme should be active, the settings should be backed up, and the homepage plan should be clear. The builder should be tested, and the main plugins should be installed. Once these things are done, your setup is on the right track. These steps may seem simple, but they build a strong base. Every good Enfold theme installation guide should include them. They help you move from basic setup into real design work without confusion or risk.
Common Enfold Installation and Setup Problems & Solutions
Missing Stylesheet Error During Upload
One common problem appears during the first upload step. WordPress may show a missing stylesheet error and stop the process. This usually happens when users upload the full download package instead of the installable theme ZIP. The fix is simple and clear. Use only the installable Enfold theme file for dashboard upload. If needed, extract the full package first and find the correct theme ZIP inside it. This is one of the most common issues in any Enfold theme installation guide. It often happens before users even begin the real setup.
Website Looks Different After Activating The Enfold Child Theme
Some users activate the child theme and think the layout is broken. In many cases, the theme settings were not moved correctly. The child theme does not always carry over every saved option by itself. That is why you should export the parent theme settings first and then import them into the child theme. This helps keep the same layout, colors, and header settings. If you plan to install the Enfold theme in WordPress for a serious website, this step matters a lot because it protects future edits.
Demo Import Resets Design Settings And Removes Earlier Changes
Demo import is useful, but it can create setup trouble too. Many users change colors, fonts, or logo settings first. Then they import a demo and lose those changes. That happens because demo imports can reset theme options. The best fix is to export your settings before importing any demo. This gives you a clean backup and saves time later. In a good Enfold theme setup tutorial, this should always be explained early because demo import mistakes are very common.
Demo Import Does Not Finish Fully Or Some Parts Look Incomplete
Sometimes the demo import runs, but the site still looks unfinished. Images may be missing, widgets may not match, or some pages may not load as expected. This can happen because of server limits, interrupted imports, or missing plugin support. The best step is to retry the import carefully and check whether all needed plugins are active. You should also test the import on staging if possible. This is a safer way to install a premium WordPress theme and test full demo content without harming the live site.
Theme Changes Do Not Appear On The Frontend
This problem confuses many beginners. You change header settings or colors, but the frontend still looks old. In most cases, caching is the reason. Your browser cache, site cache, or file merging feature may still show old files. The fix is to clear every cache layer and test again. Sometimes you may also need to disable CSS or JS merging for a short time. This problem often appears after you upload an Enfold theme to WordPress and begin editing, so it is important to know this early.
Builder Feels Confusing When Switching Between Editing Methods
Enfold includes its own layout builder, and it works well when used clearly. But some users switch between the default editor, page builder, and other tools during setup. That can make the workflow feel confusing. The best solution is to choose one editing method and stay with it while building pages. Start with one sample page and use only the Enfold builder there. This makes the setup cleaner and easier. It also helps you learn how to install Enfold themes and build confidence.
Website Layout Looks Fine On Desktop But Breaks On Mobile
Responsive issues can appear even when the desktop view looks good. Large images, extra spacing, and header settings often cause these problems. That is why mobile testing should never wait until the end. Check the homepage, menu, buttons, and builder sections on mobile early. Fixing these issues sooner is much easier than fixing them after full site design. Good WordPress theme installation steps should always include a mobile review before launch.
Best Practices After Setting Up Enfold Theme in WordPress
Always Use The Enfold Child Theme For Future Custom Changes
A child theme is one of the safest setup habits. It protects your custom CSS, code edits, and template changes during updates. Without it, future parent theme updates can remove your work. This is why child theme use should be part of every Enfold theme installation guide. Even small custom work becomes safer when the structure is correct from the beginning.
Always Export Theme Settings Before Major Design Edits Or Demo Imports
This step is simple, but it saves a lot of time. Before changing large layout settings, importing a demo, or testing a redesign, export your current settings first. That backup can help you return to a stable version very fast. It also reduces fear during edits because you know you have a safe restore point.
Keep The Enfold Theme Updated For Smoother Site Performance
Theme updates help fix bugs, improve compatibility, and support newer WordPress versions. If you ignore updates for too long, the website may face design or plugin issues later. That is why registration and update checks matter after setup. A clean update habit keeps the site more stable and easier to maintain over time.
Build On A Staging Website When Testing Bigger Design Changes
A staging website is the safer place for testing. It lets you try demo imports, layout edits, and plugin changes without affecting the live site. This is very useful when you install the Enfold theme in WordPress on an existing business website. Live websites should stay stable while you test changes in the background.
Keep The Website Light By Using Only Necessary Plugins And Content Blocks
Enfold gives many design tools, but you should still keep the website simple. Use only the plugins you really need. Use only the builder elements that support the page goal. Too many plugins and too many design blocks can make the site slower and harder to manage. Clean websites are easier to update, test, and improve.
Test Every Important Page Before Calling The Setup Complete
Do not end the setup after checking only the homepage. Review the about page, contact page, blog page, and shop page if WooCommerce is active. Check forms, buttons, menus, and mobile views too. A full page review helps you catch small issues before visitors do. This is one of the best final habits in a strong Enfold theme setup tutorial.
Save A Clean Backup After The Full First Setup Is Finished
Once the theme, pages, menu, and settings are working well, save a fresh backup. This backup becomes your safe version after the first complete setup. It helps later if updates, redesigns, or plugin changes create problems. A clean backup is one of the smartest final steps after you install a premium WordPress theme.
Conclusion
Installing and setting up the Enfold theme in WordPress becomes much easier when you follow the right order. You need the correct theme file, a safe backup, the child theme, and a clear setup plan before making design changes. When these steps are handled properly, Enfold can help you build a clean, flexible, and professional website for your business, blog, portfolio, or online store. The real success does not come from only installing the theme. It comes from setting it up carefully, testing each part, and avoiding common mistakes from the start.
If you need expert help with Enfold theme installation, setup, customization, or troubleshooting, 24x7wpsupport is ready to help. Whether you need theme upload support, demo import help, child theme setup, layout fixes, speed improvement, or complete WordPress maintenance, our team can handle it for you. Visit 24x7wpsupport to get reliable WordPress support and keep your website running smoothly.
Related posts:
Parallax Effect – What is it and How to Add it to Your WordPress Site?
WordPress featured image not showing – The Probable Reasons and How to Resolve this Issue?
How to reset the WordPress administrator password
How to Embed a Twitter Feed in WordPress Without Plugins
How to Resolve the “Missing MySQL Extension” Error in WordPress Quickly

Brian is a WordPress support specialist and content contributor at 24×7 WP Support. He writes practical, easy-to-follow guides on WordPress troubleshooting, WooCommerce issues, plugin and theme errors, website security, migrations, performance optimization, and integrations. With a focus on solving real website problems, Brian helps business owners, bloggers, and online store managers keep their WordPress sites running smoothly.
