
How to Find and Access WordPress Error Logs
Managing a WordPress website goes beyond simply posting content—it also demands regular upkeep and careful monitoring to keep everything running smoothly. When something breaks or malfunctions, identifying the root cause quickly becomes critical. A reliable method for identifying and resolving problems on your site is by reviewing WordPress error logs.
This guide will walk you through the essential steps to locate and access error logs in WordPress, helping you diagnose issues with ease. Whether you’re a developer, site owner, or support technician, understanding how error logs work can save you hours of debugging and restore your site faster.
What Are WordPress Error Logs?
a. Definition and Purpose
WordPress error logs are files that record problems happening on your website. These issues could range from PHP warnings and notices to fatal errors that crash the site. When enabled, WordPress logs these issues to a file, allowing you to inspect the problem and fix it.
b. Types of Logs
When troubleshooting a WordPress issue, you may come across different types of logs. Every log plays a unique role and reveals valuable details about your site’s internal processes. Understanding these logs helps you choose the right one for diagnosing problems efficiently.
- PHP error logs
- Debug logs
- Server logs
1. PHP Error Logs
These logs track issues related to PHP, which is the core scripting language used by WordPress. PHP error logs capture a range of problems such as:
-
- Syntax errors in custom code.
- Fatal errors caused by incompatible plugins or themes.
- Warnings and notices about deprecated or incorrect functions.
These logs are especially useful when a white screen appears on your site or a plugin fails to load properly. They’re often maintained at the server level and can be accessed through hosting dashboards or log directories.
2. WordPress Debug Logs
When you enable WordPress debug mode, the system creates a special file—debug.log—inside the wp-content folder. This file captures:
-
- Theme and plugin conflicts.
- Database query issues.
- Deprecated function usage.
- PHP notices or warnings that WordPress encounters during runtime.
Debug logs are specific to WordPress and provide clear indicators of what’s broken or misconfigured. They are easy to access and ideal for isolating problems related to WordPress core or third-party extensions.
3. Server Logs
These are maintained by your hosting provider and cover a broader range of issues beyond WordPress. Server logs include:
-
- HTTP errors like 404, 403, and 500.
- File permission errors.
- Resource usage statistics.
- Unusual or unauthorized access attempts.
Common types include Apache error logs, NGINX logs, and access logs. Server logs are essential when the issue seems to originate from the server itself, such as timeout errors or PHP misconfigurations.
Why They Matter
Each log provides a unique window into how your website is functioning. Whether you’re debugging a plugin, fixing a database issue, or responding to a security threat, knowing which log to check can make troubleshooting faster and more effective.
Why Checking Error Logs Is Important
a. Diagnosing Problems Quickly
Error logs give you real-time visibility into what’s causing trouble. If a plugin crashes the site or a theme has coding issues, the log will likely contain the error details. You can pinpoint the faulty script without guesswork.
b. Preventing Site Crashes
Regularly checking error logs allows you to catch and resolve problems early—before they lead to major site disruptions. Silent errors can stack up and eventually bring your site down if not addressed early.
c. Improving Performance and Security
Error logs often reveal slow-running queries, deprecated functions, or unauthorized access attempts. By resolving these, you can improve performance and tighten your site’s security.
How to Enable WordPress Debug Mode
a. Editing the wp-config.php File
To begin tracking errors, activate WordPress debug mode by modifying the wp-config.php file found in the root folder of your website.
Here’s how to do it:
- Access your WordPress files via FTP or cPanel File Manager.
- Open wp-config.php.
- Add or modify the following lines before the line that says /* That’s all, stop editing! */:
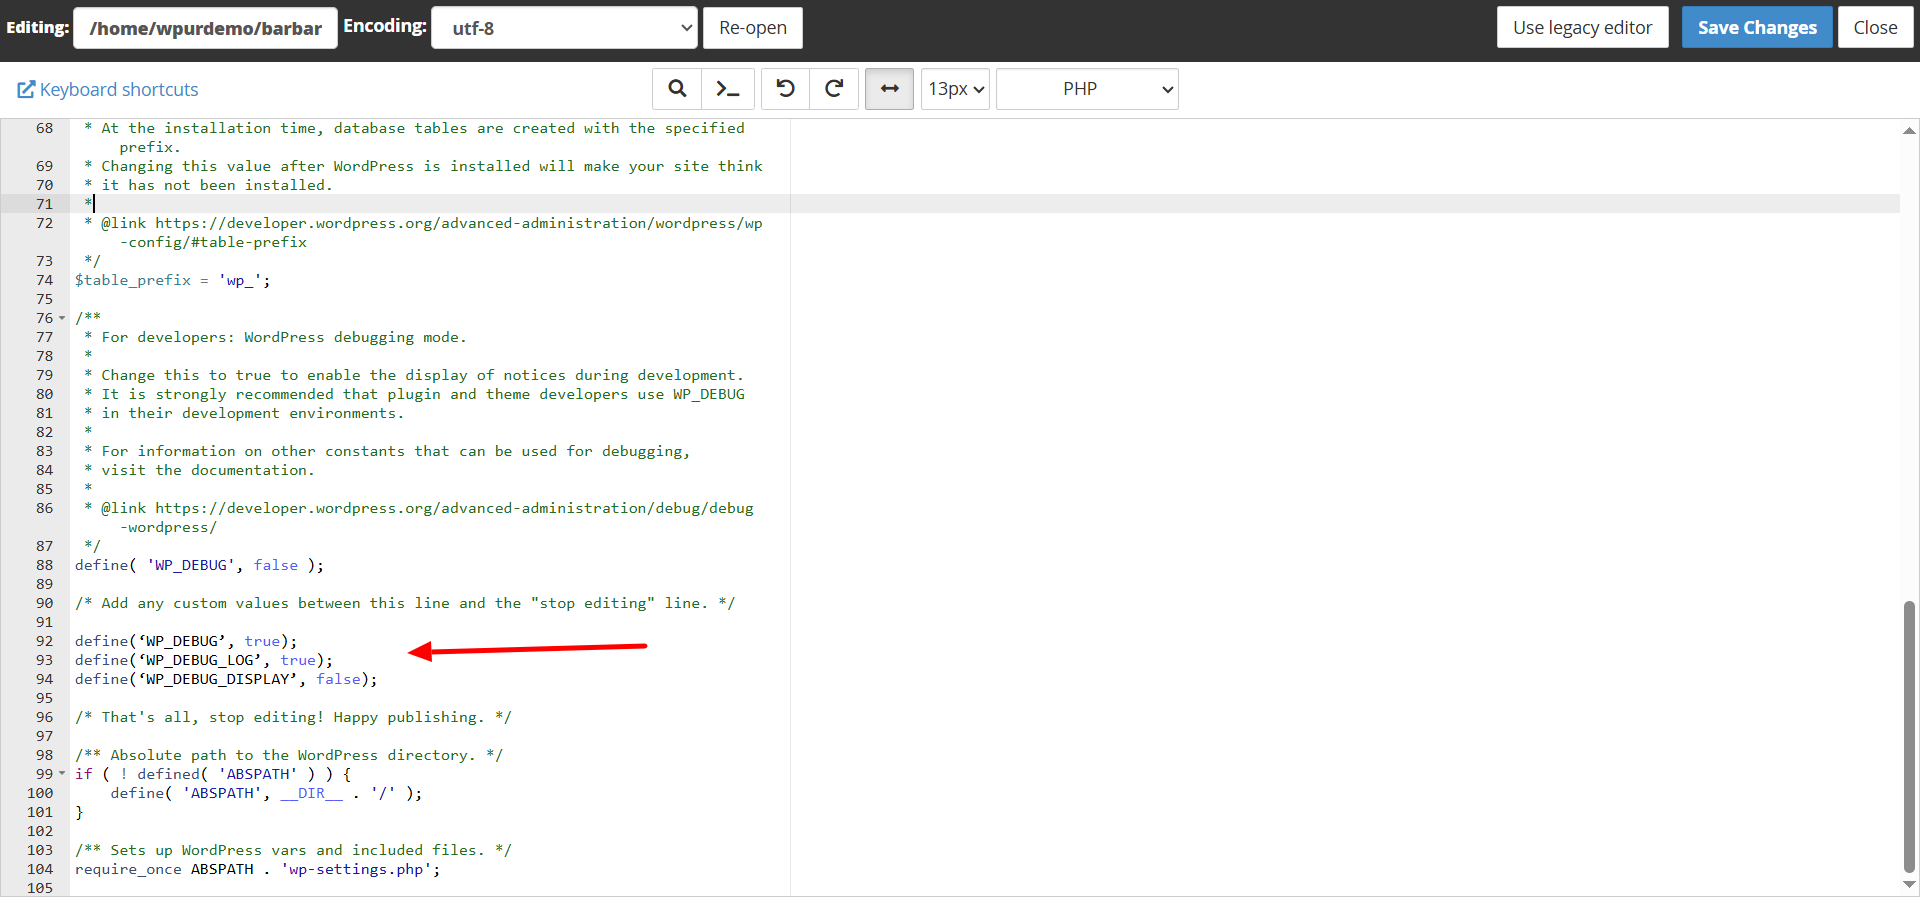
define(‘WP_DEBUG’, true);
define(‘WP_DEBUG_LOG’, true);
define(‘WP_DEBUG_DISPLAY’, false);
b. Explanation of Each Line
- WP_DEBUG: Turns on WordPress debug mode.
- WP_DEBUG_LOG: Saves errors to a file named debug.log.
- WP_DEBUG_DISPLAY: Prevents errors from being shown directly on the website (recommended for live sites).
This configuration quietly records errors in the background, keeping technical information hidden from visitors.
Where to Find the WordPress Error Log File
a. Default Location
After enabling debugging, WordPress generates a file called debug.log within the /wp-content/ folder. This is the default spot where all errors and warnings are recorded.
To find it:
- Navigate to wp-content/ in your file manager.
- Look for debug.log.
- Open the file to review logged errors.
b. Using File Manager in cPanel
If you’re using cPanel:
- Sign in to your web hosting dashboard or control panel.
- Go to File Manager.
- Open public_html or your WordPress root folder.
- Locate wp-content, then find and open debug.log.
c. Using FTP/SFTP
You can also access the log using tools like FileZilla:
- Connect to your website via FTP.
- Go to /wp-content/.
- Download debug.log to view it locally using any text editor like Notepad++ or VS Code.
Accessing Server-Level Logs
a. Apache or NGINX Error Logs
Server-level error logs provide more in-depth information than WordPress logs.
For Apache, the error log is usually found here:
/var/log/apache2/error.log
For NGINX, look in:
/var/log/nginx/error.log
However, access to these files may be restricted depending on your hosting provider.


b. cPanel Access
Most shared hosting providers offer server logs through cPanel. To access:
- Go to your cPanel dashboard.
- Click on Errors under the Metrics section.
- You’ll see the most recent error messages logged by the server.
You can also check Raw Access Logs or use Awstats and Analog Stats for more detailed reports.
Using Plugins to View Error Logs
If you’re not confident working with code or server files, plugins offer an easy solution. You can view error logs directly from your WordPress dashboard using a few reliable tools—no technical skills needed.
a. Helpful Debugging Plugins
Several plugins make it easy to track errors and debug issues:
- WP Debugging – This plugin automatically turns on debug mode and gives you quick access to error logs.
- Error Log Monitor – It displays log messages right in the admin toolbar, so you don’t have to search for them.
- Query Monitor – A powerful tool tailored for developers, this plugin provides in-depth insights into database queries, hooks, conditionals, and other behind-the-scenes processes for debugging and performance analysis.
b. Steps to Use a Plugin for Viewing Logs
Follow these simple steps to get started:
- Log in to your WordPress dashboard, then go to the Plugins section and click on Add New to begin installing a plugin.
- Search for “WP Debugging” or “Error Log Monitor”.
- Select Install Now, and once the installation completes, click Activate to enable the plugin.
- After activation, log data will appear under the Tools menu or in your admin bar.
These plugins take the stress out of debugging by giving you instant access to logs, right where you manage your site.
Best Practices for Managing Logs
Proper log management helps keep your WordPress site secure, clean, and running smoothly. Consider following these effective tips and best practices:
a. Disable Debug Mode on Live Sites
Leaving debug mode active on a live site can reveal private details like file paths, user data, or error messages to visitors. This can pose security risks. Once you finish troubleshooting, turn it off by setting:
define(‘WP_DEBUG’, false);
Always double-check that debugging is disabled before pushing updates live.
b. Clean Up Log Files Regularly
Your debug.log file can grow quickly, especially on busy sites. Large logs not only take up space but can slow things down. Make it a habit to:
- Delete or truncate the log file after reviewing it.
- Create a backup before removing any files—just in case you need to refer back.
c. Test on a Staging Site First
Debugging should be done in a safe space. Use a staging environment instead of your live website. This lets you:
- Identify and fix errors without affecting users.
- Experiment with plugins or code changes risk-free.
Following these tips can ensure your WordPress site stays secure, runs smoothly, and performs efficiently.
Troubleshooting Common Errors Found in Logs
Once you access your error logs, you may find messages that point to common issues. Understanding these can help you fix problems faster. Below are a few frequent error types and how to resolve them.
a. Memory Limit Errors
What it looks like:
Fatal error: Allowed memory size of 268435456 bytes exhausted…
Why it happens
Your site has run out of the memory WordPress is allowed to use.
How to fix it:
Increase the memory limit by adding this line to your wp-config.php file:
define(‘WP_MEMORY_LIMIT’, ‘512M’);
This gives WordPress more room to run resource-heavy processes.
b. Deprecated Function Warnings
What it looks like:
Deprecated: Function get_theme_data() is deprecated since version 3.4.0…
Why it happens:
The theme or plugin is using an outdated function no longer supported in current WordPress versions.
How to fix it:
- Update the theme or plugin to its latest version.
- If you’re a developer, replace deprecated functions with modern alternatives.
Ignoring these warnings can lead to future errors or compatibility issues.
c. Database Connection Errors
What it looks like:
Warning: mysqli_connect(): (HY000/1045): Access denied for user…
Why it happens:
WordPress can’t access the database, often because of wrong login details or problems with the server.
How to fix it:
- Open wp-config.php and verify that the DB name, username, and password are correct.
- Check that your hosting server is up and the database service is running.
Fixing this error quickly is essential to bring your site back online.
Conclusion
WordPress error logs are a powerful resource for identifying and fixing website issues. From simple plugin conflicts to major PHP errors, logs provide insight into what’s really going on behind the scenes. By enabling debug mode, checking the debug.log, and using plugins or server tools, you can quickly resolve problems and keep your site running smoothly.
Always follow best practices like disabling debug mode after testing and using a staging environment for development. Consistently reviewing your logs helps boost site performance, strengthen security, and reduce the risk of downtime.
If you’re still stuck or need help interpreting your error logs, reach out to 24×7 WP Support—our expert team is here to assist you around the clock.
Related posts:

Brian is a WordPress support specialist and content contributor at 24×7 WP Support. He writes practical, easy-to-follow guides on WordPress troubleshooting, WooCommerce issues, plugin and theme errors, website security, migrations, performance optimization, and integrations. With a focus on solving real website problems, Brian helps business owners, bloggers, and online store managers keep their WordPress sites running smoothly.
